
Imagine this scene from ...
By Rob Van Zeijst
Imagine this scene from a Hollywood movie. The hero is involved in a shoot-out and he knows the bad guy has only six bullets in his pistol. So, the hero implements a strategy to make the bad guy waste bullets while he counts off the shots. The moment the hero counts off the sixth shot, he knows he is ahead of the game and will only have to watch out for smaller weapons. This shows that every shot counts and a wasted shot has lethal consequences. In go, we have a similar situation. You can play moves that help you and must be answered with moves that have no overall impact. This kind of forcing move is called a kikashi. When your opponent has weaknesses you can cut and fight like there is no tomorrow or you can coolly guide him to a place where you want to fight. Let's continue the game we started last week between Masao Kato (Black) and Cho U, current Honinbo, in the semifinals of the 2003 Oza tournament.
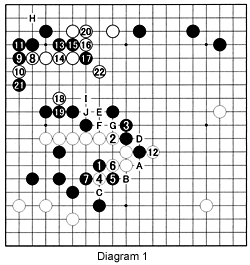
Diagram 1 (1-22 represents moves 33-54): Black strikes at the vital point with 1. He could have cut, but this would weaken his overall position. Black 1 forces White to exchange 2 for 3 (strengthening Black). Next, White sacrifices 4 to make Black play 5 and 7 in order to take sente and switch to 8. This leads to the forced exchange through to 11. White is the benefactor of this kikashi. Black's stones at 9 and 11 only defend and are directed toward the inside whereas white 8 and 10 are directed to the outside and have a much greater impact, making 12 possible. If Black pushes through at A, White plays kikashi with B, forcing Black to answer at C. White would then cut at D. This is possible for White because he is strong in the top left and threatens to cut with E, which would be followed by black F and white G. Black cannot risk a direct fight, so he first cuts with 13, followed by 15 and 17. To cope with this cut, White first needs to make a kikashi at 18 and one at 20. If Black does not answer in the top left, a placement at H captures the black stones 13 and 15 or the entire corner. Black 21 is one way to defend the corner. However, thanks to his stone at 18, White can now immobilize 17 by playing at 22. Note White does not want to make the I for black J exchange as this invalidates the cut starting with E. We will continue this game next week.
Hints for improving your game
Sente moves have to be answered, but a kikashi is a good forcing move. On the other hand, a bad exchange spoils possibilities. Sometimes even pros make a mistake in judgment in this respect.
Diagram 2: Before achieving life with 3, Black should first make the kikashi at A. Clearly white B has no other meaning than connecting, but A may have more significance, such as a ladder breaker. At this stage, White must defend with B because then Black has to spend a move at 3. If Black plays at 3 first, White may answer at C after black A.
Diagram 3: The moves through 10 form a joseki. Black usually plays at A. However, in some cases, 7 is a good move. After 8, Black usually defends with 9 or B. Even if White docilely connects with 8, the 7-for-8 exchange may still be bad for Black.
Diagram 4: If Black later plays the marked stone without the A-for-B exchange, black 1 would be a strong move. This invasion aims at splitting the white position and at connecting underneath with C. However, after the A-for-B exchange, Black can no longer aim at C. Therefore, this exchange lowers the value of the marked stone.

Solutions to last week's problems
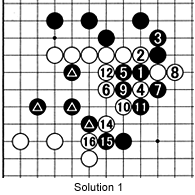
Solution 1 (Black plays 13 where he captured white 4): The question was, can Black cut with 1. White 2 through 6 are an appropriate answer, To escape, Black must play 7 and 9, but White sets up a squeeze with 10 and 12, and then cuts with 14 and 16. Black's marked stones are in trouble now.
New problems
Problem 1: When Black played 1 (13 in Diagram 1), White answered with A, followed by black B, white C, black D and white E. The move at D caused a lot of trouble for White. Wouldn't it be simpler to play at 2 to connect all of his stones? No, as this gives Black many kikashi opportunities to cover his weakness at F. Black can play at G next.
Problem 2: After Black's last move (the marked stone) White should defend his corner. If he fails to do so, Black will clamp at 1 and grabs the corner with 3 through 7. The question is, before clamping at 1, is the exchange black A for white B good? In other words, is black A kikashi or aji-keshi?
Want to find out more? Come to Ben's Cafe in Takadanobaba, Tokyo (03) 3202-2445 where the English-speaking go community congregates every Sunday. You can enjoy free lessons, 11 a.m.-1 p.m. Ben's Cafe can be accessed at www.benscafe.com.
Van Zeijst is a four-time European go champion and European representative at the Fujitsu World Championship.
