Throughout the game of go ...
By Rob Van Zeijst
Throughout the game of go, we encounter problems. Some are local problems while others have a larger, more global context. Local problems often have a simple solution, even though this might be difficult to find. However, global problems are multidimensional and can be extremely complex. In the beginning, it is difficult to determine who will win a game. In fact, top pros will choose different options, with some preferring territory while others go for influence. But some pros come up with another alternative. These different styles have different degrees of success.
One of the most successful players in the 20th century, Eio Sakata, accumulated 64 titles during his lifetime, when there were far fewer tournaments than now. He had an all-round style and could adjust this style to his opponent's play or use different strategies with the black or white stones. Even at an advanced age, he was a formidable player. Let's have a look at a game from the 1990 China-Japan Supermatch in which the 70-year-old Sakata (White), a 9-dan and an honorary Honinbo, defeats Yu Bin, an 8-dan, who at 23 was a up-and-coming Chinese star. Incidentally, Sakata told me that to become a top player, it was only necessary to avoid mistakes and play an occasional brilliant move. In other words, it was not necessary to play brilliant moves throughout a game.
Diagram 1 (1-44): On the left side is an interesting position. The moves 5, 7, 13 and 17 form a joseki, as do the moves 9, 11, 15 and 17. In short, black 17 serves a double purpose and therefore there should be synergy. However, white 18 is an excellent move and Black is forced to extend to 27 and 37, in the direction of White's strength even though these extensions have no effect on White's position. On the other hand, White develops his position well with 20 through 26, and then starts an invasion with 28. Instead of 37, Black could have completed his wall by playing at A, but then White would have neutralized the strength of the wall with B. This gives White an excellent opportunity to start a battle with 38. After 44, White has a good position.
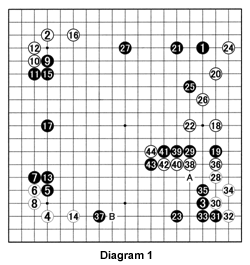
Diagram 2 (45-70): For the center fight, extending to A would be better than playing at 45, but Black is afraid that White would strike with B, followed by black C and white D at some stage. If Black's marked stones lose touch with one another, he will be in a precarious position. However, Black's inferior move at 45 allowed White to take the initiative in the center. At the same time, White gobbled up the right side with 50 and 52. Black 69 looks like an interesting move, but appearances are not what they seem.
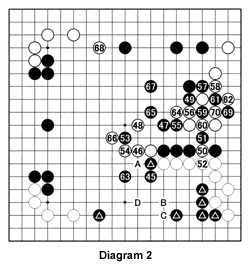
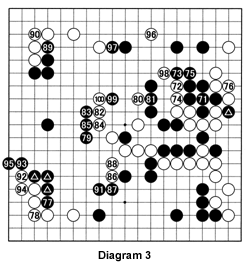
Diagram 3 (71-100): After 71, White 72 is a brilliant move that neutralizes Black's marked stone on the right (see Reference 1 and Problem 1). White comes back with 76 and, as a bonus, can exchange 80 for 81 later. Black steps up the pressure starting with 79, which is a big move, but White plays 92 and 94 in sente. Black must play at 95 or he will risk losing his marked stones on the left (see Reference 2). White then invades at 96. If this invasion succeeds, White will win the game. To stop the intruder, Black is forced to play 97 and 99, moves that help White.
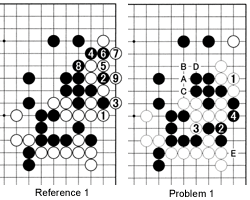
Reference 1: If White simply answers with 1, Black forces the sequence through 9 to build thickness. This is a terrible situation for White.
Problem 1: On the other hand, if White answers at 1, Black will play at 2. If White cuts at 3 now, black 4 threatens to win the capturing race, i.e., White's stones have only three liberties, while Black's have four if White plays at E. This is a dangerous situation. Therefore, White's exchange A for B and C for D in the game was exquisite timing. However, after black 4, White can win the capturing race. Where should he play?

Reference 2: If Black does not descend at 2 beforehand as in the game, White can attach at 1. Should Black descend to 2 now, White cuts with 3, and the sequence through 9 is inevitable, resulting in Black's marked stones being captured.
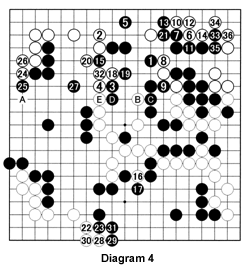
Diagram 4 (1-36 represent moves 101-136): White brilliantly hollows out Black's corner at top right. Black 27 defends against white A. After seeing Solution 1, you may wonder again why 72 and 74 in Diagram 2 were such great moves. Due to the presence of these moves, White was able to force B for C and induce D for E, both exchanges that favor White. The rest of the moves are given for reference. White won by 2.5 points.
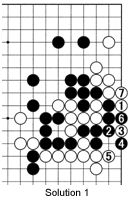
Solution 1: White 1 is a good move. No matter what Black does, White can keep his liberties restricted to two and win the capturing race to 7.
Van Zeijst is a four-time European go champion and European representative at the Fujitsu World Championship.
