How can Japanese go players stop ...
By Rob Van Zeijst
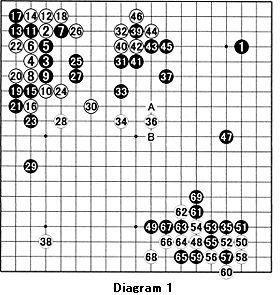
How can Japanese go players stop the Young Turks from South Korea and China? The Nakano Cup was established to give Japanese pros below the age of 20 a chance to prove themselves. On paper, Daisuke Seto, 6-dan, was the strongest, but he was beaten by a 1-dan in the first round. In the end, Yuta Iyama, 4-dan, won the tournament. Iyama was featured on TV when he turned pro at the age of 13. As he is still only 16, he may dominate this tournament over the next few years. More importantly, however, he is Japan's major hope against the young Koreans and Chinese who dominate the international scene. Let's have a look at the final game in which Iyama (white) defeated Huang Yizhong, 4-dan.
Diagram 1: Apart from moves at 1 and 38, this diagram is basically made up of two giant joseki, the nadare in the upper left and the one in the lower right. The nadare, or avalanche joseki, is a large-scale joseki full of possible deviations. For example, black 23 could have been played at 26 to give it a more contemporary look. However, Black chose the traditional continuation to 33, then switches to 35 to take sente (initiative). Instead, he could have kept up the pressure in the center by playing at A. If White plans to occupy the lower right, a white move at B is good. When Black plays the last move in the joseki at lower right--move 69--he has built a splendid moyo (sphere of influence) on the right. White must now try to contain Black's moyo. Note that he has a potentially weak group in the center. We will continue this game next week.

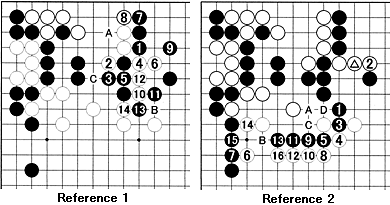
Reference 1: Instead of 41, couldn't Black have played at 1? White 2, 4 and 6 are effective. Black 7 is sente, meaning White has to answer at 8 to prevent Black attaching at A. Black 9 then appears to have trapped 4 and 6, but white 10 cleverly counters this. After 14, Black has two defects at B and at C and can only defend one of them. White can free up his stones by playing the other move.
Reference 2: After White's marked stone, Black makes a tentative move at 1. White has to ensure an escape route with 2, but black 3 and 5 are fairly strong moves. However, exchanging 6 for 7, then pushing through with 8 through 16 puts Black on the spot. Black cannot cut through and has to defend at A or C. If he defends at A, white B becomes sente. If he defends at C, White can force A for D, taking away Black's eyes, before defending the cut around B. This is great for White. That is why Black gives way with 41 through 45.

Hint for improving your game

Diagram 2: We already know this type of cut in a keima (White's knight formation of two marked stones) is bad for White. However, a similar shape often becomes a point of contention.
Diagram 3: When two keima formations (marked stones of each color) are cut, this is a shape that often appears. Usually, neither player wants to give in, leading to a large-scale battle.
Solution to last week's problems
Solution 1A: Black 1 is a type of trick move employed by aggressive players. White must split Black's two stones with 2. Usually a development like the one shown takes place. After exchanging 10 for 11, White can safely play at A or push Black with B. Either way, White is doing well.
Solution 1B: A simpler alternative for White is 4. Often Black will answer with 5. With 6 and 8, White makes a shape on the outside, while aiming at Black's positions with A or B or attacking at the top with C. Note, White can make eye-space with D, which would be followed by black E and white F (or G to avoid a ko).

Solution 2: What Black should do after white 2 and 4 is a tricky problem. For example, if White has a strong position, such as the marked stones, black 5 might lead to a tough fight. After 16, Black's stones on the right are in bad shape. On the other hand, if White is not strong on the lower right, Black would get a good result up to 15. It all depends on the surrounding stones. If the situation is favorable, fight. If not, don't.
Solution 3: Black 1 is correct. Even if White plays at 2, 4 and 6, Black can make two eyes with 3, 5 and 7.
Reference 3 (incorrect): Black 1 looks good, but white 2, 4 and 6 are deadly. Black can't play at 8 because of a lack of liberties and has to capture with 7, but white 8 kills the group anyway.

New Problems

Problem 1: Look at Diagram 1 again. Where should White play next? Black later attacks White's center group. How does he do that?
Problem 2: Black 1 is the wrong move. Where should he have played?
Problem 3: Where should White play next to kill the Black group?
Come to Ben's Cafe (03-3202-2445, www.benscafe.com) in Takadanobaba, Tokyo, where the English-speaking go community congregates every Sunday. You can enjoy free lessons, 11 a.m.-1 p.m.
Van Zeijst is a four-time European go champion and European representative at the Fujitsu World Championship.
