The player pros most admire is Shusaku Kuwahara (1829-1862),...
By Rob Van Zeijst
The player pros most admire is Shusaku Kuwahara (1829-1862), who is simply referred to as Shusaku. His fame is ascribed to having played the most famous move ever--the ear-reddening move, a move that so surprised his opponent, Gennan Inseki, that Gennan's ears were said to have turned red--and his record of winning all of the 19 castle games, equivalent to today's title matches. His innovations in the fuseki (opening game) form the basis for modern fuseki theory. Shusaku's style was thick and steady, but when he was behind, his fighting skills were second to none. I picked this game between him and his teacher, Honinbo Shuwa, because it illustrates the Shusaku opening and is a masterpiece as well because of Shuwa's amashi style of play, which means Shuwa took territory at every opportunity while allowing his opponent to take points. You can find out more about Shusaku and the games he played, including this one, in Invincible: The Games of Shusaku by John Power.
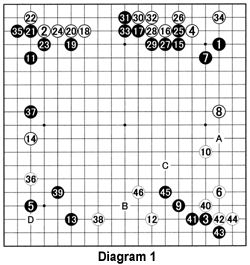
Diagram 1 (1-46): Shusaku (Black) plays 1, 3 and 5, the so-called Shusaku fuseki, opening moves that still bear his name. Black 7 sets up moves at 15, 17, 28 or A. White 8 is the most common counter to this fuseki. This move and 18 illustrate the spirit of the amashi style--it allows Black to make a wall through 33, but the influence is already countered by white 8 and 18, moves that take points as well. Black 35 is an important move as it makes a base for both the black and the white group. The combination of 36 and 38 look like an overplay, but by seizing the initiative at lower right, White hopes to come back and defend on the left. In contrast to solidly defending with B, white 46 is a strong move. A black move at C has no impact on White's position on the right. White would probably probe at D and sacrifice this stone to strengthen his two adjacent weak groups. How should Black deal with these prospects?

Diagram 2 (47-79): Black 47 shows splendid fighting spirit, initiating a battle that ends with white 66. Black has lost his stones at 47, 49 and 51, but he has taken a large corner in the lower left, which he expands even more with 69. White 70 launches a strong attack. A black jump to A would be punished with a white nozoki at 71, a move that would "peep" through two black stones. Black 71 is therefore the vital point to make eye shape. White 78 is worth about 20 points in territory alone, but it has added value as it makes eyes for White's group--just imagine a black stone here. Still, black 79 sets up a huge framework. The question is, what is the status of Black's group at lower right?

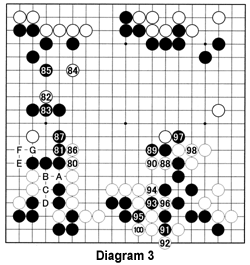
Diagram 3 (80-100; Black 99--not shown--takes the ko at 93): In response to white 80, black 81 is no mistake. White could have played at A, followed by black B, white C, black D, white E, black F and white G. Now you can see why 81 and 87 are in the right spot. Next, White starts a strong offensive with 88 and so on. Black 93 and 95, however, are clever countermoves. This sets up what appears to be a hopeless ko, but in fact, Black gets eye space while holding in reserve a ko. Can you see how that works at this stage?

Diagram 4 (1-24 represent 101-124): Setting up the ko in the previous diagram was brilliant. After 3, Black is virtually alive. Once he makes sure of this, he can play at A and threaten to start the ko where the marked stone is or connect underneath with B. Black lets White capture two stones with 6 and 8, but plays excellent moves at 5, 7 and 9. Answering 10 with 11 is a typical move pros might make. However, white 16 and 18 do more than erase Black's territory. Black seems to be in deep trouble when White cuts with 24. What should he do?

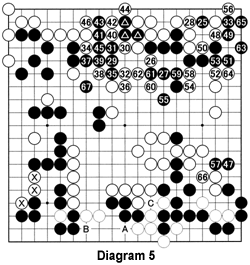
Diagram 5 (25-67 represent 125-167): Black sacrifices his three marked stones and plays great moves with 47 and 57. White gains a lot of territory in his attack at upper right, but Black makes two eyes and in the end White has to come back to 66. Black therefore can seize the largest remaining endgame move with 67 and take a slight lead. White then keeps challenging Black to start a ko with A, followed by white B and black C. In the end when he has enough ko threats, Black picks up the gauntlet and the ko becomes a reality. Black manages to win this ko, but White is able to rescue his marked stones as compensation. When the dust finally settles, Black has won by 3 points. This game was played in an era when there was no komi, meaning Black did not need to give compensation for playing the first move. These days, the komi stands at 6.5 points. That, however, does not mean Black would have lost the game if it had been played in modern times. But it does mean that White's play was indeed marvelous. The game is a great example of Shuwa's amashi strategy.

Van Zeijst is a four-time European go champion and European representative at the Fujitsu World Championship.
