As we discussed last week, ...
By Rob Van Zeijst
As we discussed last week, there is a huge difference between exercises and problems, where the latter adds a new dimension to the former. In go, this is similar to the difference between tactics and strategy. Although sometimes complicated, tactics are simple and one-dimensional, such as in life-and-death problems, because the object is clear. However, strategy calls for a different approach. When there are relatively few stones on the board, it is impossible to visualize all possible variations. Therefore, strategic decisions are mainly based on knowledge, experience and intuition. Ironically, an important way to improve your strategy is by practicing tactics, especially by doing life-and-death problems.
Diagram 1 (1-22 represent moves 59-90): Let us continue last week's game between two top pros. White's marked stones, which were played last week, appear to be in trouble. However, Black ignores them. Instead, he plays at 1 to prevent White from making a corner enclosure. After 2, Black would usually play at A, followed by white B, black 8, white C and black D or E. But at this point, the top is more valuable than the left side--just imagine a white move at F. That is why black 3, white 4 and black 5 are natural moves. White 6 and 8 are strong moves. Black 9 seems to make few points, but it supports Black's stones at top left and isolates White's center group. A move at G would give White a similar situation. White 10 and 12 are a natural defense, but black 11 is not. Black J would have been a weak move. Note that after 11, white H would be met with black I, followed by white J and black K. White 14 is an intuitive move. But if this stone dies, points would be lost. After 17, white 16 is dead (see References 1 and 2). However, White 20 and 22 are a great combination. Can you see how this works together with White's possibilities in the corner? How should Black respond?

Reference 1: If White tries to remain alive with 1, 3 and 5, black 6 and 8 are a good combination to counter this. After 10, White's corner group is dead. However, keep in mind Black must answer white A at B.
Reference 2: White 5 seems to do the trick, but black 6 and 8 are unexpected, because White did not anticipate being allowed to capture a stone with 7 and 9. However, in this case, after black 10, White is dead.

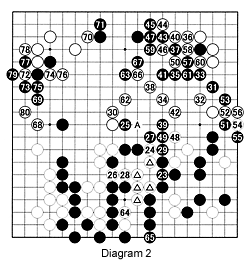
Diagram 2 (23-80 represent moves 91-148): Having to play at 23 is a terrible setback for Black, but he had no choice (see Reference 3). Probably still flustered, Black then makes a fatal mistake by playing at 25. Reference 4 explains why he should have played at A to remain in the game. With 26 and 28, White connects his marked stones, while Black is handicapped with a cut at 29. Black tries to turn things around with 31, but White keeps his lead by playing solidly in the center. White is leading in territory and Black desperately tries to turn the tables, but Black's stones around 69 finally die. The real cause for Black's loss can be found in black 25. The moves after 80 are not shown.

Reference 3 (white 6, black 9 and white 12 are played in ko): If Black blocks at 1, White starts a ko with 2, as he has plenty of ko threats in the corner starting with 4, while Black has none. Black merely goes through the motions by playing at 7, 13 and 15. However, white 16 makes White's corner alive. Black's best answer is A, which would be followed by white B, black C, and white D.
Reference 4: After 25 in Diagram 2, when White plays the marked stone, Black cannot cut with 1 and 3, because he gets creamed when White plays 4. After this move, Black needs to fight the ko at 2, but, as mentioned before, White has many ko threats around at A and B. On the other hand, Black cannot hope to escape to the center either and connecting at 5 will only provoke white 6.

Solution to last week's problem
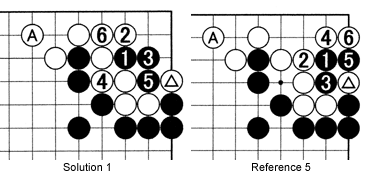
Solution 1: Black 1 is a terrific move. White's best response is 2 and 4, but with 5, Black grabs the marked white stone and reduces White's territory in sente. That is why white A is a blunder.
Reference 5: Black 1 does not take sufficient advantage of the White mistake at A. White 2 is the vital point. Black captures the marked stone with 3 and 5, but after white 6, he has to connect at the spot where the marked stone was taken.

New Problems:
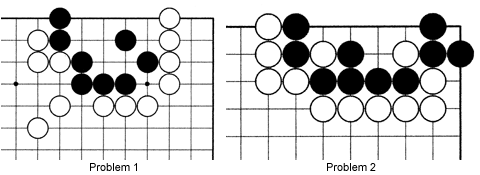
Problem 1: It is White's move. How can he inflict maximum damage?
Problem 2: Using the same diagram, White can kill the Black group if he plays first. How? The solution gives a hint for Problem 1.

Van Zeijst is a four-time European go champion and European representative at the Fujitsu World Championship.
