Unless you know the denouement of a situation, ...
By Rob Van Zeijst
Unless you know the denouement of a situation, it is extremely difficult to decide whether a singular, isolated event is right or wrong. Zen Buddhism is a philosophy that avoids making such value judgments. However, for us lesser mortals, we like to know where we stand, where we are heading, what our role is in the greater picture, and why. But because we do not understand absolutes, we usually end up making comparisons to certain standards, such as the prevailing opinion or simply what the neighbor thinks. Generally, we make an effort to be fair, based on these standards, and how things should be divided up. In go, we divide things up all the time and any fairness in doing so is the result of tried and true patterns that give more or less even results. Many of these patterns include some sort of exchange called furikawari.
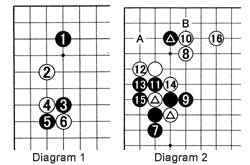
Diagram 1: The moves through 6 are the start to a number of possible joseki (standard exchange). Black, however, can simplify things with furikawari.
Diagram 2: Black 7 and 9 lead to the sequence through 16 in which Black gives up his marked stone in the corner while capturing the marked white stones. As you can see, Black trades his corner for a very strong position on the left side. In fact, Black still has some aji (bad potential) for White at A. Instead of 16, White can play at B to eliminate any tricks by Black, but this is a very tight move. Depending on the overall circumstances, the sequence through 16 can be regarded as an even result.

Diagram 3 (1-28 represent moves 83-109): Let us continue the game we started last week between Shinichiro Okada (Black) and Shinya Nakamura, both 8-dan pros. Last week, a large strategic furikawara between the top right and the lower left took place when these territories changed owners. After the loss of his territory in the lower left, White played the marked stone, answered by black 1. This was a bad decision, because it gave White strong moves at 2, 4 and 6 (see Reference 1). After white 12, Black's marked stones are in dire straits. Black then plays at 17, but instead of connecting at A, White pushes up with 18. If Black can save his stones 1, 11 and 15 in sente, he can cut at A. Black 19, 21 and 23 are an attempt to do this (see Reference 2 and 3), but White captures the three stones with 24 and 26 in order to avoid playing at A and then encircles Black's marked stones with 28. In exchange, Black breaks through at the top with 23, 25 and 27. Thus, another furikawari takes place. In the end, after many small battles all over the board, Black resigns.

Reference 1 (black 13 connects at 6): If Black resists with 1, 3 and 5, White puts him on the spot with 10, 12 and 14. If Black attempts to stay alive with 15, White makes two eyes with 16 and 18, and kills Black with 20 through 24.
Reference 2: Black 1, 3 and 5 are clever moves. If White connects at 6, black 7 is sente, so Black can cut at 9 next. After 11, White cannot capture Black's stones and White's marked stones die. This is a disaster for White.
Reference 3: After 5, White can also capture with 6. Now, Black will extend to 7, prompting White to connect with 8. Black can now move out with 9, and as black A threatens to connect underneath and makes eye shape as well, Black's marked stones will continue to live. In addition, Black can later play at B, followed by white C, black D, white E and black F to break through at the top.
Diagram 4: The moves through 9 are a joseki. White should now play at 15. However, what happens if he cuts through with 10 instead? Black gives way with 11 through 15 and gives up his two stones at 5 and 7. White loses his stone at 2. An exchange takes place, but we do not call this furikawari because this is not a fair trade as Black's profit is worth more than White's wall.

Solution to last week's problem (See Diagram 3): Black 1 in (83 in last week's Diagram 2) is bad because it leads to a lack of liberties that White skillfully exploits with 2 through 8. In retrospect, 1 was better played at 2 as Black is then strong at the top left and can fight his way out with his marked stones.
New Problems
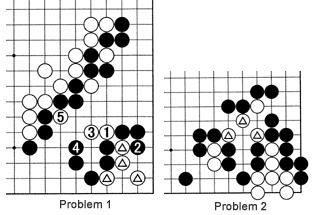
Problem 1: This is a situation from a game played about 40 years ago between Rin Kai Ho (Black) and Eio Sakata. White cut with 1 and Black captured the corner with 2. If White plays 3 and 5, Black can force a furikawari. White did not play at 3 in the actual game because this exchange is slightly favorable for Black. Anyway, where should Black play after white 5?
Problem 2: Assuming that White would lose any ko, where should he play his next move to save some of his marked stones?

Van Zeijst is a four-time European go champion and European representative at the Fujitsu World Championship.
