In sports such as soccer or when delivering ...
By Rob Van Zeijst
In sports such as soccer or when delivering a political speech, a friendly crowd is a huge advantage. Confronted by a hostile mob, a team may play badly or a person giving a speech could freeze up. That is why soccer teams, for instance, prefer to play on their home ground. Let's see if we can discover similar situations on the go board.
Home advantage
This first installment of a new series deals with how to keep and even widen your lead when you are playing on your "home ground." It is a good idea to learn a few scenarios by heart so you can make a more objective evaluation of your initial plans.
Diagram 1: Let's start with a nine-stone handicap. White will usually play at 1. Black's best move is 2, which would normally be followed by white 3 and black 4. Black should try to avoid complications and keep the big picture in mind. In combination with the stones marked with a triangle, black 6, 8 and 10 are good moves as they form a loose net around White's group and set up a huge framework with the stones marked with crosses. With 11, Black's corner is surrounded and a defense at 12 is needed.

Diagram 2: After 5, Black can play at 6 to remove White's eyes. This may lead to a battle and a lot of confusion. Cutting at A is not possible because, in principle, white B is sente (i.e. Black must answer). But the main problems are that Black's stones will be cut and they don't work together.

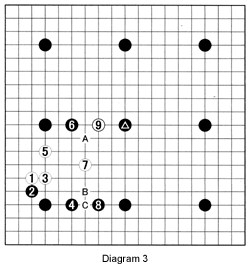
Diagram 3: After white 7, defending at 8 has a natural feel to it, but 9 is a good move. When the players are of the same strength, starting a battle with A is a possibility, but because White can exchange B for C, Black will not prevail.

Solution to last week's problems
Solution 1A: After playing the marked stone, White threatens to descend to 1, hoping for black 2. White 3 and 5 are fine moves, giving White a better result.
Solution 1B: However, things generally won't work out that well. Thanks to the exchange of the marked stones, Black is able to resist with 2. White 3 and 5 look like strong moves but Black can simply block at 4 and 6. White A is answered by black B.
Solution 1C: So why not play 3 and 5? This is quite different from Solution 1A where White built a solid wall. After 6, White is left with a defect at A that can be exploited later.
Solution 1D: After 2, white 3 is a good move. If Black fails to play at 4, White will play there himself. Black A would then be followed by white B, which would capture Black's stones.

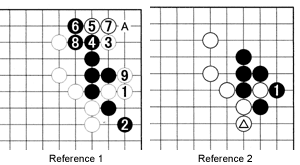
Reference 1: In this situation, descending to 1 constitutes an even bigger threat. If Black plays at 2 now, the invasion at 3 will be a great success. If Black resists all the way with 6 and 8, white 9 puts him on the spot. Therefore, Black should play 6 at 9, followed by white A. However, losing the corner like this is a huge loss.
Reference 2: Therefore, after White plays the marked stone, Black should capture with 1 immediately.

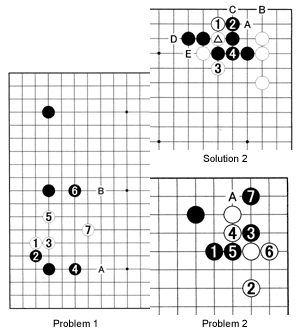
Solution 2: This is the result of a joseki. It is Black's turn. However, in most cases he will play elsewhere. To use the marked stone to his maximum advantage, White should exchange 1 and 3 for 2 and 4 at an early stage. At a later stage he may be able to play at A, preventing B in sente. Usually Black will answer at C to prevent White from linking up there. In addition, White has forcing moves at D and E.
New Problems
Problem 1: In a six-stone handicap game, if you adopt the sequence through 6, where should you play after white 7--at A or B? What would happen if you played either of these moves?
Problem 2: Black 1 can be a good move to build up the top. If White answers at 2, black 3, 5 and 7 are a good combination. White will usually respond with A. How should Black proceed in that case?

Want to find out more? Come to Ben's Cafe (03-3202-2445, www.benscafe.com) in Takadanobaba, Tokyo, where the English-speaking go community congregates every Sunday. You can enjoy free lessons, 11 a.m.-1 p.m.
Van Zeijst is a four-time European go champion and European representative at the Fujitsu World Championship.
