In dealing with others, almost everything ...
By Rob Van Zeijst
In dealing with others, almost everything involves some form of negotiation. For most people, this is often done without much thought, but governments and large companies employ people with negotiating skills. A skilled negotiator will consider goals, what alternatives there are, the balance of power, possible or expected outcomes, and the consequences.
The go board also witnesses "negotiations" that include all of the above ingredients. One specific example of this is furikawari, which signifies a situation involving the trading of one territory or group of stones for that of the opponent.
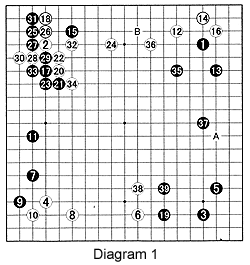
Diagram 1: In this game between two 8-dan pros, Shinichiro Okada (Black) and Shinya Nakamura, a large strategic furikawara takes place. The first furikawari takes place at upper left. Black builds up his influence on the left, but his stone at 15 is in trouble in the sequence up to white 24. However, Black invades at 25 to try to take White's corner. White resists with 28 and 30, offering the furikawari shown in Reference 1. With 31, Black tries to sweeten the deal for himself and offers the furikawari in Reference 2. White refuses and chooses the outside with 32 and 34, while Black gets the corner with 31 and 33. Black 35 offers another furikawari of a white invasion around A, and Black would then jump in around B.

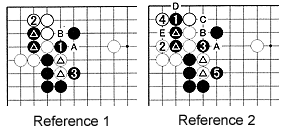
Reference 1: At this point, Black can cut with 1. White takes the corner and kills the marked black stones with 2, and Black captures two marked stones with 3. This is probably a fair trade, but White could spoil it by making the white A, black B exchange before playing at 2.
Reference 2: In response to black 1, White can take the corner with 2 and 4, but this time, Black forestalls the A for B exchange, while after black 5, he also can force B for D and C for E. This is a lot better for Black than Reference 1.

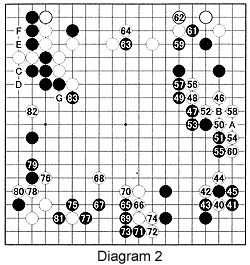
Diagram 2 (40-83): As Black's territory on the right is huge, White has to do something so he makes preparations with 40, 42 and 44, before finally invading at 46. After 54, Black can set up a ko with A, followed by white 58 and black B, but White has many ko threats starting with C for black D, E for black F, and G. White is doing well up to 60, but Black gets compensation with 59 and 61, and he has a great wall on the outside now. Because of this, he invades with 65 and 67. Black 77 makes sure he will stay alive in this area. This is a kind of furikawari with White living in Black's territory and Black living in White's. At lower left, a new furikawari takes place when Black plays at 81 to make doubly sure he will remain alive, while White cuts through with 78 and 80, then invades at 82. Black 83 could be a losing move. We will continue this game next week.

Solution to last week's problems

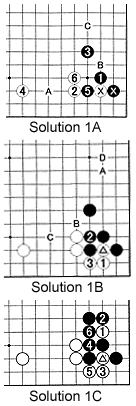
Solution 1A: This is the result of last week's moves but in a different order. 1 through 4 is joseki, but the exchange 5 for 6 is bad for Black because it eliminates White's weakness at A, while creating a weakness at B. Black should defend against this with C. So without the marked moves, this gives Black a poor result. What about with the marked stones in place?
Solution 1B: If Black uses an extra move, the situation is certainly bad for him. What if White gets to move first? He can then draw out with 1 and 3--if black 2 is at 3, White cuts at 2, which is disastrous for Black. This gives White a fair result, while Black still needs a move around A. He can also play at B, followed by white C and black D, giving Black a reasonable result.
Solution 1C: However, White also has 1 as an option. Black 2 is usually the safest response, but white 3 is clever. After white 5, Black has no choice but to connect at 6. This is a good result for White. In other words, the marked White stone is not lost, but it still has bad aji (potential).
Solution 2: Black 1 is the correct move. White's best move is 2, but after 3, White has a shortage of liberties and he cannot capture at A after black 5. If White plays at A, his entire group is still in atari and Black will capture by playing where his stone at 3 was captured.
Reference 3: Cutting at 1 is wrong. After 4, Black must connect at A or else White will play there and Black cannot save his two stones. This means White would stay alive with 6.
Reference 4: Black 1 looks like the vital point, but this reverts to Reference 3. Of course, White plays at A and is alive.
Reference 5: Black 1 and 3 look good, but White makes a ko with 4. This is not the best option either.

New Problem
Have a look at Diagram 2. White's two stones in the corner still have aji, i.e., they may pose problems for Black. Try to establish why 83 is a bad move and find a better move. In addition, find White's best move after black 83.
Van Zeijst is a four-time European go champion and European representative at the Fujitsu World Championship.
