In his book The Art and Craft of Problem Solving, ...
By Rob Van Zeijst
In his book The Art and Craft of Problem Solving, Paul Zeitz, an associate professor of mathematics at the University of San Francisco, offers a systematic strategy for solving problems. First, he makes a distinction between exercises and problems. Exercises, he says, test the mastery of a specific technique, while problems are often open-ended and paradoxical and sometimes cannot be solved. In essence, this is the difference between strategy and tactics that go players face in every game. Tactics require techniques that can be acquired by doing exercises. Strategy involves working out a plan that can be backed up by an understanding of these tactics. The more advanced you are, the better you will become in spotting specific situations and the easier they will be to solve.
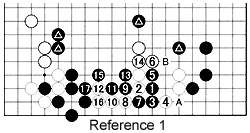
Diagram 1: Let's look at a game in which we make a distinction between an exercise and a problem, although we will use the terms strategy and tactics. This is a game between two 9-dans. After black 5, White can choose to play at 14, 15, or elsewhere. After 6, the sequence through 14 is forced, as this is a standard exchange (joseki). Therefore, white 6 is a strategic move, while the moves 7 through 14 are mere tactical moves. The next strategic move is black 15. Another possibility is A. However, White would immediately exchange B for black C, leaving Black with a flat position at the bottom. In contrast, after black 15, Black can press White's position with 21. This is both a strategic move and a matter of taste. White 16 is again a strategic move. Instead, a move to the right of A is possible. White 16 through 20 create a weak group in Black's sphere of influence. How does Black deal with these invaders? Black makes the exchange 21 through 24 to strengthen his group and push White with 25. White 26 is a good move, but so is Black 27. White can now reinforce around C but chooses to play at 28 to break up Black's framework. This is a strategic move, backed up by tactics. White needs to be sure he can withstand a black attack. However, black 29 and 31 are strong moves. (See Reference 1.)

Reference 1: Black 1 is a severe move. Trying to capture the invader with 2 and 4 is impossible as the sequence through 17 demonstrates. After 8, the moves through 17 are forced, but White loses the capturing race. His four stones have three liberties while Black's invaders have four. So preventing a connection at A with 4 is impossible. Note White can still cut at B. As you can see, Black backs up his strategic marked stones with tactical moves. Also, note that if white 2 was played at 8, as in the game, Black would play at 9 before 7.

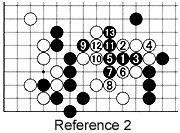
Diagram 2 (Black 55 captures ko at 51): From a strategic point of view, White has to reinforce his bottom position, but Reference 1 invalidates an attempt to capture Black's invaders. Now, it becomes apparent why he plays at 32 and Black at 33 and 35. While making eye-shape, white 36 and 38 aim at attacking Black's group to the left. Black now needs to reinforce his stones, but how? Playing at A looks safe, but is rather mundane. A better strategy is to attack White's group and see what happens. That is why Black plays at 39--it attacks White's eye-shape. (See Reference 2.) In retrospect, white 38 was probably better at 43, but then Black would not play at 39. However, the most surprising move has yet to come. Black starts a ko at 51. This seems ludicrous but Black has a perfect ko threat at 53 and after capturing the ko with 55 (at 51), White has no better ko threat than 56. After white 58, Black is clearly leading.


Reference 2: After black 1, White cannot capture this stone with 2, 4 and 6. Black can easily escape with the sequence through 13. There are various ways White can try to capture Black's stones, but they will all fail.
Solution to last week's problem

Solution 1A: Black 1 looks weird, but it is the correct move. White would capture with 2.
Solution 1B: But then Black would play at 3. If White plays at 4, black 5 makes this space into a false eye. Even if White captures two stones with A, Black will come back again to play where black 3 was taken to make this into a false eye.
Reference 3 (black 3 connects where the marked stone was taken): Black should not try to save his three stones by capturing the marked stone with 1 and connecting with 3 (where the stone was taken), because White has a clever combination with 4 and 6. Now Black cannot connect at 4, because White will capture with A.
New Problem
Problem 1: White has just defended with A. How can Black take advantage of this mistake?
Van Zeijst is a four-time European go champion and European representative at the Fujitsu World Championship.
