The difference between new pros ...
By Rob Van Zeijst
The difference between new pros and veterans is not usually how well they can execute a trick--they are all good at that--but how well they can incorporate such a trick into a grander strategy. In the game below, we can see an example of how the younger pros ply their tricks of the trade. For the past two weeks we have followed the game in which Yuta Iyama (white) defeated Huang Yizhong to win the Nakano Cup, a tournament open to players below the age of 20. Let's see how Iyama emerged victorious.


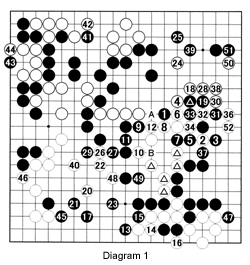
Diagram 1 (1-52 represent moves 99-150): Last week, Black cut White's center group in half and is now attacking the right side. With 1, Black threatens to cut with black 9, followed by white 12 and black A. Forced to defend, White comes up with the beautiful combination of 2 and 4. The latter cuts through the keima (knight's jump) shape formed by the marked black stone and black 1. If his counteroffensive works, this is perfect for White. Indeed, Black plays at 5 instead of cutting with 6 (see Reference 1). Black 9 is a mistake. He should first exchange 10 for B, then push at 9, which would be dangerous for White as he would probably have to allow black B and abandon his marked stones. White 10 is a good move that puts a stop to Black's attack. After this, the game is quickly over as White breaks through on the right. Black resigns after white 52.
Reference 1: A Black cut at 1 after White plays the stone marked A could land him in trouble if White cuts through on the right side, e.g. with the combination 6 through 18. With white 20, Black loses his marked stones as well as his threat against the marked white stones.
Hints for improving your game
This week we will dwell on unnecessary moves that are sente (those that need to be answered), but lose their way or induce a lack of liberties in the process.
Diagram 2: This is an example of what often happens in games between beginners. White needs to defend against the threat the marked stone poses. Many novices will make forcing moves such as 1 and 3 before finally defending at 5. What do the exchanges 1 for 2 and 3 for 4 accomplish? Both exchanges are bad for White.
Diagram 3 (black 2 is played elsewhere): White should defend with 1. After Black plays elsewhere, White has interesting possibilities, e.g., white 3, 5 and 7. Even after black 8, Black's corner is not 100 percent safe as White can take away his eyes with A.
Diagram 4 (black 2 is played elsewhere): After white 3, B1ack may choose to defend with 4, allowing White to seal off the center with 5. This is clearly superior to Diagram 2 for White.

Solution to last week's problem
Solution 1: Black 1 is correct. This reverts to Solution 3A (see No. 332). Similarly, if White answers differently, this would revert to Solution 3B (see No. 332).
Solution 2: Black 1 is a blunder. White 2 is a surprising answer and leads to ko. Black can capture the marked stone right away to start the ko and use the exchange 3 for 4 later as ko threats. It is a favorable ko threat for Black, but compared to Solution 1, it is a bad result because White is not unconditionally dead.
Solution 3: This is a funny problem because black 1 seems to do nothing right away. However, it prevents White from playing at A. This allows Black to play there himself, if White captures his stones with B or C.

New Problems
Problem 1: The exchange of the marked stones looks like it benefits White. However, it leads to damezumari (shortage of liberties). How can Black attack White's corner after this exchange?
Problem 2: How can Black attack White's corner? Supposing the exchange of the marked stones is not made, how can White fight off this attack?

Want to find out more? Come to Ben's Cafe (03-3202-2445, www.benscafe.com) in Takadanobaba, Tokyo, where the English-speaking go community congregates every Sunday, 11 a.m.-1 p.m.
Van Zeijst is a four-time European go champion and European representative at the Fujitsu World Championship.
