Be proactive
The first few diagrams illustrate why taking the initiative often leads to success, and also how to act if you are being challenged.
Diagram 1 :
As in last week's column, we start out with two black stones and two white ones on a 7x7 board. The komi is two points-given by the player who moves first. Black gives White two points (often by handing White two stones, or prisoners). With 1, 3 and 5, Black expands his own territory while limiting White's. White just defends against Black's advance.
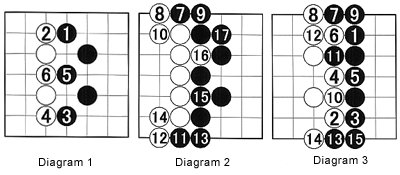
Diagram 2 :
Seen from White's prospective, he has to defend against any threats posed by Black. Therefore, he must guard with 8 and 10, and again with 12 and 14. The only time he gets a chance to attack is when he plays at 16. Note that Black correctly defends at 17-otherwise White would cut at that point. The final score is Black 18 points in territory and White 10 points in territory, plus two points in komi for a total of 12. The difference is six points in favor of Black. White only played moves he was forced to and still the margin was very large.
How can that be ?
Now let's take a look at what happens when Black is passive whereas White is proactive. If Black starts out just defending his territory with a move such as 1 and White aggressively expands his own territory while at the same time taking away potential territory from Black, we might see the result shown here. The final score is Black 14 points, White 16, plus two in komi for a total of 18 points. White wins by four points.
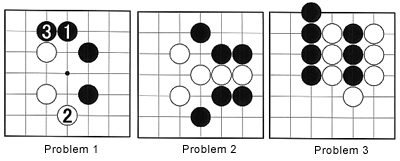
Problem 1 :
If both parties are aggressive, White must inevitably play at 2 in response to black 1. After black 3, how should White proceed ? Try to picture the next few moves for both sides.
Problem 2 :
White plays first and wins the game. What is his first move ?
Problem 3 :
Black's three stones are in trouble. There is a way to save them. Ultimately though, the goal is to win the game. Can Black win this game (with no komi) ?
Proactive young pros
What follows is a game between Keigo Yamashita, 7-dan, who plays White, and Naoki Hane, 8-dan, in the second round for the Judan (10-dan) title. At 23 and 25 respectively, both Yamashita and Hane are breaking into the top group of players.We have featured Yamashita in this column before, but Hane, the son of Yasumasa Hane, 9-dan, is a relative newcomer.
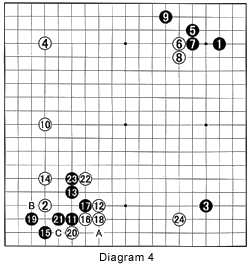 Diagram 4 :
Black's moves 1, 3 and 5 form a conventional fuseki. Traditionally, White splits up the right side somewhere in the middle between 1 and 3 on the third line, but with 6 and 8, Yamashita chooses a different approach. These moves emphasize the center, making it more difficult for Black to expand his shimari (the enclosure of 3 and 5)-see Reference diagrams.
White 12 is a move that is in vogue these days. After black 15, defending the corner at 19 may seem the natural move for White, but then Black slides to A, leaving white 12 in an awkward position. White 16 is therefore the correct move.
For Black, the exchange of 17 for 18 is a necessary evil before jumping into the corner with 19. White 20 is an important move as it takes territory and makes a base, while black 21 only serves to connect. For White the next move would usually be B, which is answered by black C. In terms of territory, this exchange benefits White, but a black stone at C would hurt his stones in that area. So instead, White hits a vital point at 22 before (over)extending to 24. (Note that White will later need to play at C to defend his stones).
Reference 1 :
The shoulder-hit (kata-tsuki) of white 1 is an interesting move. White 1 and 3 keep Black's marked stones under restraint in terms of center influence. One of the questions in this game is whether the exchange of 1 and 3 for 2 and 4 will turn out well or badly.
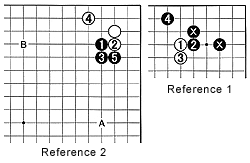 Reference 2 :
In general a shoulder-hit (at 1) is answered by pushing once with 2 before playing a keima (knight's move) at 4. In the case of a white stone at 3-3, a black move at 1 is quite common. In which direction should White push? In general, if Black has some development around B, White should follow the pattern shown here.
However, if Black has one or more stones around A, pushing with 2 is helping Black as, after white 4, Black can block with 5. With this background information in mind, try to understand moves 6 through 9 in Diagram 4.
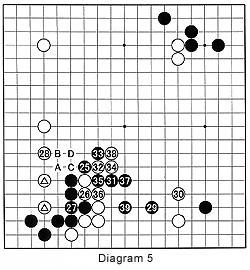 Diagram 5 :
Black 25 is an important move. Although it allows White to defend with 28-which is necessary, otherwise, Black plays at 28, white A, black B, white C, black D to swallow up White's marked stones-it takes the initiative in the fight that is initiated with black 29 and 31. White 32 is tesuji-if Black cuts at 35 right away, white 32 will be difficult to eradicate and remains troublesome. However, black 33 induces the move white 34. Next, White needs to take care of his stones 32 and 34-he cannot allow both these two stones to be captured. While White is busy saving his stones in the center, Black gets two vital points, 37 and 39. Where should White play next ?
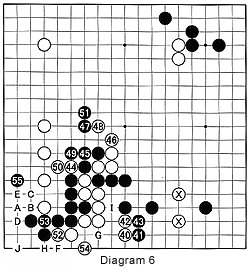 Diagram 6 :
Although he manages to cut some black stones in the center with 44 to 50, White has no choice in the end but to make his stones alive with 40, 42 and finally 52 and 54. White 40 and 42 are painful moves because they strengthen Black's stones (black 41 and 43) while endangering White's two marked stones.
Black 55 is necessary-but why ?
If not played, White can force A, black B, white C, black D, white E, black F, white G, black H, white I (to make his own stones alive) and black J. Yes, Black does live, but a White move at I hurts Black's position there, while the moves A, C and E are good for White because they create a lot of territory in sente (while keeping the initiative). In short, 55 might not be, strictly speaking, necessary to live, but the value of a move like this is great.
Problem 4 :
Look at the result of Diagram 6. Black defended at -55-now it is White's turn to attack. Where will he strike?
