
While most of us will never achieve this level of concentration, we can learn how to concentrate by "reading," or calculating board positions.
Last week, we discussed some problems in which reading was involved. Capturing stones in a geta, or net, was the main theme. This week we will focus on capturing stones in a ladder, or a loose ladder.
Diagram 1: This is an example of a ladder, also called "shicho." Black puts the marked stone in atari. If White tries to escape, Black traps the stones with 3, etc. In the end, if he persists, White will lose all of his stones.
Diagram 2: If there are enemy stones in the line of the ladder--white A for example--be careful.
Diagram 3: If Black tries to capture the marked stone in a ladder with 1, White will escape with the sequence through 12. Because of white A, Black's stone at 7 is in atari. The white stone at A is called a "ladder-breaker," or "shicho-atari."

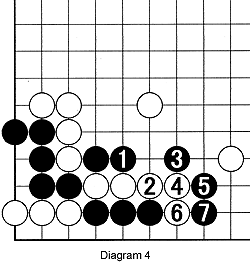
Diagram 4: This is an example of a loose ladder. It is a ladder, except that White has an extra liberty. However in the end, he suffers from the same problems as other ladders--he runs out of liberties. It should be understood that this type of loose ladder is even more hazardous than normal ladders and needs more concentration.
Problem 1: This problem constitutes the basics of the loose ladder. They involve sacrifices and squeezes. Black has just played the marked stone. Is it possible to capture the three white stones?
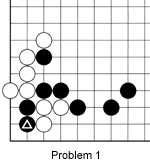
Solution 1A: White's three stones have two liberties against three liberties Black's two stones have in the corner. White's only chance is to get more liberties. However, black 2 through 8 form a good combination. Note, Black should not connect at 7 after white 5.
Solution 1B: White's stones now are in atari, but if he connects at 9, black 10 and 12 will capture him. Note, the presence of the marked black stone is not necessary if the ladder favors Black.

Problem 2: How can Black save his marked stone and capture White's marked stones?
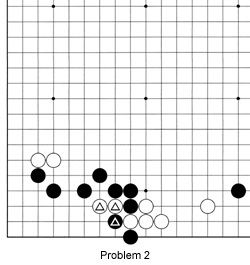
Solution 2: Black can save his marked stone with 1 and capture the marked white stones with the loose ladder combination to 9. Black's stones have four liberties while White's have only three so White's stones are lost.
Note, this combination doesn't work if there is a white stone at A or B because after black 9, White would then push through at C, followed by black D and white E (atari).

Solutions to last week's problems
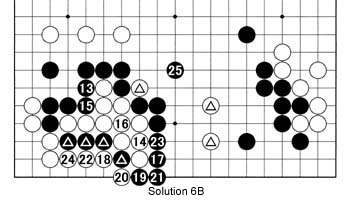
Solution 6A: Last week, this problem was represented incorrectly without the marked white stone in the center. With this stone in place, the correct answer is the combination through 11. After white 12, Black seems to have run out of steam.
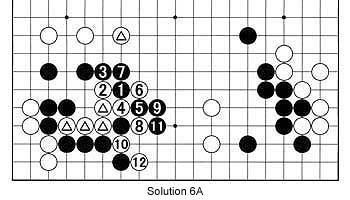
Solution 6B: However, black 13 and 15 squeeze the white stones and White is forced to connect with 14 and 16. Black 17 through 23 are another good combination. Yes, White does get to capture all of the marked black stones, but black 25 ensures a huge territory that include the death of the marked white stones.
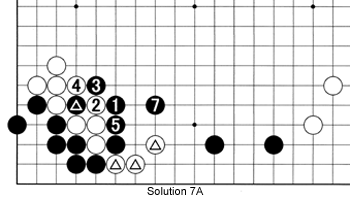
Solution 7A: (White 6 is where the marked black stone is taken)
Black 1 is a good move. White can now choose where to play, but Black will squeeze him in either case. In the moves through 7, the marked white stones are in dire straits, while white stones on the left side are not very healthy either.
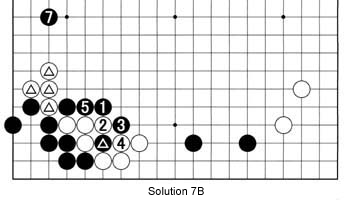
Solution 7B: (White 6 is where the marked black stone is taken)
If White chooses the other possibility by playing at 2, he will be squeezed again in the sequence through 6. Black 7 is a severe attack on the marked white stones, while the white stones on the lower side are still vulnerable to attack.
Solution 8: (White 14 is played where black 1 is taken)
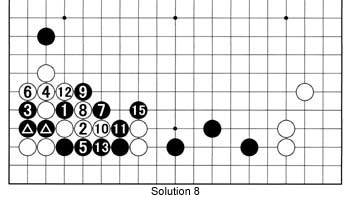
The problem was how to get the most use out of the two marked black stones. Black should first play atari with 1 and 3, then play at 5. White needs to capture the marked stones with 6, giving Black the opportunity to squeeze with the combination 7 through 13. After White connects with 14, black 15 incapacitates the two white stones below it. This is a huge success for Black.
Want to find out more? Come to Ben's Cafe in Takadanobaba (03-3202-2445 or www.benscafe.com), where the English-speaking go community congregates every Sunday starting at 11 a.m. You can enjoy free lessons until 1 p.m.
Van Zeijst is a four-time European go champion and European representative at the Fujitsu World Championship.