For the past four weeks, we have followed the second game of this series. We saw O fall behind in the opening and then Yamashita's failure to decisively take the lead. O then made a desperate attempt to infiltrate his opponent's territory and succeeded beyond his wildest dreams, only to give it all away on the next move. Yamashita then went for the kill, failed, and went on to attack the next group. Actually, O was on the defensive for the entire match.
In this fifth installment, we will look at the last grand battle of this second game and its denouement. Yamashita is Black.
 Diagram 1: This diagram incorporates solutions for last week's Problems 1 and 2: "Who is leading in territory and where should Black play next?'
As we saw last week, White is alive on the right. So where should Black play?
The first thing you must consider, are there any weak groups on the board? In general, defending or attacking a weak group is worth about 20 points.
However, a player sometimes cannot afford to defend a group because there are more important issues at stake. For example, a larger group needs to be defended or an important move must be played to keep the territorial balance even. To make that decision, you have to count the territory. Without getting too specific, the easy way to do this is by simply comparing territories.
White's upper left corner and left side are worth about the same as Black's lower left corner plus Black's territory in the upper left center. White's lower right corner is worth about the same as Black's upper right corner. Black still has territory in the lower right center. White has potential to make territory on the upper edge of the board with the stones marked with triangles. He also can make some territory on the lower edge with B, but then Black will jump in at C, making the whole exercise fairly meaningless.
What about a Black attack at B? White still has an escape route to the center around A, so no big worries there. The stones marked with triangles still have no base. At the same time, this is the place where White can still score a lot of points. In short, Black should play in this area.
 Diagram 2: Black 1 splits White's position. After White defends with 2, he still cannot connect with A. Next, Black attacks at the vital point with 3. White 4 aims at connecting with A so black 7 is necessary, but first Black exchanges 5 for white 6. Now you can see how many points Black is taking away from White and how many he is making for himself in this area.
On top of that, White is still struggling to ensure life. After white 16, Black needs to defend at 17 to secure eyes. It seems that White is dead, or is he? Is there anything White can still do to make two eyes along the upper edge?
Diagram 3: White cleverly plays 18 through 24 to create liberties, then attacks from the back with 26 (see Reference 1). Black resists with 27 to try to keep White dead. However, white 22 through 32 set up a ko.
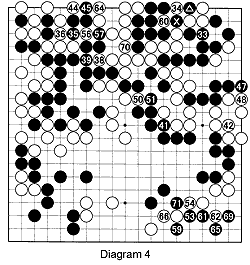
 Diagram 4: Played in ko are black 37, 43, 49 and 55 at the stone marked with a triangle, white 40, 46, 52 and 58 at 34, and black 63 at the crossed stone, black 67 at 56, and white 68 at 60.
In this diagram, the players engage in a complicated ko fight. The fight is especially difficult for White because he has to use three moves at some stage to capture 10 black stones, which he does with 34, 68 and 70.
In the meanwhile, Black is able to play 65, 69 and 71 in compensation. These moves decide the game as White's entire lower right corner is captured. White plays on for a few moves, but then resigns.
 Reference 1: Black could have avoided the ko. After he played 1, white 2 is a vital point for attacking Black's liberties. If Black just follows along he can capture with 3, 5 and 7 (necessary otherwise he cannot connect at B after white A).
Next, White will play at 8 and make two eyes (at C and D). This is probably good enough to win the game, but the ko in the game is so unfavorable for White (he cannot afford to lose it and needs three moves in a row to ensure that he does not do so), Black decides sacrificing 10 stones is a small price to pay for capturing White's lower right corner.
7-stone handicap
This is the ninth article in a series of discussions on the 7-stone handicap game.
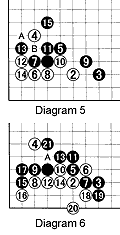
 Diagram 5: Last week we got this shape. It is a little painful for Black because his stones 7 and 11 make an empty triangle, a notoriously bad shape.
In a game without handicap, this is slightly better for White. However, in a handicap game with six or seven stones, this is good for Black because it is simple and takes outside influence.
Diagram 6: Now let's combine this with what we learned a week before that. We found White should have played at 13 instead of at 12 allowing Black to cut at 14, after which White would have to sacrifice 2.
However, what happens if White does not want to sacrifice that stone? Can't he just connect with 12 and 14? Of course he can, but now Black can play 15 and 17. White has to reinforce the corner with 18 and 20. But this gives Black the chance to make a good shape with 21, immobilizing white 4 in the process. Moreover, white 6 is also in a bad position.
Compare this to Diagram 5, which is a standard joseki, and then you understand how bad this is for White. When this shape appeared in a game between two of my students, Black was unhappy because he became gote (lost the initiative). Keeping sente (initiative) is good but making a good shape is more important even if takes an extra move. A good shape is a source of strength while a bad shape comes back to haunt you.
 Problem 1: In this shape (a simplified version of Diagram 6), if White descends to 1, Black can play 2 and 4 in sente, i.e. White has to answer. However, if he plays elsewhere, how can Black kill the white stones?
Problem 2: In the same shape, White can also play 1 and 3. Black 4 is a tricky move. Descending to 5 is dangerous as Black can take advantage of this mistake. How?
Rob van Zeijst is a four-time European go champion and European representative of the Fujitsu world championship.
