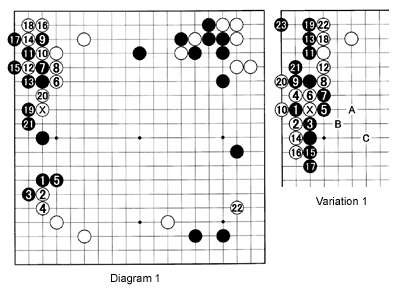
Diagram 1 :
The first 26 moves were given last week. The marked stone is White's last move. Last week, Problem 4 asked how to deal with this invasion. Neither directly answering nor completely ignoring White's invasion, black 1 is O's solution. For alternatives, look at Variations 1-3.
White 2 is an unusual answer to Black's solution. If White plays at 6 right away, without the exchanges 2 through 5, Black could possibly invade in the lower left corner. On the other hand, White has no time to properly defend the lower left corner by playing at 4 instead of 2, because then Black can take the initiative in the upper left corner, making the marked white stone a bad move. Black 7 next is standard, but the jump to 9 is unusual.
Note that after black 21, there is a defect in White's wall, next to 20, that Black might exploit later on. With white 22, the focus shifts to the lower right corner. Before looking at the next diagram, can you guess Black's answer ? Here are some questions to guide you: What are White's objectives ? What should Black aim for ? Should Black drive White out into the center by taking away his eyes? Or should he try to surround White and make him live at the edge ? These are strategic questions. Once you have established the strategy, how can you implement it? Now, tactics come into play.
Variation 1 :
Black 1 is sometimes a good answer. White can affront Black by cutting at 2 and then again at 8. Up to 23, Black doesn't have much choice. Next, White can attack the black center group, for example at B or A, followed by black B and white C. I think this is more a matter of taste than a question of which is better.
Variation 2 :
On the other hand, White may cut at the other side with 2, and then play 4. The moves to 13 are a standard sequence. Next, White will probably extend to 14. This looks like a good variation for White, because he gets a thicker position, while Black is locked up in the corner with few points.
Variation 3 :
If there is no stone at A, Black can answer the marked white invasion stone by jumping out to 1, prompting White to answer at 2 (or at A). Next, Black grabs hold of the marked stone with 3. White then exchanges white 4 for black 5. However, in this game, White already has a stone at A, so a black jump to 1 is punished by White running out to 3, splitting Black into two.
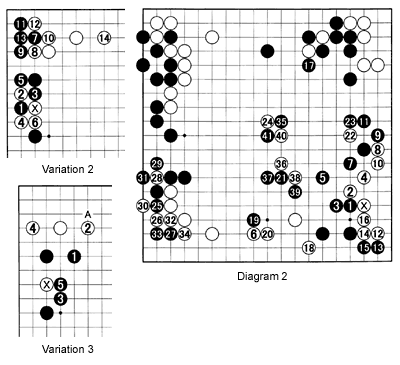
Diagram 2 :
Black played at 1. What are the reasons for this? First, it prevents White from linking up the marked stone with the stones on the lower side, and second, by attaching itself to the marked stone, it makes Black stronger, and forces White to answer. Black's plan is to either play around 6 and claim the lower side, or to lock White up in the corner to gain superiority in the center.
White has no choice but to answer at 6, allowing Black to take another key point at 7. After black 21, White needs to somehow lay waste to Black's center thickness. After making the exchange 25 through 34, Black frontally attacks white 24. White sets up a tesuji (locally clever move) combination with preparatory moves 36 through 40, expecting black 41.
Solutions to last week's problems
Solution 1 :Black 1 makes good shape, which doesn't leave behind any weaknesses. This is the kind of move an amateur needs to understand in order to grow stronger.
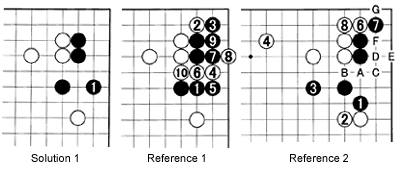
Reference 1 :
Black 1 may seem to have the same virtues, and may actually look stronger, but the move at 4, in combination with a move at 2 (changing the order might be even better), is a powerful attack. If Black replies with 3 and 5, white 6 through 10 put him on the spot.
Reference 2 :
Black 1 is the kind of move weaker amateurs play, because it looks more aggressive. And yes, it does evoke a white answer at 4, but later on, when Black plays somewhere else, white 6 and 8 uncover Black's weaknesses. If Black ignores these moves, White will play hane (diagonal connecting stone) at A. If Black cuts with B, this will be followed by white C, black D, white E, black F and white G, eating up Black's corner.
Solution 2A :
Depending on the circumstances, exchanging black 1 for white 2, then jumping out to 3, may be an acceptable strategy for Black if he needs to get out into the center. White will usually answer with 4.
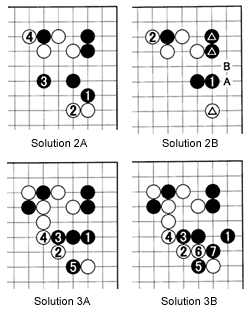
Solution 2B :
However, if you don't want to strengthen the marked white stone, black 1 or black A are good. White will probably still answer with 2. The placement at B doesn't work for White, because the marked black stones have one more liberty than in References 1 and 2.
Solution 3A :
Black 1 makes good shape here. If White tries to lock Black up in the corner, Black can counter with 3 and 5 to break through White's wall.
Solution 3B :
Black 1 also makes good shape. If White tries to lock Black up in the corner, Black can counter with 3 through 7 to break through White's wall. It is hard to choose between 3A and 3B.
Reference 3 :
Black 1 is wrong. After white 2, Black can't get out into the center. For example, black 1 will be cut off with the combination white 4 and 6. This promises to be a tough fight for Black.
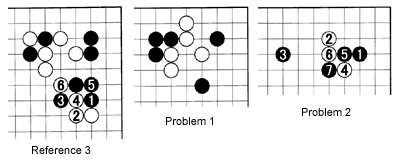
New Problems
Problem 1 :How should Black play here? Can he connect his stone in the corner to the outside world?
Problem 2 :
The moves 1 through 7 form part of a joseki (standard corner exchange). White must not put black 7 in atari (one move before capture), but he should still use the threat of an atari. Where should White play ?
Problem 3 :
If you found the correct answer in Problem 2, can you guess White's response to black 41 in Diagram 2 ?
