Ko
In this game Yamashita is black. Initially the focus is on the upper left, where Naoki Hane, the challenger, starts a huge ko.
Diagram 1: After white 6, white 8 through 20 take sente to play 22 to split Black's stones at 5 and 9. Sure, Black wants to defend the left side, but 21 is necessary: If omitted, a white move at A is severe. Black 23 and 25 are a combination to strengthen himself while weakening white 22 and creating a cutting point between 6 and 24. White 26 seems to defend against that cut but 27 is a clever move. It aims at the cut as well as at connecting underneath with B. When playing 22, White probably felt good, but after 25 he was not sure anymore. These feelings likely caused White to play aggressively with 28.
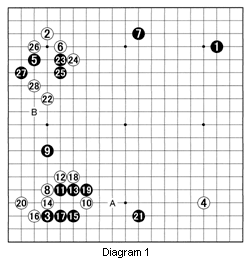
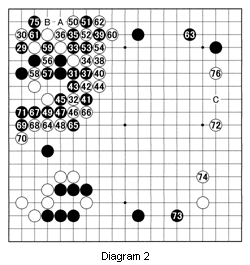
Diagram 2: After black 31 usually White must extend to 34, but 32 is more important now. Black then starts his attack with 33 through 39. The race is on between the corner and Black's surrounding stones. The moves from 42 through 49 are a one-way street. But backed up by the combination of 50 through 54, White starts a ko with 56 and 58. Unable to answer properly, Black captures the ko with 61 but loses six stones after white 62. After exchanging 64 through 71, White extends to 72 to continue the fuseki. Yamashita commented he wanted to play at C instead of at 75 but he was afraid White would invade at 76. Territory-wise, black 75 is worth about 23 points.
Solution to last week's problems
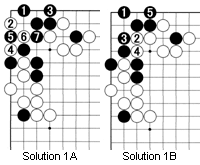
Solution 1A: After black 1, White can start a ko with 2 through 6. After black 7, White can capture the ko first by playing 8 where white 4 was. Please note the order of 4 and 6--this enables White to capture the ko first.
Solution 1B: However, in the game, Yamashita played 2 and 4, allowing Black to live with 5. Why? Because anything can happen while fighting ko. With 2 and 4, White turns the center into territory. If he loses the ko, his territory will be gone.
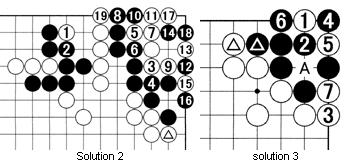
Solution 2: The question was why Black needed to defend the corner after White's marked stone. If Black does not defend, White can exchange 1 for 2, then invade the corner with 3 through 9. Black's best counter is 10 through 18 but after white 19 it is ko. Of course White has something at stake, but Black may lose a huge corner. That is the reason Black played at 9 after White's marked stone.
Solution 3: The exchange of the marked stones is bad for Black. If he now plays elsewhere, White can strike with 1 and 3. Black can only get a ko now. Not exchanging the marked stones would enable him to play at A after white 7, but the exchange caused him to lose a vital liberty.
Solution 3: In response to black 1, White 2 and 4 put all of Black's marked stones in atari. Black can capture only one pair of them, forfeiting most of the corner. This action is possible thanks to White's marked stones.
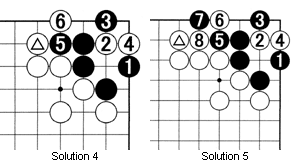
Solution 4: The marked stone kills Black's corner. If Black tries anyway, e.g. with 1, white 2 through 6 follow. You can see
the importance of the marked white stone.
Solution 5: The presence of the marked stone is also good enough to keep the black stones dead. Black 1 through 7 is of no avail.
New Problems
Problem 1: Look at black 41 in Diagram 2. He should first have exchanged A for B. Why?
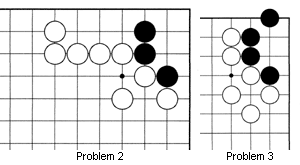
Problem 2: Oops, this is tricky. What is the status of Black's corner?
Problem 3: This is a fine problem. How can Black live unconditionally--i.e. without ko?
Want to find out more? Come to Ben's Cafe in Takadanobaba, Tokyo (03) 3202-2445 where the English speaking go community congregates every Sunday. You can enjoy free lessons, 11 a.m.-1 p.m. Ben's Cafe can be accessed at www.benscafe.com.
Van Zeijst is a four-time European go champion and European representative at the Fujitsu World Championship.
