Function over form

For the past few months, we have studied basic shapes, and their variants, which trigger certain automatic responses in pros--the Japanese pros refer to this as (good) style. But the South Korean pros are concerned less with style and more with results. Often the two go together, but when based on a conditioned response, style may not offer the answer. The South Koreans prefer to make decisions based on reading (visualizing the next few moves), and as a result they are very good at it. To improve our game, the question is: Can we master the art of reading?
Last week, we introduced the book Life and Death. It approaches problems in a systematic way and makes the reader visualize moves and countermoves. Another good feature is that the book does not call for either color to ensure life or kill its opponent--instead it asks what the status of a certain group is. That is closer to what happens on the go board.
Chapters 5 and 7 deal with one- and two-space notchers. Here are problems similar to those in the book.
Problem 1: The basic shape of the one-space notcher is shown here. What is the status of the Black group?
Problem 2: What about the status of this Black group?

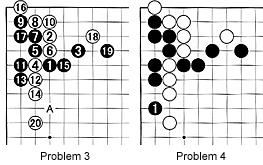
Problem 3: This is part of a joseki (standard corner exchange). White 20 can also be played at A. What do these moves threaten and how?
Problem 4: Based on the preceding problem, how should White respond to black 1?

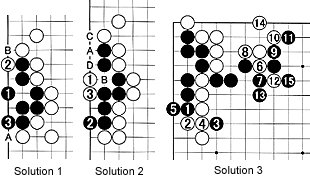
Solution 1: If Black moves first he can live, but White can kill the black group if he moves first. Black 1 is the only way to live. White 2 and black 3 are miai--if White plays at 2, then black plays at 3, and vice versa. Note: A white stone at either A or B would be fatal for the black group. To kill, White could play at 1, 2 or 3, or even at A or B depending on the surrounding stones.

Solution 2: The result also depends on who moves first. White can kill the black group by playing at 1. Black 2 enlarges the total eye space, but white 3 is fatal. If Black were to play first, he could live by playing at 1 or 2 as his first move. If White counters at 1 after Black moves at 2, the sequence black 3, white A, black B, white C and black D would follow, leading to the capture of a white stone and the creation of two eyes.
Solution 3: Again, everything depends on who moves first. As can be seen in the previous two situations, Black needs to play at 1 and 5 to live. After that, White plays on the upper side to ensure life for his stones in that area. Note: White needs white 20 or A in Problem 3 to be able to play 2 (otherwise he would be cut at 4).
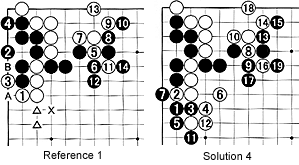
Reference 1: Of course, it is possible for White to play at 1 immediately. If the same moves follow on the upper side, this would be the result. The black upper left corner is one point smaller, and White still has the exchange white A, black B in reserve. So isn't this better for White? No, because White has no stones at the triangular spots, while Black has none at the spot marked X. For Black, it does not matter much, but for White it is terrible. His stones are now very close to Black's center thickness, and he has less of a chance of making an eye shape, thus demonstrating the reason why the joseki is followed in Solution 3.

Solution 4: In response to black 1, White needs to play at 2, which will be followed by a battle for supremacy. The moves to 7 seem forced, but after that there are several possibilities. This diagram shows just one example and the battle has not yet ended.
White must be careful not to connect at 3 instead of 2, thinking to avoid a fight. That would make the black group on the left side unconditionally alive--try this out on a real go board--and Black would be able to play on the upper edge first.
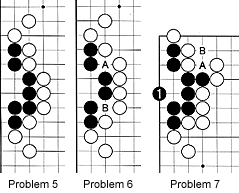
Problem 5: Here is your basic two-space notcher. What is the status of the Black group?
Problem 6: This is a similar problem, except that White does not have a stone at A or B. What is the status of this Black group?
Problem 7: Isn't black 1 a mistake (see Reference 2)? And what happens if Black exchanges A for white B?

Solution 5: Black can live if he plays first, while a White move first can kill the black group. Black 1 is correct and in response to white 2, black should play at 3.
Reference 2: Black 1 is wrong because white 2, 4 and 6 will kill the white group.
Reference 3: After black 1 and white 2, Black 3 is also wrong. White 4, 6 and 8 kill the group. Black cannot play 7 at 8 because White will capture four stones.

Solution 6: Black can either play at 1 or at A. White 2 must be answered with 3.
Reference 4: For Black, it is even possible to play at 1. White 2 is the strongest counter, but in the sequence to 9, Black lives by the skin of his teeth. As a matter of fact, he gets much more territory than in Solution 6, but that is only because White should have played differently.
Solution 7: Black 1 works because of the intricacies of the corner. So, after white 2, Black can play at 3. If white plays at 4, black 5 ensures life. Note that if Black had exchanged A for B, he would not have been able to play at 7 in response to white 6, because of a shortage of liberties.
