Middle of three stones
Our theme this week is playing in the middle of three stones, as this is a vital spot.
Diagram 1 :
We looked at this shape a few weeks ago and categorized it as a variation of the mouth shape, with black 1 (as well as a white move here) constituting the vital point. However, it is more than just a variation of the mouth shape, it is also a variation of a different shape, namely the middle of three stones. Where are those three stones ?

Diagram 2 :
The three stones come into existence when white plays at 2. Now this is a pillar of three stones enclosed on three sides by black stones. What is so bad about this particular shape ? The remarkable lack of liberties. For example, if White plays at 4, black 5 follows. White 6 may seem severe, but in fact, White's stones are captured by black 7. White can take black 5, but then he will be caught immediately in a snapback (as Black can recapture four stones by playing again at 5).
Diagram 3 :
Diagram 1 and this diagram are very similar. You might go so far as to say that black 1 in Diagram 1 constitutes the middle of three stones, even though that third stone has not been played, and will probably never be played, by White.
Diagram 4 :
The black stones are in trouble because of an acute shortage of liberties (damezumari) caused by the two marked white stones-this is called hane at the head of three stones. Of the other three white stones, not all need to be present to get Black into trouble and to make A the vital point. Black should, of course, try to prevent this situation from occurring in the first place.

Problem 1 :
Black needs to escape with his three stones and plays at 1. White tries to trick Black by playing 2 and 4. How should Black respond? Notice black A will be punished with a White cut at B.
Diagram 5 :
At this point, we also have to explain the empty triangle shown here. The reason we call it empty is because there is no white stone at the marked spot. Although some amateurs think nothing of playing this move, pros have a strong dislike for its very appearance. True, there may be instances where it is "correct," but in general, one of the three stones shown was played on the wrong spot, because the one in the middle does not need to be present for connection.
Diagram 6 :
When there is a white stone present in this shape, we don't call it an empty triangle. This shape is good because all of the black stones (including the one in the middle) need to be there to make a connection.
Problem 2 :
Let's look again at Problem 1 at the moment Black plays 1. White can now force Black into an empty triangle. How ?

Solution 1 :
Black 1 is the vital point. If you imagine a stone at the marked spot, it is easy to see black 1 is in the middle of three stones. Next, note black 7, again in the middle of three stones.
Solution 2 :
After Black plays the marked stone, the combination of first exchanging white 1 for black 2, then pushing at 3, puts the marked white stone on the vital point. Whether this gives White a good result overall is another question, but at least he has forced Black into making a bad shape with 4. In itself, this constitutes an aesthetic victory.

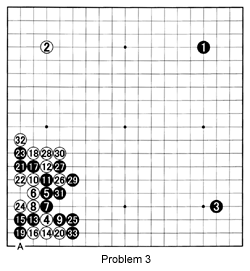
Problem 3 :
This is the final game of the 6th Samsung World Open title match between Cho Hoon Hyun, the founding father of modern go in South Korea and the teacher of Lee Chang Ho and many other young talents, and Chang Hao (white) from China. The moves to 33 follow naturally, after White plays the relatively new move at 26. Playing at A is very big, but there is an even better move. Where should White play next ?
Solution 3 :
White 1 is correct. By playing at 2, Black grabs 20 points, but white 1 is more important. Why ? See References 1 and 2.
Reference 1 :
If White takes the 20 points, Black 2 and 4 will build up a domineering center position. Incidentally, black 1 is at the head of a pillar of three stones (the four marked stones) which severely restricts White's freedom there. For example, Black can play at A later, and White can't resist with B, because of the sequence black C, white D, black E.

Reference 2 :
The marked white stone has another meaning. If Black later cuts, he can only do so by playing at 1, followed by white 2, black 3. In the first place, this would make an empty triangle (the marked black stones plus black 1) and in the second place, black 3 would be on the head of four stones now.
Notice Black can't cut at 2 instead of 1, because White would cut at 1, putting the marked black stone on the left in atari. Black would have to connect, giving him an even worse shape.

Problem 4 :
Resuming the game, a fight breaks out in the upper part of the board. Black is not without eyes, but white 18 limits Black's freedom. Where should he play next ? This is a difficult problem, but if you use what you have learned about shapes, you should find the answer.
Solution 4 :
Black 1 is the correct move because it is the vital point of the pillar of three white stones.
