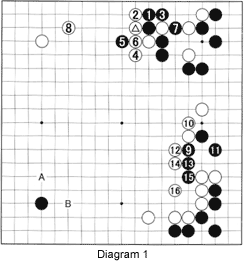
 Diagram 1: The marked white stone was the sealed move on the first day and black 1, the first move on the match's second day, was forced. White had a choice of moves (see References 1 and 2), but white 2 and 4 were an unexpected surprise (see Reference 3). White 4 in particular is highly uncommon for a top pro. The official game commentator went so far as to say that, if he had seen the same move in a game between amateurs, he would have wanted to stop watching. In general, White's play up to 8 was badly received by commentators.
On top of that, black 9 aims at containing White's influence. But after white 16, Black appears to be in danger. How should Black continue? Note that Black has a strong position in the upper right. We will discuss the third part of the game next week.

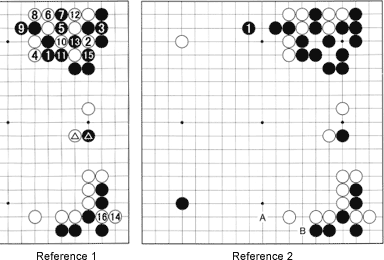
Reference 1: After black 1, White could have played atari at 2, then pushed up with 4. Black needs to respond by cutting with 5 and 7 and moving out with 9. White 10, in combination with 12, is a tricky way to build a ko. Black has no choice but to accept it with 11 and 13. White 14 is a strong ko threat, but black 15 ignores it and finishes the ko. White in turn captures the lower right corner by cutting with 16. During the game, Yoda thought the exchange of the marked stones was an attempt to create ko threats.
Reference 2: This is what the board looks like after the ko fight. Black needs to add a move at 1, and he can look forward to playing A in sente. White has to answer around B. Black ends up with both more thickness and more secure territory.
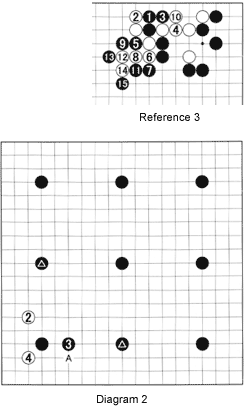
 Reference 3: The moves from 2 through 10 are a tesuji combination, but so are the moves black 5 through 9. The result is decided by the ladder Black starts with 7, 9 and 11. In the game, the ladder is bad for White, meaning White cannot play the combination 2 and 4. Instead, he could have played a ladder block at A in Diagram 1. Black will have to answer in the upper right corner, giving White an extra move to make a double approach at B. The result is reasonable for both players.
Handicap go
Now let's go back to exploring handicap go. We have discussed some rules by which Black player should play--some concerned strategy, others were about mind-set. Among the latter is a rule that says it is best to think of the corners as White's territory, even though Black has taken some or all star points. Today, we will talk about several invasions White can mount and how Black should respond.
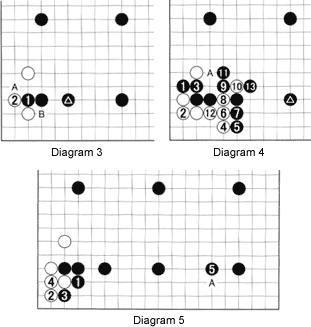
Diagram 2: The handicap stones are counted as move 1, so White's first move becomes 2. The kakari (approach) of white 2 is a standard move. Black 3 is one of a variety of standard responses,a nd, with the marked stones in place, that should be your first instinct. The reason is that with a nine-stone handicap, Black does not usually want to be confronted with a double kakari which would lock up the corner stone. However, neither black 3 nor a move at A will prevent a white corner invasion. White's move at 4 guarantees life in the corner, but this does not necessarily give Black a bad result. How should Black respond?
 Diagram 3: With the marked stone in place, Black should definitely play at 1. White 2 will almost certainly follow. At this point, Black has two choices, A and B. In general, Black should choose A, but if the lower side (below the marked stone) is considered important, it might be better to play at B. Try to envisage the follow-up for both sides.
Diagram 4: After black 1, the moves white 2, black 3 and white 4 are a joseki. Black can now either strengthen his position by playing at A (if there is a white stone instead of or around the marked stone) or alternatively seal White in the corner by attaching at 5. The moves to 9 follow. White will normally connect at 12, but sometimes he throws in the cut at 10. In this case, Black has the marked stone in place, so he has nothing to fear from the cut and answers with 11. White has to play at 12 to make his corner alive. Black can now capture white 10 by setting up a ladder with 13.
Diagram 5: If the lower side is important to him, Black can also block at 1. White 2 is a good move, inviting black 3. After white 4, Black can switch to a large point elsewhere, like 5 or A.
So an early White invasion is nothing to be scared of. White will make some corner points, but Black will build overwhelming center influence. Next week, we will look at some variations, when Black answers white 2 in Diagram 2 with A.
