This is the sixth and final game in the Kisei title match between defender O Rissei (Black) and challenger Ryu Shikun. At our starting point this week, Ryu finds a good combination that has everything to do with pattern recognition at the highest level-molding a shape to match a famous tesuji (locally clever move) and taking the lead in Diagram 1, only to lose it again in Diagram 2-and finally make a crucial mistake and lose the game in Diagram 3.
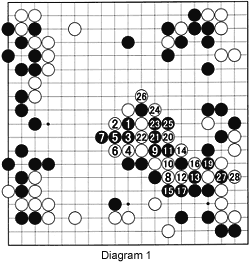
Diagram 1 :
(White plays 18 in between 12 and 14.) The first 89 moves were covered in the previous two columns. Black 1 was the last move given last week, and it was also used for Problem 3 in that column. Moves 2 through 6 form the solution. White 2 is the instigator, encouraging black 3, after which White can drive a pole through Black's position with 4 and 6 in sente (taking the initiative), followed by a severe cut with 8. Compare this to References 1 through 3.
There are several alternatives to the sequence that follows, but once White plays 12 and 14, Black has no choice but to bottle up several stones (the stones around white 8). In the meanwhile, White breaks into the center and gains massive influence in this area, which once was Black's sphere of influence.
Reference 1 :
Black 1 is the move that started it all. If White plays a hane (diagonal play around an opponent's stone) with 2, Black's cut at 3 will be severe. White can try to save this stone with the sequence to 8, but black 9 through 13 put these stones in acute danger of dying.
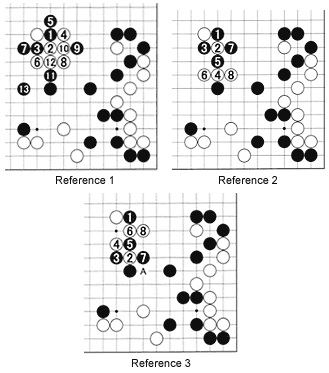
Reference 2 :
After Black's cut at 3, white 4 is a tesuji, but the situation is already beyond recovery. White is able to push through with 6 and 8, if Black plays at 7. This is still not a really good result for White, as Black can easily lay waste to the lower side. However, instead of 7, Black might play at 8, which makes it even worse for White.
Reference 3 :
When Black answers with 3 in response to 2, White can then play at 4. If Black insists in cutting White with 5 and 7, White pushes his way through Black's center. These stones are virtually immune to attack, while the black ponnuki (capture of one stone with the minimum number of stones, four, as in the four stones capturing white 2) does not affect White's lower side much.
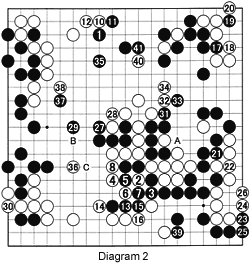
Diagram 2 :
(Black plays 9 at 2) Black played at 1 to gain territory, although a move at A is honte (proper move, removing all bad aji). White immediately seizes the chance to force the sequence 2 through 9, to build even more center thickness. At this moment, White could have solidified his lead by stopping four black stones in the center by playing at B. After white 12, Black keeps sente throughout 26, then saves his center group with 27 and 29. Still, the game favors White. White spends a move to eliminate the aji (potential) in the corner-see Problem 1. Black next had a chance to take the lead by playing 35 at C, worth about six points in reverse sente (it is gote for Black but sente for White).
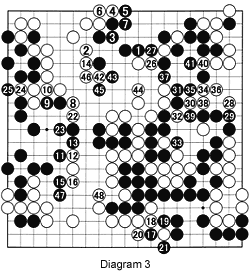
Diagram 3 :
Instead of 8, White should have played at 11, nibbling away at Black's territory while threatening to cut around 23. This would give White a certain victory. Upon seeing 8, Black seized the opportunity to stop the hole with 9 and 11. White 14 is another mistake, as it enables Black to exchange 15 for 16 (worth two points in sente). At this moment, the game is dead even. Any mistake by either side would be fatal. It is then that White, severely handicapped by lack of time, plays at 30, miscalculating his ability to dive into Black's territory here. In the sequence to 37, he loses about five points. Black, on the other hand, takes no risks and securely plays the endgame to win the game and the title by 2.5 points.
Solutions to last week's problems
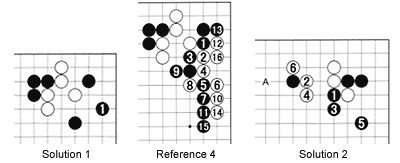
Solution 1 :Black 1 is the right move to connect in this shape.
Reference 4 :
On the premise that Black can't capture white 8 in a ladder, and Black has to compromise with 9, White can immediately start cutting with 2 and 4. Next, after exchanging 6 for 7, cutting at 8 is a tesuji if the ladder is good, ensuring that White can push once more with 10, before playing 12, 14 and 16 to stay alive, while capturing the corner. Even if the ladder is unfavorable, and White can't cut with 8, the threat of white 2 is imminent.
Solution 2 :
When Black cuts with 1, white 2 is the correct answer. The sequence to 6 is a joseki (standard corner exchange), and 1 is the right move to connect in this shape.
Reference 5 :
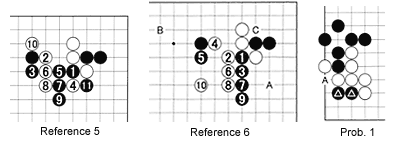
If Black foolhardily insists with 3, White deploys the tesuji 4 through 8, then drops back to 10. Black now has to add a move at 11. This is also a joseki, with the advantage being more thickness for Black, but the drawback is that he ends up in gote (plays the last move in the sequence and loses the initiative).
Reference 6 :
First playing atari at 2, then playing at 4 lacks style. Black can now extend to 5, and White has no choice but to push with 6 and 8, giving Black territory on the fifth line, a recipe for a sure loss. After white 10, Black doesn't need to reinforce at A anymore, and is free to play at B or C.
Problem 1 :
In the game, White played 30 in Diagram 2. Why was this move necessary? In other words, if it is Black's turn, how can he stir up trouble in this seemingly secure corner ?
