Get an eye for shape
Last week, we looked at the mouth shape (Diagram 1) and its variable (Diagram 2).
Diagram 1 :
The mouth shape is strong and makes a good eye shape, but it lacks dynamics.
Diagrams 2 and 2A :
A combination of the bamboo shape (see Diagram 3) and the mouth shape is more flexible as it can take on either appearance. Add a stone at A to make a bamboo joint, or at B to make the mouth shape.
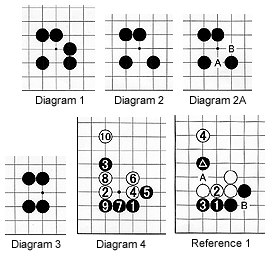
Diagram 3 :
The bamboo joint makes a strong connection, but may slow things up.
Diagram 4 :
This sequence is a joseki, meaning the results are about even. Notice the way White makes a bamboo joint.
Reference 1 :
When Black plays at 1 (7 in Diagram 4), White shouldn't play at 2. This would make an empty triangle-a bad shape. A move at A, instead of 2, puts more pressure on the marked stone. If White could cut at B, after white 2 and black 3, there would be some justification for playing at 2, but that's not possible here. In other words, when comparing moves at white 2 or white A, white A has the same advantages as 2 and none of the disadvantages.
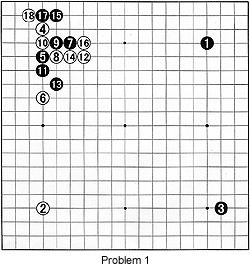
Problem 1 :
This is the second game of the International Tengen 2000 title match between two titleholders-Lee Chang Ho (South Korea) and Chang Hao (China), in which they created a new joseki in the upper left corner. After white 18, Black needs to defend his stones somehow. Which move should he make to ensure shape ?
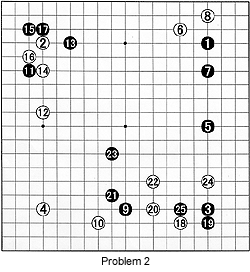
Problem 2 :
This is a game played in the first round of the 2000 Ing Tournament, the so-called Olympic title with a winner's purse of $400,000. Keeping our lessons on mouth shape in mind, where should White play his next few moves after black 25 ?
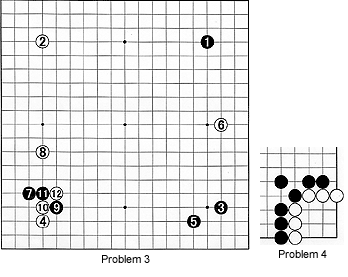
Problem 3 :
Here is the beginning of the game in which 17-year-old Kong Jie (Black) defeated the Meijin Yoda Norimoto in the playoff for third place in the 2000 Chunlan Cup. A few weeks ago, we looked at a similar problem. Do you remember the solution and the rationale behind it? Where should Black play next ?
Problem 4 :
If you can't find the answer to the first three problems, this one should be easier. How can Black kill White ?
Solution 1 :
Black 1 makes the correct shape for Problem 1. Playing at 3 instead seems possible, but then White will exchange 4 for 5, and attach at 1. Another alternative might seem to be 2, but again White will exchange 4 for 5, then hit the vital point by playing at 1.
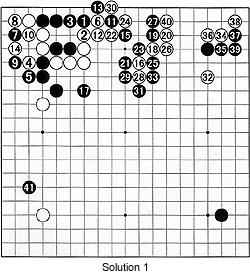
The sequence to 16 gives an even result, but black 17 was overdoing things. He should have defended at 20 instead. White 32 and black 33 are both bad moves. In the end, White gets good results up to 40.
Solution 2 :
In response to black 1 (black 25 in Problem 2), white 2 makes the beginning of good shape-in general ikken-tobi (one-space jump) is a good shape anyway, and one of the reasons is found here. When Black cuts off one white stone with 3, white 4 is just right. After White has built this shape, the marked black stones become weak, and in the end they die a natural death. Also notice in the moves following black 9 that Black cannot capture white 12 in a ladder, because the marked white stone is a ladder-breaker. White easily wins this game.
Solution 3 :
Only the left side of the board is shown for Problem 3 because the moves to 28 are all played in that area. Black 1 is the correct answer-this is a famous tesuji. White cannot resist and needs to defend at 2. Still, after black 3, White vigorously attacks by rendering the black group eyeless with 4 and 6. Black fights back with 7 and 9, but with the combination 16 through 24, White gains a dominant center position, even though Black manages to take the upper left corner.
Solution 4 :
Black 1 is the correct move for Problem 4. Notice that no matter what White does, he will have liberty problems (damezumari).
Solution 4A :
In this variation, the comments above also apply here.

