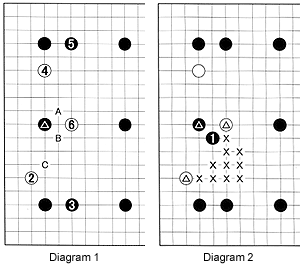
 Diagram 1: For the past few weeks we have studied Diagram 1, a nine-stone handicap game, and established that Black can either sacrifice the marked stone or try to keep it alive. But he should not concentrate only on the marked stone, as this would jeopardize stones nearby, and he must not be half-hearted whatever he decides to do.
Last week, we looked at what would happen to the marked stone if Black played at A to split white 4 and 6.
Now let's split white 2 and 6 by playing at B. This looks easier, because the space between the two white stones is greater than that between 4 and 6. However, there are plenty of pitfalls.
Diagram 2: After Black splits the two marked white stones, White will often try to surround the black stones by somehow establishing a link between these stones. Usually, he will do that by following a strategy that places two stones at or near the marked spots. But if White plays at one of these spots right away, Black will naturally run away, while keeping White separated. Therefore, White will usually use other tactics.
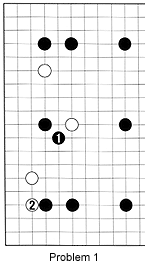 Problem 1: Keeping in mind White's real aim as outlined above, how should Black respond to white 2?
Solution 1: Black's marked stones are not really weak, but for reasons you might not expect. It is not because there is a lot of space around them or because the white stones are relatively far away. There are actually three reasons:
1. Black's stones nearby are strong, so they will incur little collateral damage if Black suddenly needs to help his marked stones. This is a strategic consideration.
2. White's stones are split and weak. This is also a strategic consideration.
3. White has not yet managed to connect his stones in a straight line so Black's stones are safe for the moment.
Black needs to stop White from getting into the corner (see reasons 1 and 2). The corner is the place where both parties can most easily establish a base, so putting up a fight in that area is vital. Probably the single most important way to gain a base in the corner is to occupy the three-three point, also called san-san. That is the reason Black blocks at 1. Black 3 may not be the severest move, but it leaves behind no weaknesses (reason 1).
 Reference 1: Black 1 and 3 are bad moves. They do the job of connecting, but ignore reasons 1 and 2. White moves into the corner with 2 and establishes a firm base with the moves up to 6. Black is almost forced to react up to 7, after which White can switch to 8 to salvage his marked stones.
Problem 2: This is a follow-up to Solution 1. After black 3, white 4 seems a good move. Black 5 now looks natural, but after white 6, Black is completely hemmed in. Something went wrong somewhere. But when and where?
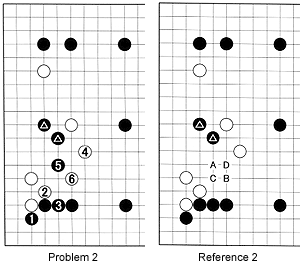 Reference 2: Before looking at the solution, check out reason 3 once more. Black should stay outside any possible connection White's stones can make, while more or less staying connected to the marked stones. So if Black plays at A, then White plays at B, and if Black plays at B, White plays at A. Either way, Black gets cut off. The alternatives are C and D. What happens after that?
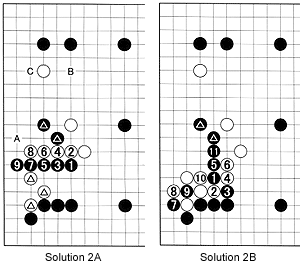 Solution 2A: Stay flexible! Black has to move just beyond the line between White's surrounding groups. This is a recurring theme in go. Other descriptions that fit the bill are "stick your head out," "move beyond your opponent" and "stay ahead." That is the reason Black should play at 1. If White tries to cut with 2, Black plays at 3. White can cut off the marked stones to 8, but in exchange, Black engulfs the marked white stones. After black 9, the marked white stones are dead, but the marked black stones still have some life in them. Black can still connect underneath with A, and even if White prevents that, Black can sacrifice his marked stones with B and/or C. In short, this is a profitable trade for Black.
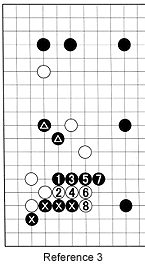 Reference 3: Black C in Reference 2 is also good. But only if you are willing to block at 4 after white 4. If Black yields and allows White to drive between his positions as shown in the sequence to 6, Black sets himself up for failure. After white 8, his cross-marked stones are in trouble. Even if they don't die, they will cause damage to stones nearby.
Solution 2B: Black 1 is good, too. But Black should be prepared to block at 3 after white 2. And after white 4, Black has to fight. The moves to 11 are one example. After white 10, the life of the white group depends on the outcome of the ko Black starts with 7 and 9. This is a dangerous fight for White, while Black only needs to break through White's surrounding stones. He can do that by aggressively pressing the ko threats. However, Black cannot avoid battling it out once he plays at 1. If you are not comfortable with this, try Solution 2A.
Next week, we will look at what happens when Black plays at C in Diagram 1. This will initiate a great fight.
