
During the Edo period (1603-1868) this system was not in place yet and it was quite obvious that Black won far more than 50 percent of the games. This compensation, called komi, was introduced by the Nihon Kiin to make go fairer and more exciting. In go, the final score consists of your territory plus the number of stones you have captured plus the komi, if there is any. Although the komi used to be 4.5 points, these days it is usually 5.5 points, and there are even some tournaments where the players bid for the komi. The highest bidder gets to play black, but has to give a high komi. It seems, though, that in this tournament the average winning bid is around 6.5 points, the perceived value of playing black. The half point is significant, as you will see in the game below, which results in a half point win for Ryu Shikun.
Kisei Title
This is the second game in the best of seven Kisei title match between current title holder O Rissei (Black) and Ryu Shikun (White). Although O is generally expected to defend his title, and in fact won the first match, Ryu is a dangerous player with a strong will to win.
Diagram 1 :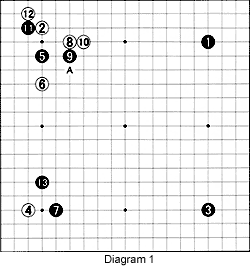
Approaching at 5 is rare. Usually Black would play at 7. See References 1 and 2. In response to white 6, playing tenuki (elsewhere) is uncommon. Usually Black jumps out to 9. Playing at 7 indicates Black wants a quick development. Even though the exchange black 9 for white 10 is disadvantageous for Black, it is necessary to prevent being locked up with a white move at A. The exchange of black 11 for white 12 is a high-level play, see Reference 3. Black 13 is the only move, as it works as a preemptive strike against any advantage White may gain in the upper left corner. Another way of looking at it is by once again having a look at references 1 and 2-in a way black 13 takes away any support white 4 might be giving to white 6. It also cuts the imaginary connection between these two white stones.
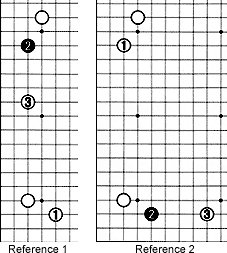
Reference 1 :
If White has the choice of making a shimari (corner enclosure) at 1 or at 2, he would always choose 1, because if Black next plays at 2, white 3 would be ideal, as it both pincers black 2 and is an extension from the shimari below. This is in contrast to Reference 2.
Reference 2 :
If White makes the shimari at 1 and Black approaches at 2, White's pincer at 3 is just that-it pincers, preventing Black from making a base there. However, on the lower right there is a black stone, so white 3 is not also an extension, making the shimari in this diagram inferior to the one in Diagram 1.
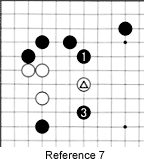
If the more desirable shimari for White is the one in Reference 1, it follows logically that Black should prevent this shimari first.
Reference 3 :
For Black, what is the benefit of the exchange of the marked stones? Usually it is used to enable defending with a bamboo connection (with double stones connecting each other) instead of just connecting the original three black stones as a stick. This is more effective in most cases.
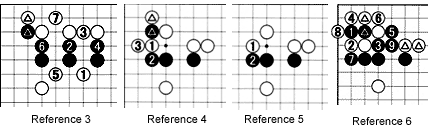
Reference 4 :
In this game, the situation is slightly different, but Black made the exchange of the marked stones anyway. White can capture the marked black stone with 1 whenever he wants to. However, after black 2, he almost has to spend an extra stone at 3, which wouldn't be the case without the exchange.
Reference 5 :
Without the exchange of the marked stones in the previous reference diagrams, White can play at 1 and black would be gote (White doesn't need to answer). Compared to Reference 4, White gets a complete move. So the question is, why does White need to respond at 3 in Reference 4 ?
Reference 6 :
If White omits the last move in Reference 4 and plays elsewhere, Black can play at 1. If White next cuts at 2, Black can, for example, cut at 3. In the end, the two marked white stones get cut off.
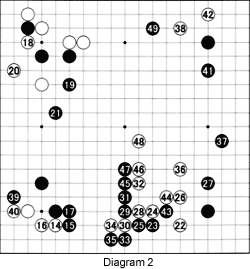 Diagram 2 :
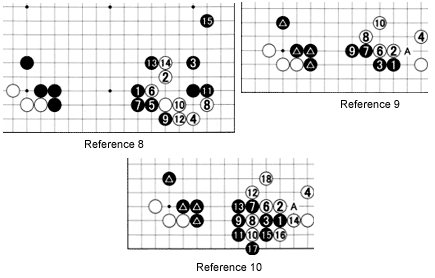
By exchanging white 14 through black 17, White gains life in the corner in exchange for outside influence by Black. Also, White gets sente to attack the black stones in the upper left corner. Ryu took more than 50 minutes to play 18. Other pros had predicted a move at 19. That move certainly is a strong attack, and it is the vital point (Reference 7), but 18 takes profit. Of course, Black then plays at 19. White 20 prevents Black from playing as in Reference 4. However, black 21 is an excellent move. Almost all of his stones are now on the outside, while White's stones are all close to the edge (on the 2nd, 3rd or 4th line) only. White 22 is the most normal move. He wants to find out Black's stance in this area before moving to the upper or right side. Backed by his stones on the left side, black 23 seems a reasonable pincer, although Masaki Takemiya, the NHK commentator, preferred playing at 24, because after 23, White would be able to easily build a position in the center, as he does in the game. See Reference 8. For amateurs, white 30 seems curious-Why give away an extra stone (or even two, as in the game) ?
Reference 7 :
After White plays the marked stone, black 1 is a vital point-it is one space removed from the marked stone. If White ignores this move, then black 3 is severe. Moves like these that attack the stones sideways-one space removed from the stone that jumps into the center (the marked stone)-are called the ears of a stone. So 'grabbing your opponent by the ears' is usually a severe attack.
Reference 8 :
After black 1, the moves to 15 are possible. Black keeps more outside influence, but he loses profit in the lower right corner. O likes profit, while Takemiya has a center-oriented style.
Reference 9 :
On the other hand, after black 7, White cut and lost two stones as in the game. Was there no other way? What about the moves to 10 in this diagram? Aren't Black's stones too close to the marked stones now ? True, White gets an outside position but he still has a weakness at A.
Reference 10 :
Basically, this is the same diagram, but White sacrifices two stones, 8 and 10, to gain 14 and 16. He no longer has a weakness at A. This is the result White was hoping for.
With 10 Reference diagrams, the commentary is very extensive, but it demonstrates only a fraction of what the players might have been thinking.