
It can be concluded that Ryu's mistake in the fifth game-assuming the game had ended-cost him 42 million yen. One can only hope that future victories will be earned by good play, and not by decisions based on ambiguous rules.
O Rissei keeps Kisei title
Following is the sixth and final game in the best-of-seven Kisei title match. O Rissei plays black.
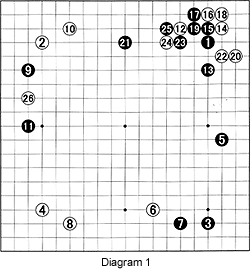
Diagram 1 :
The moves through 8 form the latest development in the low Chinese fuseki (opening), the same opening used in the first game of the series, which was played in London. Ironically, in that game O played the white stones and Ryu initiated the fuseki. In that game, Ryu played his next move at 10. But in this game, O decides he doesn't want to make just one big moyo-he would rather split up the left side. This is why he used his next moves to make a base in this area with 9 and 11. After the exchange 12 for 13, White has a number of choices, such as extending on the upper side or on the left side. However, he opts to invade Black's upper right corner. Rather than just playing the best move, it seems that White's strategy is to grab territory first and fight later. Ryu may be attempting to use O's own style against him, as O is well-known for exactly this kind of play.
The moves to 21 are obvious. White 22 is an interesting move, since it prevents Variation 1. White 24 was played as yosu-miru (a move that tests the opponents plans). At this point, Black has little choice but to play at black 25. White 26 is the first really challenging move in this game. How would you answer ?
Variation 1 :
If White plays tenuki (elsewhere), Black will strike at 1 to lock White up in the corner in the sequence to 5. White can cut in sente (free to play elsewhere) with 6, but eventually he has to come back and defend with 8. After black 9, White can escape in the center, but even after white 14, he is still in danger from attacks at A or B. Later on, Black can also play at C, forcing white D, followed by black E and white F. In other words, the corner territory is small, while Black dominates the center.
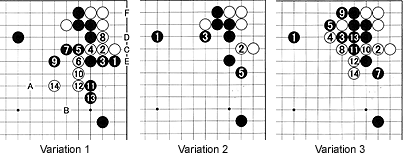
Variation 2 :
Just by exchanging white 2 for 3, White can play tenuki (white 4, not shown), allowing himself to be locked in. However, black 5 has no effect on the corner.
Variation 3 :
In the game, White also exchanged 4 for 5, which invalidates Variation 2. If Black insists on locking White in with 7, the moves through 14 ensure White gets center influence, while black 7 and company become largely meaningless.
Solution to last week's problem
Solution 1 :White's best move is the clamp at 1, threatening to connect in two places (see Reference 1). Black's best response is at 2. White can't connect at 4, because Black will prevent White's connection in sente, while keeping his turn and defending on the inside. Therefore, White needs to block with 3, making it ko (repeatedly fighting for one stone). If Black loses the ko, he loses the entire corner, but if White loses the ko, he loses only a few stones. The ko is not a free one for White, but Black has much more at stake. The threat of this ko is like Damocles' sword, and Black should defend the corner before White strikes at 1.
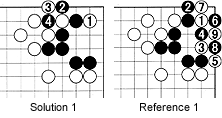
Reference 1 :
What happens if Black just extends to 2? In that case, White plays 3, which Black needs to answer at 4, allowing White to connect underneath with 5. Through the clever combination of 6 and 8, Black can still make it ko, but this ko is even more one-sided than the one in Solution 1. Also, unlike the other ko, in this one, White is the first to take the ko, meaning Black is that much closer to collapse.
Solution 2 :
Black 1 makes the correct shape. White 2 might be the most challenging move in this shape, but black 3 through 7 save the situation. Later on, White can play A, followed by black B, white C, black D, white E and black F. The real danger lies in White playing at C before attaching at 2. There is no standard reply, so there is a case-by-case solution.
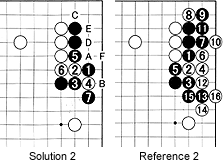
Reference 2 :
Black 1 seems to work, but after white 2 and 4, Black will be split into two, as shown by the ensuing moves. Depending on the surrounding stones, this result is not necessarily bad for Black, but he still needs to spend a move capturing at white 8 in order to keep his corner alive. This means White can take the initiative in the center.
Reference 3 :
The moves through 5 are a joseki (standard corner exchange). Later on, White can probe at 6. Black then either pulls back at 10 or stretches to 7. In the latter play, white 8 and 10 are a tesuji (locally clever move), which Black has to answer with 9 through 13. How this result should be evaluated overall depends on the surrounding stones.
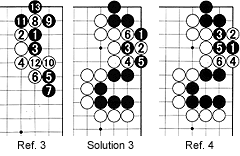
Solution 3 :
Black 1 (or at 5) is the correct answer. White can try to split with 2 through 6, but after that it is Black's turn, so he will use his seventh stone to connect at 2.
Reference 4 :
Black 1 leads to failure. This move is exactly in between, but doesn't do the job of connecting. White can start his next move at 2, or he can start at 4 to split. In this case, starting at 2 will cut off the larger area (the lower part of Black's groups).
Solution 4 :
Black 1 and 3 are a clever tesuji. Although it doesn't connect all stones, most of Black's stones are connected this way. Once you understand this tesuji, you can think of other possibilities, for example playing 7 first before playing 1 and 3. Black 7 first would threaten connecting with 9 or with the 1 and 3 combination. That would achieve an even better result. The main thing, though, is to remember the black 1 and 3 combination.
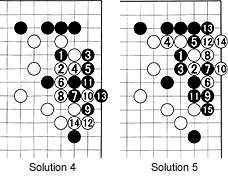
Reference 5 :
If White resists with 2, black 3 to 11 cut White. Next, White needs to live in gote (a move not requiring an answer), allowing Black to connect with 15.
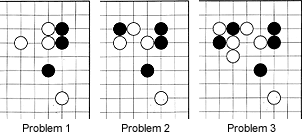
New Problems
Problems 1-3 :In each problem, it is Black's turn, and his task is to connect his stones in the best way. Usually there is more than one possibility. Sometimes, depending on other stones, the best move may change. The main idea of these problems is to think about the various possibilities, not just find one solution.
Problem 4 :
Look at Diagram 1. White has just invaded at 26. Find at least three possibilities for dealing with this invasion, then try to find Black's best response.