The ponnuki

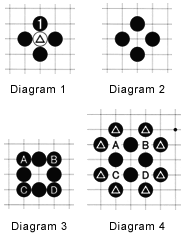
Diagram 1: A ponnuki is the shape that results as in this case, when Black cleanly captures one white stone (the marked one) by playing at 1.
Diagram 2: This is the end result after the completion of Black's move. This is an effective shape, usually valued at around 30 points, a good value because Black has effectively played three moves (one White move against Black's four moves)--or 10 points per move. The reason the ponnuki is worth this much is because of the influence it exerts in every direction. In addition, it has good eye shape. The space the white stone occupied will provide an eye in most cases.
Diagram 3: The effectiveness of the ponnuki is heavily influenced by stones in the neighborhood, white or black. For example, stones A through D increase Black's influence (also called thickness) only slightly, and none of them improves eye-shape.
Diagram 4: As you can see here, Black improves his eye-shape if he plays any of the marked moves. These moves increase his thickness. Thickness is usually defined as a combination of influence and an abundance of eye-shape, with a minimum of double eyes. Looking at this shape, it should be easy to see that any black stones at A through D (see preceding diagram) impair Black's eye-shape.

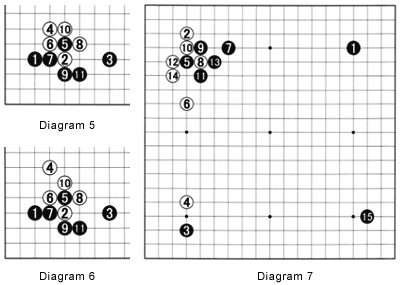
Diagram 5: The moves 1 to 7 are a joseki standard corner exchange. However, even if White can capture black 5 in a ladder, he shouldn't. The reason should be obvious--after Black 11, White has captured a stone, but this is not really a ponnuki shape as white 4 adds nothing to it. In the meantime, Black secures about 20 points in territory. For White, the worst thing is that his stones are still vulnerable to attack because of their imperfect eye-shape.
Diagram 6: The moves 1 through 11 are a joseki. Comparing this sequence with the one in the previous diagram, white 4 is the only move that is different. It may not look like a big deal, but after the explanation in Diagram 3 and 4, the difference is obvious: Eye-shape is the vital issue. White's stones are unlikely to ever come under attack.
Diagram 7: This is a game between Hashimoto Shoji (white) and Rin Kaiho. Black answered white 6 with the large knight's move of 7. The sequence then followed the moves in Diagram 6. After white 14, Black occupied the empty corner with 15. In spite of White's secure territory in the upper left, Black was satisfied with the result because his stone at 7 is working efficiently with his ponnuki to make a thick position that will give him the advantage on the upper edge, even exerting its influence to the right side.
In professional games, in shapes similar to the ponnuki, the issue of fights is often to make a ponnuki less effective. An example of this can be seen in Diagram 3, where the player making the ponnuki has to add one or more stones at A through D.

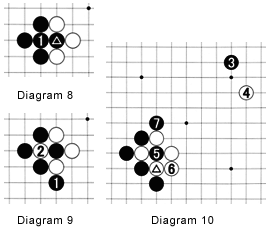
Diagram 8: Here is another shape you might recognize. If Black doesn't play 1 to save the marked stone, this is a ko. If he didn't know any better, Black might take some pride in having won the ko fight. But, with our newly acquired knowledge of ponnuki, we realize that black 1 is a very inefficient move. Black is filling in the one space that could have been his eye--taking away his own eye-shape.
Diagram 9: What about not connecting? The goal is not necessarily to make the ko bigger, so Black shouldn't try to cut. Black wants to make the ko bigger only if he wins it. He wants to make it smaller if White wins. Giving atari is a common technique in realizing that goal.
Diagram 10: Suppose Black is facing a lot of ko threats, and that black 3 is answered by white 4. Next, Black can capture at 5. This constitutes a grave threat, as Black is about to capture the marked stone as well, giving him, in effect, two ponnuki shapes. White has no ko threat large enough and so is forced to connect at 6. Next, Black can try the same by playing at 7.

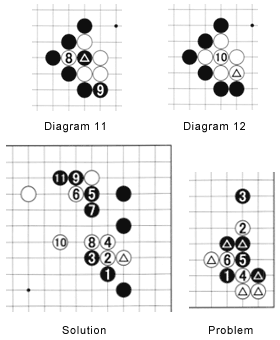
Diagram 11: White can recapture the marked stone with 8. Black 9 is another severe move.
Diagram 12: Sure, White can connect at 10 now and claim to have won the ko fight. But he has two problems. First, the marked stone is worthless, and second, by playing at 10, White fills in his own ponnuki.
The fight taking place in Diagrams 9 through 12 is one that has no simple solution. Every situation is unique, but the point is to try to maintain good shape (particularly eye-shape) while spoiling your opponent's eye-shape.
Solution to Aug. 10 problem
Black 1 and 3 steer White in the desired direction to set up a leaning attack with 5 through 7. White is unable to accept the challenge Black is posing by cutting at 9. And even if it looks lukewarm, White will have no choice but to play at 10, allowing Black to grab solid hold of the upper side.
New Problem
The moves 1 through 6 are the beginning of a joseki. The rest of the moves are given as triangles. Can you figure out the order through deduction? Be careful with the order of playing atari. If Black makes a mistake, what will happen?
