
Where there is a keima, there is a cut
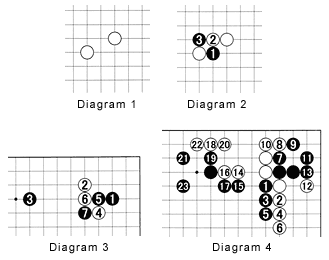
Diagram 1: The shape these two white stones make is called a keima (knight's move). It is often used in attack and defense as it is faster than the kosumi and more flexible than the one-space jump.
Diagram 2: The major problem with the keima is that there is always a cut. Depending on the surrounding stones, Black can cut with 1, followed by white 2 and black 3--this often leads to a heated battle.
Diagram 3: In this example, White plays the keima with 4. Black could play along the right edge (to the right of 4), but that would be too passive. Cutting through with 5 and 7 promises a good fight. Notice that once Black sets course to cut with 5, he must follow with 7.
Diagram 4: White has no choice but to play 2. Pushing with 3 and 5 next is a good strategy, after which Black should defend the corner with sequence 7 through 13. White now has a problem of breaking through to the center. If he wants to solve the problem by making eyes, he can, in the sequence to 23, but this gives Black a better result. There are a few alternatives for White, but we won't go into them now.
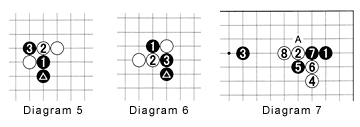
Diagram 5: The cut Black initiated with 5 in Diagram 4 is similar to the shape shown here. Black plays 1, White blocks with 2 and Black cuts with 3. This particular cut is played when the marked stone is in place. Let's call this cut type 1.
Diagram 6: So what do you do when the marked stone is one space to the right? In that case, Black would initiate the cut with 1, White cuts with 2, and Black finishes the cut with 3. Let's call this cut type 2.
Diagram 7: Here is an example of the type 2 cut. After white 4, black 5 and 7 constitute this type of cut. White could now play at A, but this would revert back to Diagram 3. White is probably better off extending to 8--again this will lead to a heated battle.

Diagram 8: This is a no-no--try to avoid this type of cut! In professional games, you will rarely see a mix of type 1 and type 2. If the marked stone is located as in type 2, Black will almost never initiate the cut shown here.
Diagram 9: Up to the previous diagram, everything is more or less common sense. What we see in this diagram, though, is a bit more flexibility when the cut in Diagram 6 leads to a bad result for White. Let's look at some examples from pro games.
Diagram 10: You might think that after Diagram 9, Black can just cut the marked white stone completely off from the other two white stones, but if Black tries to do so by playing at 1, White will next cut at 2, followed by black 3 and white 4, putting white in a good position to capture two black stones in a ladder. Allowing White to capture two stones is out of the question, therefore Black has to be more careful, and not just play on a gut feeling.
Problems
When solving problems, shape is important, but shape must be backed up by reading. It is best if you can solve the problems without hints, but if needed, Reference 1 and 2 serve as a guideline to what happens if you play the all-too-obvious move. The solutions to today's problems will be carried next week.
Problem 1: This is the game in which Yoshio Ishida (Black) took the Honinbo title away from Rin Kaiho in 1971 when he was 22 years old. How should White defend against black 3?
Problem 2: In the same series this situation appeared. Black 1 seems fair enough, but what about white 2? Can't it be cut easily? Or perhaps it is the other way round. If black is being cut, how should he defend against white 2?

Problem 3: Let's now have a look at this year's Honinbo title match, played by defender O Meien and Masao Kato--both veterans. The second game of the series was played on May 24 and 25. O (Black) has just captured the marked white stones, but in exchange White has two moyos, one on the left and one on the right. Black 1 seems to be the best move, because if it succeeds, it cuts off the three white stones above it. White 2 was probably a mistake, as Black can now fairly easily ensure life in the sequence to 15, if he captures with A (this makes two eyes, one where 8 was, and one at B)--but before committing himself, Black first probes (yosu-miru) with 19. If White cuts with C, black A follows. Next, if White doesn't do anything, Black will cut with D, aiming at E and F. So how should White respond to 19?
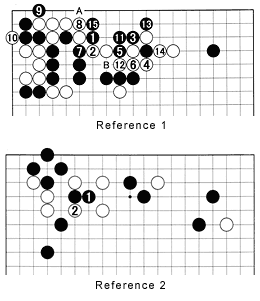
Reference 1: If White cuts with 1, Black will in turn cut with 3. Before the exchange black 1 for white 2, White has a perfect answer with 4, but after that exchange, things become complicated. In the sequence to 15, White needs to play both at A (otherwise Black plays there to capture the corner) and at B to save his two stones. In other words, White is in trouble because of the black 1-white 2 exchange.
Reference 2: Black 1 seems natural, but that way, in the moves through 9 (Black has to connect his three stones by playing 9 at A), White can now play at 10 and 12, putting pressure on Black's corner on the right. The white stones around 4 and 8 are not weak, and Black has a defect at A that White can aim at.