Professionals try to give their own stones perfect shape, while foiling their opponents attempts to do the same. If the objective of a particular fight is not immediately clear to an amateur's eye, the reason is usually because it is about shape.
Ponnuki

We have been discussing ponnuki for a few weeks now. First we established that ponnuki is a perfect shape(Diagram 1) depending on its location and the influence it exerts on its immediate surroundings. Then we discussed the different grades of ponnuki (Diagram 2), and that giving away one stone, leading to a perfect ponnuki, is usually not good, but if giving away a stone leads to an imperfect ponnuki, it can be a valid tactical maneuver.
Diagram 1: Assuming Black captured a white stone in the middle, this is the perfect ponnuki shape. It is a strong shape radiating influence in all directions, while the spot in the middle(where there used to be a white stone) serves as an eye. Depending on the location, the value of a ponnuki can be up to 30 points.
Diagram 2: The original stones are good, but stones A through D are redundant and make the ponnuki imperfect. Unless there's a different reason for them to be there, A through D decrease the effectiveness of the ponnuki shape. Stone E through F also make the ponnuki imperfect, but less so because they are farther away and their existence can be justified. But worst of all is the marked stone in the middle. This stone donesn't add any value--in fact it takes away value because it makes the black ponnuki eyeless.
Moves A through D and the marked stone are the Achille's heel of the black ponnuki.
Diagram 3: Any of the marked stones add to the strength of the original ponnuki(unmarked stones). For more information, refer to the last week's article.
 Now let's now see how pros apply this in games. At first I had trouble finding good examples, but then I remembered the greatest master of shapes: Go Seigen, maybe the greatest go talent of the 20th century, who doesn't play actively anymore, but continues to teach many of today's top pros. This exchange, in the upper right corner, is an excellent illustration of the concept of perfect and imperfect ponnuki shapes.
Diagram 4: This is a game played in 1941 between Go Seigen(White) and his main rival at the time, Minoru Kitami.Together they created the New Fuseki Movement. Many of the opening moves may look unfamiliar, but keep in mind that many moves and joseki that are "common sense" now were new and unfamiliar then. The first real fight starts when White plays at 48 and Black cuts with 49. After black 53, the focus stays on the aji of white 48--can he escape, and even if he can, should he? Threatening to activate white 48, White starts another fight with 54.

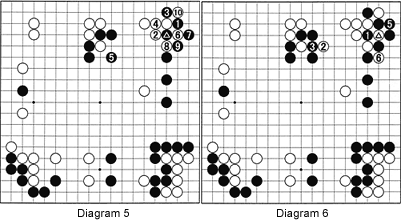
Diagram 5: After white 2, Black needs to defend at 5. But before he does so, he first forces the exchange black 3/white 4. After this exchange, he can give away the marked stone in the exchange that follows. White 6 and 8 capture a stone to make a ponnuki, albeit an imperfect one. Black 9 threatens to spoil White's (already imperfect) ponnuki shape. At this point, White should never connect. Instead, white 10 is a good move.
 Diagram 6(white 4 captures ko): Black 1 captures the ko. White 2 is a perfect ko threat. White 4 (where the marked stone is) recaptures black 1. Black has no choice but to conect at 5. White 6 is another hit at the Achille's heel of Black Shape.
Diagram 7 : Black 1 recaptures the ko, but again White uses the marked stone for a ko threat.
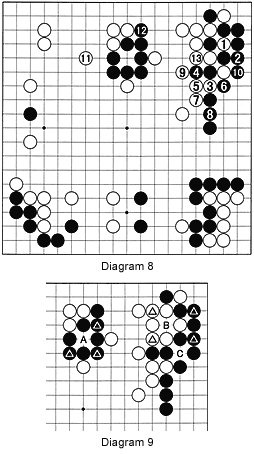
Diagram 8: White 1 recaptures the ko and, since Black has no ko threats, he is forced to connect at 2. White then breaks through Black's position on the right with 3 and 5. Black manages to capture another stone with 6 and 10, but his position on the right has become very low.
 Diagram 9: This is the final position in the upper right corner. As you see, three ponnuki were made, but only one perfect on (at C). All the marked stones are redundant, and forcing his opponent to add them(irrespective of whether this happened before or after the ponnuki itself) was a success. As you can see, Black has five marked stones to White's two. White lost two stones (A and C), white Black lost only one (at B). All in all, Black played six redundant moves, while White played only four. Seen in this light, it should come as no surprise that Go Seigen was the final victor in this game.
Solution to last week's problem
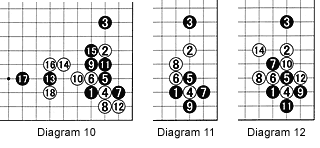
Diagram 10: The moves 1 through 12 are a joseki, while the move 13 through 18 are a common follow-up. Note the order of black 7 and black 9.
Diagram 11: Black 7 must not be answered by pulling back at 8. Black 9 makes a perfect ponnuki shape--Black is strong in the corner while White's stones are still floating.

