Yamashita's momentum?
When Yamashita lost the first three games in this best-of-seven series, he was considered finished. But he edged back into the match by winning the fourth game, and then scored a resounding victory in the fifth game. Let's have a look at the fifth game.

Diagram 1: Playing 6, which constitutes the Low Chinese Opening, is a rarely used strategy for White. However, in combination with expanding his framework with 10 and 12, the result seems reasonable. Black 13 is an interesting move as it could be followed by black 15 or black A. White decides the latter move, which could be followed by white B and black C, is more dangerous, and plays 14 to prevent this. However, black 15 is the vital point for attacking the white formation on its right. After black 19, white 10 and 12 are under attack. White 22 is a difficult move to assess; it seems to do hardly anything but it did provoke black 25, leading to the sequence through 31. Norimoto Yoda, the current Meijin and official commentator, said that after white 30 it felt as if Black was fighting with a hole in his stomach. If 17 had been at D, Black's shape might have been justified. Instead of 25, Black perhaps should have played at E. Still, White is under attack on the right side. How does he cope? Yamashita came up with the combination 32, 34 and 36. These moves are backed up by considerable reading of the board. See Problems 1 through 4.
New Problems

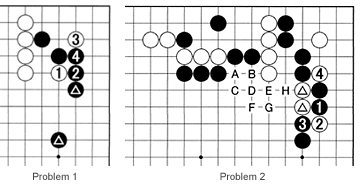
Problem 1: Instead of playing the moves in the game, White could have opted for exchanging 1 for 2 first, then invade at 3. In that case, Black would have connected at 4. White can now connect 3 to his main group in two ways. Explore those possibilities and find out which is the best one. Note that white 1 strengthens Black's marked stones, which is why White rejected this possibility.
Problem 2: After the last white move in Diagram 1, Black can play at 1. White counters with 2 and 4. However, Black can now capture the two marked stones in a ladder with H. Before playing 2, White should first make preparations to invalidate that ladder by playing a move that threatens to cut at A. All the moves B through G threaten to cut at A. Which move also breaks the ladder to allow White to play at 2 and 4?

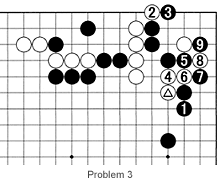
Problem 3: In response to the marked white stone, black 1 looks reasonable. However, if White plays at 2, Black cannot stop him with 3. If he tries, White will play 4 through 8. Black 9 is forced. How can White capture a few black stones?
 Problem 4: Black to play. How can he ensure his survival?
Solutions for the problems will be shown next week.
Solution to last week's problems

Solution 1: Instead of connecting his stones with a move at 4, which he did in the actual game, Yamashita could have tried to kill with 1 and 3. However, white 4 through 8 are a strong response, creating weaknesses in Black's position.
In addition, White easily ensures life with 10. This makes one eye at A, and one at B or at C. Black 11 is no use as white 12 makes an eye at B. Instead Black plays a 12 instead of 11, white 11 follows. In addition, White can exchange D for E, followed by white F and black G, and depending on the circumstances he might attach and cut with H. Black's marked stones do not seem all that strong now.

Solution 2: Black 1 is the only move that allows him to survive. White A is met with B, leaving C and D as miai, i.e. if white C, then black D, and vice versa.
Reference 1: Black 1 is no good as white 2 puts him on the spot. This move aims at A killing the marked stones. Black's last hope is B to make a ko. However, White captures with C and Black has little hope of winning this ko. Even if he did, it is better to live without a ko as in Solution 2.
Van Zeijst is a four-time European go champion and European representative at the Fujitsu World Championship.
