Kosumi
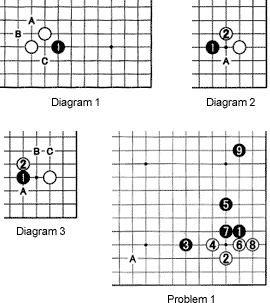
Diagram 1 :In the past few weeks we established black 1 (as well as A, B, and C) as a vital point for attacking the kosumi. The reason this is a vital point is that it induces damezumari (a shortage of liberties).

Diagram 2 :
Once we fully understand this idea, it is almost impossible to play white 2 or at A in response to 1 in this situation. You may think this because it is joseki to play as in Diagram 3. However, you might be surprised to see similar moves in your games when the situation is not so clearly spelled out.
Diagram 3 :
This is a clear-cut example of how to respond to black 1. White should resist and play at 2, A, B or C, but never as in Diagram 2.
Problem 1 :
The moves shown form a joseki that allows Black to gain influence in the center by countering White's center influence or building up a black moyo (framework). Later on, Black has several options, including extending to A. He can also threaten White's corner. How ?
Hazama
Diagram 4 :The hazama is a diagonal gap left between two stones or positions.

The gap between the marked black stone and black 1 forms a hazama. Incidentally, black 1 is known as a hazama-tobi, a jump that leaves behind the hazama shape. The virtue of the hazama is its flexibility when escaping, as well as the placement of the marked stone and black 1 when or if White plays at A. Can you see the similarity with Diagram 1 if Black gets to play both at 1 and at A ?
Problem 2 :
Black just invaded the lower left corner. What are possible countermoves? Try to come up with as many as possible, then reject the ones that don't fit the bill.
Problem 3 :
A few moves later in the same game, Black pincers with 1, forcing White to play at 2, making black 3 a more natural move than simply playing there right away. White, for his part, pincers at 4. How should Black respond ?
Problem 4 :
On the lower edge, there is a large gap between White's stones. How should White defend here ?

Solution 1 :
Kosumi at 1 is correct. This has defensive qualities if Black can make territory on the lower side and it has offensive qualities as well. For example, if White ignores this move and plays 2 elsewhere (tenuki), black 3 is a clever tesuji. If White takes black 3 by playing at 7, White plays 6, followed by white 4 and black 5. White captures the black stone at 3 and Black will close off the center in sente (while keeping the initiative). That is painful for White.

But if he plays as in this diagram, after black 9, White can't live unconditionally. In other words, if he plays A, then the sequence black B, white C, black D, white E, black F, white G and black H follows. This would leave White with a dead shape. At this moment, he can still escape into the center, but if the center is dominated by Black, White will have a hard time.
Solution 2 :
The correct answers to the black marked move are white A through D and 1. In this game, White played 1, which is more a matter of style than anything else. It is also a hazama, leaving Black with no choice but to play at C to avoid getting locked up in the corner. White then closes the corner while occupying another vital point at A.
Solution 3 :
Playing at 3 is correct-In the game though, Black first exchanged black 1 for white 2 as preparation for achieving an even better result. Now White is forced to submit with 4, giving Black a chance to escape with 5 and 7, then play a kosumi at 9.
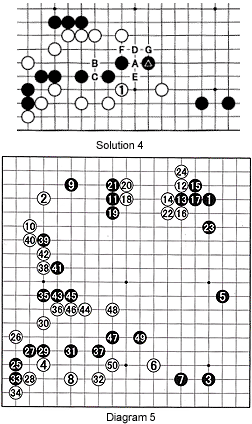
Solution 4 :
White 1 defends the gap in White's position, but it also threatens to attack at A. Before that, he could exchange white B for black C-that way Black needs to respond to white A with D, followed by white E and black F, and White cuts off the marked stone with G. Even if it is never played, this is a serious threat and Black has to be careful all the time. Once again, it is clear white 1 is the vital point of Black's kosumi shape.

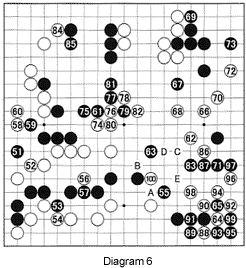
Diagrams 5 and 6 :
This is the game in which the problems above appeared. These diagrams are given just for reference. The moves 74 through 82 were a brilliant maneuver on White's part, giving him overall strength in the center. White 100 was the decisive move and Black resigned. Look at Solution 4 to understand why Black can't cut below at A. Black would have to connect at B, allowing White to connect at A. Now Black has another problem-he needs to play at C to connect, but there is still a cut left at D. At the very least it would give White the chance to connect his dead stones on the right by playing at E.
