Becoming stronger doesn't make life--or death--any easier.
Life and death
If you aspire to become a strong player, do a lot of these kinds of problems, which are called tsume-go. Try to solve these puzzles without using stones and don't look at the solutions too quickly.
When you are four dan or stronger, only look at the solution after you are sure you have cracked the problem.
Diagram 1: Here is a board position in a recent game between two top players. What does this have to do with our current theme of life and death? None of the marked groups is alive as it stands. First, the black group at upper left has potential eyes at A, B and C, but if White destroys one of these eyes, Black is in trouble if he can't connect his stones to his group in the top right.
Second, the white group at top right may run into eye problems, and sooner or later F becomes an important move. Third, the black group at right is not fully secure yet as long as the white stone at E is not put to rest. And last but not least, the black lower right corner is ko at D.
In other words, there are four life and death problems going on at the same time, while a fifth problem will soon present itself at top right.
It's Black's turn, so where should he play? Next week, we will look at how this game develops.

Solutions to last week's problems
Solution 3A:Black 1 reduces White's eye-space. White tries to fend off the threat, but black 3 is the vital point--imagine a white stone here and you can see White has two eyes. Capturing with 4 is fruitless. After black 5, white 4 is in atari so the space where black 1 is captured is not an eye. However, if you think the shape after white 4 is a little strange, you could also follow Solution 3B.
Solution 3B:Black 1 and 3 kill the white group just as well. White can't escape, as black 5 through 11 prove. This may be a "cleaner" way of killing than the other solution.

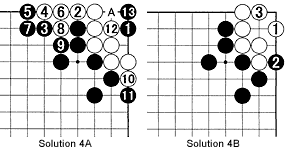
Solution 4A:Black 1 is the vital point. White can't escape, as the moves through 11 show. So the problem boils down to the eye inside. White 12 is an attempt of some sort (to start a ko at 13) but black 13 reduces White to one eye.
Solution 4B:The other question was where White should have played instead of at 2? Well, he should have played at 1 as this makes miai of making two eyes at either 2 or 3. Miai is the situation in which if one player plays at A, the other player replies with B and vice versa. In this case, if black 2, white 3 and if Black plays at 3, White replies with 2--either way, White has two eyes.

Solution 5:Black 1 prevents White from making his second eye.
Solution 6:Black 1 makes White's eye into a false one, i.e. if White captures with A, he gets a space but it is not an eye. Because Black will later play at B and put the marked stone in atari. So eventually, White will have to connect that stone by playing at 1, which means he won't make an eye there.

Solution 7A:This is similar to Solution 3. Black 1 reduces White's eye-space and black 3 hits the vital spot. However, White captures with 4.
Solution 7B:Black 5 is an elegant throw-in. This turns White's eye into a false one. After black 9, two of White's stones are in atari so White should really defend at 5, but then it becomes painfully obvious he has only one eye. In other words, after black 5, White is dead.
Problem 1:If Black plays his next move correctly, he can kill the white group. Where should Black play? The solution will be carried next week.

Van Zeijst is a four-time European go champion and European representative at the Fujitsu World Championship.
