I recently got a phone call from the friend I stayed with while visiting the Netherlands. He told me that he had recently been on a fantastic winning streak, where before he had been stuck in a rut because he was too focused on territory. I had shown him a strategy that doesn't focus on territory, but concentrates on building up strength and thickness.
An obvious advantage to this is that you don't have to read the board and worry whether your groups are going to die (although it may happen to your opponent's groups). The disadvantage is that, if no groups die, you have to make an assessment and count the existing and potential territories fairly accurately at some point. I then demonstrated this plan of attack to my friend by playing on the Internet. He was shocked when my groups didn't seem to make a lot of territory, yet in the end, one of my opponent's groups died. As a matter of fact this exact same thing happened in the game we started last week, the final game of the European Fujitsu Finals (Nov. 29-Dec. 2), played by Alexandr Dinerchtein (Black) and myself.
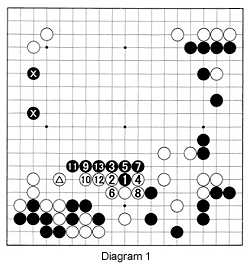
Diagram 1 :
Last week's problem was to determine Black's next move after White's last move, the marked stone. Black should try to find a move that keeps White's stones on the right weak. In that respect black 1 and 3 seem a good combination. Also these moves lead White to believe that he should link up his stones on the right with his center group by playing 4 to 8, then capture four black stones with 10 and 12. For alternatives, look at References 1 and 2.
After black 13, White faces a big problem. Black has a lot of center influence. Should White allow Black to connect the two marked stones to his wall running from 7 to 11? How much territory can he expect to make at the top ? Based on these two questions, try to work out where White should play next.
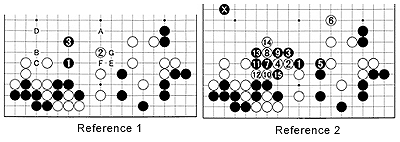
Reference 1 :
Moving out with 1 is feasible. Even if White links up his groups with 2, black 3 makes miai of A and D, aiming at exchanging B for C. If Black gets to play at A, he can aim at E, white F, black G.
Reference 2 :
Simply answering black 1 and 3 by extending at 4 is probably better for White. But I was worried about black 7. The moves that follow are one example, but there are many ways to exploit the warui aji (bad potential) after white 4.
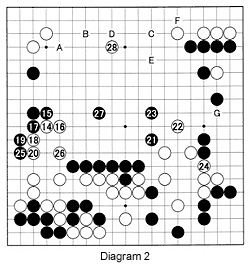
Diagram 2 :
I decided that Black shouldn't be allowed to connect his groups and played at 14. The moves to 20 are obvious-Black needs to build a base on the left, then go back to his center group, exchange 21 through 24 and protect both of his groups, while making territory with 25 and 27. White 22 and 24 are aiming at a tsuke (attachment) at G. Next, White stakes out a position on the upper edge with 28. The idea was that Black could invade at B, answered by white D, to turn the space to the right of it into territory. Or Black could invade at C, also answered by D, to turn the space to the left of it into territory. Black could also reduce with A, but this would give White too much territory. Black C could be followed up somewhere around black E, and White has to answer at F. Either way White has a good game. But Black's move is a surprise.
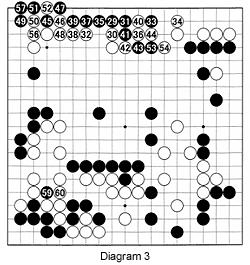
Diagram 3 :
Note: The moves black 55 and white 58 are played in the ko at 45 and 52 respectively.
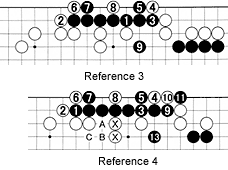
Black 29 was the move that avoided the variations that followed after invading at B or C in the previous diagram. This move was heavily criticized by the Japanese pros because it is so low, and, I suspect, it looked unconventional. But if Black can take away all of White's territory, the game is over. Up to 37, Black is implementing this strategy successfully, while White has almost no choices. However, black 39 was too much-see Reference 3 and 4. Playing at 40, I felt the game would soon be over. However, Black's resourcefulness produced a ko in the corner with 45 through 49.
Reference 3 :
Black 1 is good. White can block at 2, but black 3 makes his group virtually alive. For example, White can reduce Black's eye-space with 4 and 6, then kill Black locally with 8. But Black can run away with 9. In other words, Black is safe.
Reference 4 :
This was Black's plan. If, after black 1, White blocks with 2, it becomes even harder for White to kill Black. After black 11 (capturing two stones), White can throw in at 10 to make this into a false eye, but after 13, White also has a poor shape. Black can next cut off the two marked stones with A, white B, black C. Compared to Reference 3 this gives an even better result.
Diagram 4 :
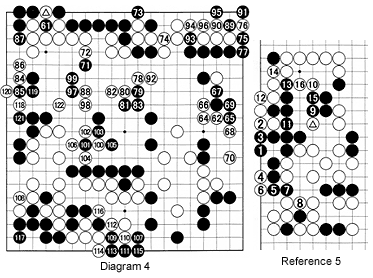
Note: Black 63 is played where the marked stone was taken. White wins the ko, but is losing the battle. With 62 through 70, this territory changes hands, and after securing the center with 78 through 92, White has a solid 5-point lead. However, the combination of the ponnuki (capturing one stone) of 100 through 106, the connection at 108, and the invasion at 118 and 120, enable White to kill the black group with 122. Upon seeing this move, Black resigns.
Reference 5 :
After White plays the marked stone, Black can try making eyes with 1 and 3, but white 4 and 6 always take the second eye, while he can't make another eye around the marked stone.
By winning this tournament, I have earned the right to represent Europe in the World Go Championship for Professionals-the Fujitsu Cup, in April.
