Go has a special term--ponnuki--denoting the capturing of a stone in a clean combination of just four moves. This shape can be seen often in beginners' games, but is rarely seen at the professional level. Since it is a basic move, beginners should make it their goal to understand ponnuki, and the move that precedes it--atari.

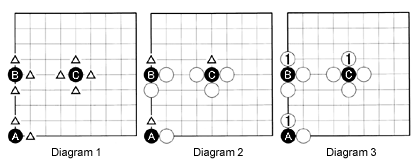
Diagram 1: The three black stones--A, B and C--respectively have two, three and four liberties, represented by the triangles.
These are three separate hypothetical positions for the purpose of showing what happens when a stone in the corner, on the edge or in the center is captured.
Diagram 2: The three black stones each have only one liberty (triangle) remaining, so they are in atari. If White moves next, they can be captured.
Diagram 3: In each case, White 1 completes the capture of the black stone.

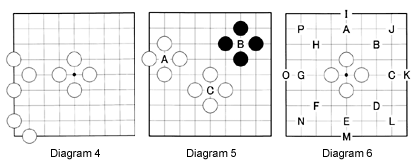
Diagram 4: This is what the end position looks like in each case after the black stones have been captured.
Capturing stones in the corner takes two moves, capturing on the side takes three, and capturing a stone in the center (or at least away from the corner or the side) takes four moves. We refer to the four moves needed in the latter case as ponnuki.
Diagram 5: Here are three ponnuki, where stones have been captured at A, B and C.
Diagram 6: A ponnuki wields considerable influence. It is clear that its power extends all the way from A through H, or even from I through P. On a small board like this (9x9, usually used by beginners), it is possible that Black will not be able to ensure life anywhere on the board. If that is true, it means this particular ponnuki would be worth 81 points--four white stones on the board + one stone captured = 78 points.

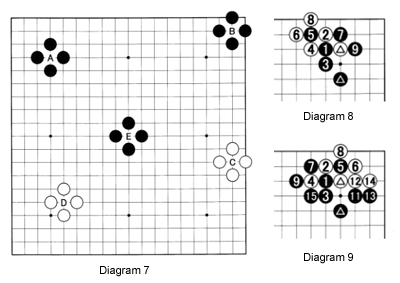
Diagram 7: However, on a regular board (19x19), ponnuki do not generally wield that much influence. Obviously, ponnuki B and C are worth far less than the ones at A, D and E. The ponnuki at B is especially ineffective in that it only has influence on its left and lower sides, while the ponnuki at E could be the most powerful, because it is not hampered in its radiating influence. As a guideline, we say a ponnuki in the center (as in A, D and E) is worth about 30 points.
In each of the ponnuki, one player has invested four moves to capture one stone (one move). The difference is three moves. In other words, a player really plays three moves to score about 30 points, or 10 points per move. That is good, because on average a move is worth about seven to eight points in the beginning.
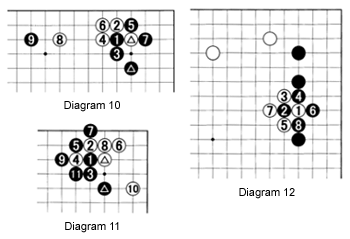
Diagram 8: After the marked stones have been played, moves 1 through 9 constitute a joseki (standard corner exchange). With 5, Black cuts on what appears to be the wrong side. But this is the way to ensure that he can capture the marked stone. White really has no choice but to capture the cutting stone of 5 by playing at 6 and 8. After black 9, the marked white stone can't escape.
Diagram 9: After white 4, Black could also cut at 5. White needs to capture with 6 and Black sets up a ladder with 7 and 9. Obviously, this variation only works if the ladder is good for Black. White plays 10 elsewhere and Black captures with 15, possibly exchanging 11 and 13 for 12 and 14 first.

Diagram 10: Sometimes you may feel the urge to connect at 6 instead of capturing black 5. However, this leads to a terrible result. Even after using an extra move at 8, White's stones are not as strong as in Diagram 8. Black 9 is a strong move.
Diagram 11: Likewise, it is not a good idea for White to play at 6, so that he can play at 10 later. Black gets good shape, while White's stones are a little thin. Black's position is far superior, even taking into account an extra move (Black's seven moves versus White's six).
Diagram 12: By now, you understand the power of making a ponnuki. In the same fashion, you shouldn't give away a ponnuki. The situation shown here frequently occurs in handicap games. Often, Black is overwhelmed by White's strength and thinks he is in dire straits after white 1. Sometimes an inexperienced player will try to connect his stones at any cost. And often such a player is proud of the result shown here--after all, he managed to connect his stones and grab a bit of territory in the process.
Problem 1: After white 1 in Diagram 12, can you think of alternatives for black 2? The answer will appear in the next installment of this column.
