In the third game of the first round of NHK's New Year tournament played on 9x9 boards by teen pros, 17-year-old Tetsuya Mitsuya (Black) took on Kenichi Mochizuki, 19.

Diagram 1: As we have seen in earlier games, Black often plays aggressively to decide the shape of the game and turn his first-move advantage into an all-out attack. This game is no different. Black 3, a move that would be regarded with disbelief on a regular board, starts a battle to turn either the entire right or the upper left into territory. White 4 seems reasonable, but Black does not let go and cuts with 5, obviously intending to sacrifice this stone while taking over the rest of the board. However, White strikes back with atari at 6 and 8, then connects at 10. This might be White's strongest countermove. How should Black respond?
Diagram 2: This is in fact a whole-board problem, because the next move will set off an avalanche. Black 11 and 13 lose the game right away, because after this, White can force Black all the way to 27 (Diagram 3) and win the game with 28. With 14, White first sacrifices one stone, and then he sacrifices three more with the sequence starting with 16. See Reference 1 to determine if Black had any alternatives to 11 and 13.
Diagram 3: In the previous diagram, White decided to sacrifice his three marked stones in addition to the one he had already sacrificed (marked by triangle). All moves through 27 are forced for Black and white 28 clinches the game the safe way. It would have been dangerous to descend to 31. White 28 is the correct move to kill any invasion Black may have in mind. Black 29 is a clever move, but white 30 is a good reply. Even though the exchange 29 for 30 makes the combination black 31, 33 and 35 sente, White has to answer with 36. Black lacks territory and resigns upon seeing 36. Black ends with 27 points against White's 34! points (28 + 6! komi, compensation for Black having the first move). White wins by 7! points.

Reference 1: Instead of playing at 7 immediately after exchanging 1 for 2, Black could have pushed with 3, then defended with 5. White would then have to play at 6 or A to protect his stones against a ladder. Now Black must play at 7. The follow-up is difficult for both sides, but if White plays at 8 and 10, black 11 and 13 seem to be a good combination. Still, since White has more chances to make mistakes in this exchange, this might be the better choice for Black.
Reference 2: Black 1 is a clever move, but even if White answers incorrectly with 2, followed by black 3 and white 4, White would still win the game by 1! points. At the end, Black has 26 points, while White has 27! ( 21 + 6! komi).
7-stone handicap
This is the fourth in a series of discussions on the 7-stone handicap game.

Diagram 4: In a previous column, we looked at the high pincer as seen in A, and the likely outcomes. This week, we will focus on the low pincer at 3. White has many ways of replying, ranging from invading at B or playing a double-kakari at C or D, to jumping out with E or attaching at F. Recently, a move at G has been seen, and playing a tenuki elsewhere is also possible.
Diagram 5: If White invades at 4, Black should block at 5 to use his marked stones to maximum effect. Black 7 is a very important move--it is the vital point of White's shape. Just imagine a white stone was there. White 8 in response ensures that White keeps sente, as Black has to answer at 9. However, even though White finishes in sente and can later play at A, followed by black B, white C and black D, also in sente, the marked black stones are positioned very well. Black is doing well in this diagram.

Reference 3: Later on, Black may have a chance to play at 1, followed by white 2 and black 3. If White answers at A, Black has prevented the sequence A through D in Diagram 5 in sente. But that is too good to be true. Black should be prepared for white 4, followed by the sequence through 7, which gives White life in sente. Black must extend to 5 rather than blocking at 6, as White would cut at 5, leading to an unfavorable battle for Black.
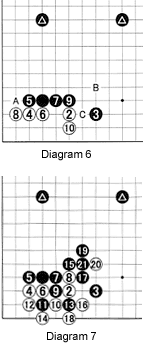
Diagram 6: After black 7, White can also descend to 8. Black must now force 9 for 10, after which he can play tenuki, block at A, followed by a reinforcement at C later, or play at B immediately. Either way, again, the marked stones are in a good position.
Diagram 7: But what happens if White resists with 8 after black 7? Then great technique and a bit of knowledge are required. The answer is to first cut at 11, then at 13, followed by a hane at 15 and forcing with 17 in order to defend at 19 and 21. Once more the marked black stones are in ideal positions. And that should really be your guide when making choices: Are you using the stones you have played earlier on, and, in handicap go more specifically, are you using your handicap stones?
