Cutting keima the right way

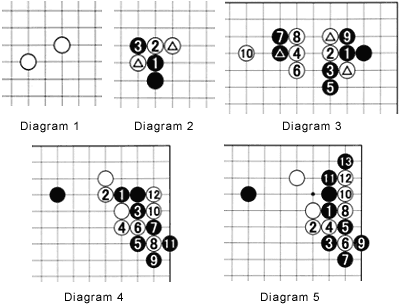
Diagram 1: The shape these two white stones make is called a keima (knight's move). Faster than the kosumi and more flexible than the one-space jump, it is often used in attack and defense.
Diagram 2: The major problem with the keima is that there is always a cut. Depending on the surrounding stones, Black can cut with 1, followed by white 2, black 3--this often leads to a heated battle. We called this cut type 1 last week.
Diagram 3: This is an example where White has a keima formation and Black cuts through with 1 and 3. The moves up to 6 are a joseki. Recently, the moves to 10 were played in a pro game--note that white 10 is the vital point to attack black 7 and the marked black stone. This initiated a tough fight in which White finally got the better part of the deal.
Diagram 4: Note that after black 1, Black has to continue to cut. If he is going to play at 3, he should omit the exchange black 1 for white 2. Compare this diagram with Diagram 5 and you can see why this exchange is no good--it takes away a black liberty, while allowing White to capture three stones with the combination to 12.
Diagram 5: In contrast, if Black plays at 1 immediately, then jumps to 3, he can resist White's cutting combination of 6 and 8 with 11 and 13. Now it is Black who captures three white stones.
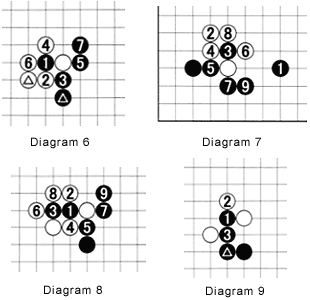
 Diagram 6: In contrast to type 1, when the marked black stone is placed one space to the right, if he is going to cut, Black should do so with 1, followed by white 2 and black 3. If the ladder is good and White can play at 4, Black has no choice but to play atari with 5 and extend with 7. Often, this gives White a bad result. Why is this result bad for White? Because the marked white stone does not contribute at all to White's overall shape. Moreover, making eyes becomes more difficult.
Diagram 7: Here is an example where Black can try this technique. If White plays at 6 because the ladder is good, Black sacrifices 3 by playing 7 and 9. Black's territory is worth more than White's influence (which might even be vulnerable to attack because it lacks an eye-shape). Instead of 6, White should find an alternative (see last week's examples).
Diagram 8: So how does White respond to the cut Black initiates with 1? Sometimes answering at 2 is a good idea. If Black plays at 3, next White can cut at 4. If Black insists in cutting with 5, next white 6 sets up a ladder, capturing two stones. Black can play with 7 and 9 just as in Diagram 6, but this is a very different result for White. He has captured two stones instead of 1, giving him superior influence and a better eye-shape, as well. This is terrible for Black.
Diagram 9: So when does this situation, in which White does not want to cut, arise? Very often it arises when Black has two stones in a row, as shown here. Now, if White fends off Black's cut of 1 by playing at 2, pulling back with 3 makes a bad shape for Black. The marked stone now makes an empty triangle--a shape pros avoid like the plague.
Solutions to last week's problems
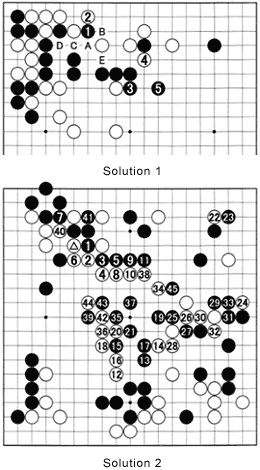
Solutions 1 and 2 are from the Honinbo tournament in 1971, when Yoshio Ishida won the title at the age of 22.
 Solution 1: In response to black 1, White should play at 2. After black 3, white 4 eliminates the warui aji (bad potential) in this area, allowing Black extra room to flee with 5. So what was the function of black 1? First of all, without the exchange 1 for 2, if the game progresses the same way, black 1 will be answered later with white A. So this exchange makes White's territory smaller. The second reason is that Black can get an extra eye by playing A through E.
Solution 2: Black 1 and 3 are the correct way of cutting (see last week's Reference 2). White managed to settle his stones in the upper left corner, but in the meantime, Black built a huge framework at the upper edge. White then attacked with 12 and 14. Black's keima of 13 and 15 can be cut, but this doesn't lead anywhere, so White settles for 16, black 17 and white 18. Black 19 takes the vital point of White's kosumi shape while threatening to cut a keima, which he does a few moves later. Note black 29, which forces White to connect in a bad shape (empty triangle) at 30. Black 45 cuts another keima.
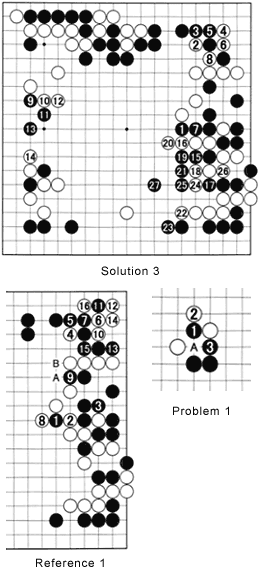
 Solution 3: This is a more recent game, this year's Honinbo title match, played between defender O Meien (Black) and Masao Kato. Black has just initiated a cut with 1. White's answer at 2 through 8 looks mystifying, but after studying Diagrams 1 through 9, it may be more understandable. Even so, White's strategy here was a mistake--he should have cut bluntly as in Reference 1. After black 7 and white 8, Black grabs the chance to pull out with 15 and 19 to take the initiative in the center. White never recovered and Black won the game by 13! points.
Reference 1: White should cut with 2, forcing black to add a stone at 3. Next, 4 and 6 are kikashi, ensuring White can make life in the corner after Black cuts with 9. Black 11 is clever, as it allows him to cut through with 13 next, but if White keeps his cool with 14 and 16, he makes life in the corner. Probably somewhere in the process White can exchange A for B.
Problem 1: Compared with Diagram 9, black 1 and 3 seem a clever combination. If White cuts at A, this reverts back to Diagram 6. How should White play to avoid this?
