In general, neither player leaves weak groups lying around and they always seem to have a vision of the whole board. Takemiya tries to make territory in the center, the so-called cosmic style, while Otake is good at chasing groups using his thickness.
 The game was shown on television two weeks ago. Otake lost quite suddenly when his groups were cut in an exquisite combination by Takemiya. The commentator, Rin Kaiho, a player in the same age group, showed many kinds of alternative possibilities and highlighted the background behind the threats.
Even though the game was played at a high level, the average go player could easily understand what was going on, thanks to Rin's enlightening comments. And because Otake lost quickly, there was a lot of time afterward for a discussion of the moves by the players themselves--which was even more interesting than the game itself. Takemiya was Black.
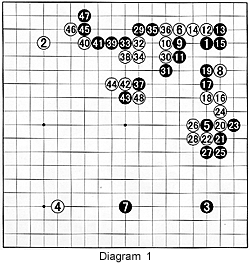
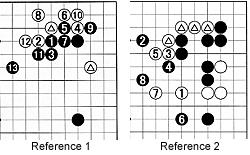 Diagram 1: Black 1, 3 and 5 form the san-ren-sei, or three star points in a row, a strategy Takemiya has employed on and off for more than 30 years. Takemiya is a stylist who does not like to make bad shape, such as empty triangles, but who is perfectly happy to induce bad shape in his opponent (see Reference 1). Hence, the choice of black 13 and 15. Black 17 is a good nozoki (peeking between two stones) and White is in a bit of trouble. Since almost everything is sente against the top white group, he needs to ensure life quickly with stones 8, 16 and 18 (see Reference 2). White 20 and 22 form a tesuji for making sabaki (light shape with potential for eyes). Takemiya immediately played 23 in anticipation of 24, which makes another empty triangle--white 18, 16 and 24. During the analysis, Takemiya offered Reference 3 as an alternative for White.
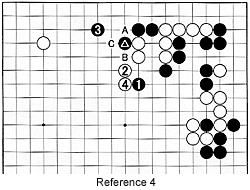
 After white 24, the sequence to 28 is forced. Next, Black attacks the other groups with 29. White 38 was the next move discussed (see Reference 4).
White 48 is a good cut, making White stronger in the center.
Where should Black play next?
Reference 1: In response to the double-kakari (the two marked white stones), the sequence shown here is the most common answer. However, now it becomes clear that black 1, 3 and 7 form an empty triangle. This unaesthetic element is the reason Takemiya dislikes this variation.
 Reference 2: If White escapes into the center, he will run into problems, because his marked group is weak. Black 2 and 4 first force White into bad shape (the empty triangle of marked stones above 3; 3 itself; and 5), and Black then engineers a splitting attack with 6. White will obviously have a hard time saving both groups.
Reference 3: (Note: After the marked stone is taken with black 5, black 7 would be played at this spot.) The combination white 2, 4 and 6 make sabaki. By sacrificing the marked stone, White's stones tesuji, thus making good shape, and Black's stones are on the inside while White's stones are on the outside. Takemiya liked this because White can make a good shape, while Black's shape is poor. However, Black can always play later at 9, and White would be unable to play at A, because Black would cut at B. In other words, White gets no territory, but he gives a lot to Black. So, theoretically, it is a good choice, but actually White loses too much territory.
 Reference 4: In theory, white 2 is better than the exchange of white B for black C. Black still needs to defend against a white cut at A. Black 3 is one way of doing that. This means White takes the initiative in the center. This probably would have been better than what actually happened in the game.
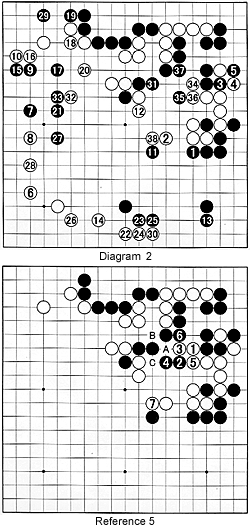
Diagram 2: Black really should defend in the upper right, because White has closed off his escape path to the center. Exchanging black 1 for white 2 makes black 3 and 5 a natural follow-up--we call this natural flow (sometimes referred to as choshi ga ii). Also note that this indirectly attacks White's group on the right, as we'll see in the next diagram. White 6 is an assertive move--Otake tries to turn the whole lower left corner into territory. Black establishes a position in White's sphere of influence on the left with 7 through 19. Otake regretted white 18 and 20 as moves that seem to connect, but don't make territory, and provoked a black defense at 21. White should have at least played 20 to the left of 19. The reason for the mistake is White was impatient to get sente (initiative) to play at 22, a move easily worth over 20 points. Black 29 is the beginning of White's end. White 30 is not to the point at this stage--he should defend his center group.
The discussion then focused on white 34 (see Reference 5).
After white 38, Black came up with a tremendous combination. What should Black's next move be?
 Reference 5: When White played at 1, black 2 seemed a good countermove. However, white 3 is not a good move to counter this. If Black withdraws with 4, white 5, black 6 and white 7 follow as in the game. White has the option of playing at A, cutting off black 2 and 4. White can only connect at B or C, but not at both points. This option would leave White thicker in the center.
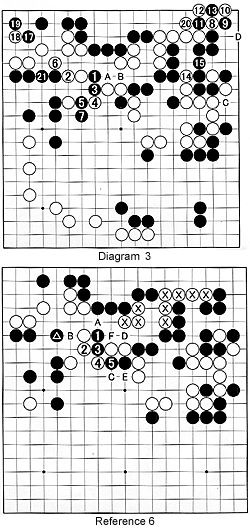
Diagram 3: (Note: White plays 16 in ko at 8.) Black 1 is a skillful move. White concludes he cannot connect his groups (Black can always exchange A for B to connect his stones at 1), and tries to make his stones on the upper left alive with 2 and 6, but black 7 threatens White's group on the upper right as well. White desperately tries to start a ko in the upper right, which he wins, but at the expense of his top left group. In addition, winning the ko is no threat to Black's top right group--he can play at C or D to make two eyes.
Reference 6: In response to black 1, White could have tried connecting with 2, but black 3 forms a clever combination with 1. Black A is sente--White needs to play at B, which hurts the marked stone, although only slightly--which means that White can capture two black stones in the sequence white C, black D, white E and black F, which kills the marked white group. The discussion also highlighted a number of different ways for White to die, but his end was a foregone conclusion at that point.
