Life and death
As I stated in previous columns, try to solve as many tsume go (life-and-death) problems as possible without using stones. Players four dan or stronger should not look at the solution until they are sure they have solved the problem.
Diagram 1: (White 6 captures the ko below black 3; black 9 captures the ko at 3.) Last week, we had a look at this game between two top pros.
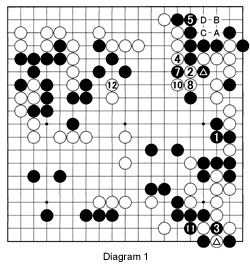
Black 1 becomes an obvious choice after last week's analysis. White 2 tries to capture the marked stone to make an eye, while simultaneously preparing an attack on the black stones in the top right. Black 3 captures the ko. White 4 is a ko threat and Black defends with 5 (if this move was omitted, white A, black B, white 5, black C and white D, would follow, causing Black to collapse in the corner). White 6 captures the ko. Black 7 is a ko threat and White follows with 8. Black 9 recaptures the ko.
This is the moment of truth. White responds by playing at 10 which takes away a lot of ko threats from Black but it also constitutes a ko threat in itself. Black finishes off the ko with 11. White then attacks another Black group with 12 .
Is this black group doomed? We won't go into the details, but after spending one hour and 24 minutes on his next move Black manages to save this group.
After the game, the white player said his move at 10 lost the game. Instead, he said he should have played a ko threat at A. Black would have answered at B, and White could have continued the ko.
False eyes
Last week, we encountered a few problems involving eyes that look real enough on the surface but were actually false eyes, or kake-me.
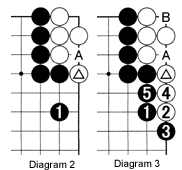
Diagram 2: This white group seems to have two eyes. However, after black 1, the marked white stone will eventually run into trouble and get caught at A.
Diagram 3: How does that work? Well, if White tries to escape after black 1, for example, by playing at 2 and 4, after black 5, White has a problem. Three of his stones are in atari, so he should connect at A, but if he does, he has only one eye--and one liberty--left. That means this White group will die. In other words, the eye at A is a false eye.
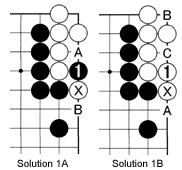
Problem 1: If it is Black's turn, he can kill the white group. Where should he play? However, if it is White's turn, he can survive. How?

Solution 1A: Black 1 is correct. White can capture with A or try to move out with B, but eventually his marked stone will be put into atari (see Diagrams 2 and 3) and it becomes clear that White has one real and one false eye.
Solution 1B: White 1 is the only move that can ensure White's survival. This move ensures that both B and C are real eyes. In contrast, White should not play at A, because then Black will throw in at 1 and we get a similar situation to Diagrams 2 and 3.
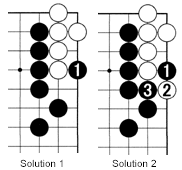
Solution to last week's problem
Solution 1: Black 1 is the correct move to kill the white group.
Solution 2: If White plays at 2 to cut off black 1, black 3 turns one of the eyes into a false one. In other words, White is dead.
New problems
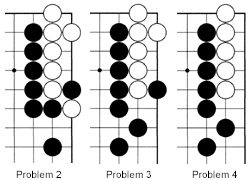
Problem 2: It is Black's turn. How can he kill the white group?
Problem 3: Black to play. Where should he play to kill the white group?
Problem 4: Black can kill the white group in two ways. How?
Van Zeijst is a four-time European go champion and European representative at the Fujitsu World Championship.
