He is defending the Kisei title against challenger Naoki Hane, 27-year-old holder of the Tengen title. Losing the first three games without putting up much of a fight and written off as a loser, Yamashita won the fourth game by the narrowest of margins. He then proceeded to take the fifth game in the patented grand style for which he is famous. Let's look at this fifth game, which we started last week.
Yamashita's reading
Yamashita, white, came up with a great combination to split the black position on the right side. Extensive reading of the board, revealed partly in Solutions 1-3, was essential.
Diagram 1: Black had to answer white 36, last week's final move, with 37, allowing White to break through on the right side with 44 through 48. In the center, White also takes the initiative with 50 and 52, and with 54 sets out to build a huge framework to claim the upper quadrant. Just in case, white 58 and 60 prepare to make an eye with A, followed by black B, white C.

By playing 70 and 72, White is actually declaring victory. Unbelievably, Black later managed to survive on the upper left side, but Black's lower right side was severely restricted and he eventually had to resign.
Reference 1: Official commentator Norimoto Yoda suggested black 1 in response to white A. The sequence through 9 would most likely follow. This would make the exchange of the marked stones a bad one for White as his stone would die without compensation. This was Black's only chance in this game, Yoda said, although he doubted that this would give Black the upper hand.

Solution to last week's problems
Solution 1A: If you were able to imagine the sequence after black 1, you are already quite strong. However, White is left with some problems after 8. Black can later exchange G for H, leaving White without enough eye space. Also the combination white A, black B, white C doesn't make an eye as in the game, because Black can play at D, if White answers at E, Black plays at F, leaving White with only one eye.
Solution 1B: In this case, white 2 is much better. The moves through 8 follow. White now can stay alive with A, followed by black B, white C, black D, white E (if we assume the marked black stone is in place). In addition, the marked white stone is much stronger than in Solution 1A.

Solution 2: Black 1 is dangerous. White 2, threatening to cut, prompts black 3. White 4 and 6 now are a destructive combination. If Black wants to save his marked stones, 7 and 9 are the right moves, but white 8 and 10 capture two black stones, devastating Black's position. Note how white 2 defends his marked stones against a ladder.

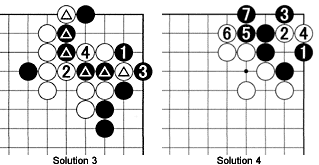
Solution 3: In response to black 1, white 2 and 4 put all of Black's marked stones in atari. Black can save only one pair of them, but forfeits most of the corner. This action is possible thanks to White's marked stones.
Solution 4: Black 1 is the move to make this black group alive. White 2 is of no avail due to the combination of black 3, 5 and 7. Black now has two eyes.

New Problems
Problem 1: In the upper left quadrant, this situation appeared much later in the game. How should White answer black 1?

Problem 2: Look at Diagram 1. Why does Black need to play 49?
Problem 3: Black is already alive. What happens if Black exchanges 1 for white 2 and plays tenuki (elsewhere) afterward? How can White profit from this exchange?
Problem 4: We know what happens if Black plays first without the presence of the marked stone. What is the status of the black stones now?
Problem 5: What about here? What is the status of the black stones?

Van Zeijst is a four-time European go champion and European representative at the Fujitsu World Championship.
