
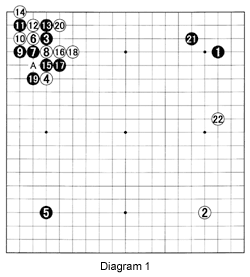
Diagram 1: In this game, Yamashita starts out with a conventional opening, playing 1 and 3. White 2 is already slightly out of the ordinary, but for a good reason (see Reference 1). O Rissei is supposed to be an expert at this fuseki (opening), having tried out the pattern starting with white 4, black tenuki (elsewhere), and white attaching with 6 at least twenty times. White often gets a slightly superior result because the ladder is good for him after cutting at A (see References 2 and 3). However, White should feel dissatified with the way the game proceeds in the upper right corner, because he gets gote (losing the initiative), allowing Black to switch to 21. White seems to be falling behind a little.
Reference 1: In general, after Black 1, White will play in his own corner, the lower right--for example, at 2 (Black is sitting on the side of the lower edge, while White is sitting on the side of the upper edge, and the lower right hand corners are their 'own'). Black would then play at 3 and White at 4 to prevent a black shimari there. Black would then finish this so-called Shusaku fuseki with 5. Again, White would approach with 6, but then Black plays around B, followed by white C, and black D. During the fight in the upper right corner, Black would then be able to pincer with E or F--the idea behind the Shusaku fuseki--and keep the initiative. In order to prevent Black from holding on to the initiative, White plays as in the game.
Reference 2: (Black plays at 18 at 6 or at 10.) This is the old joseki that many amateurs still play today. However, pros don't play this anymore because the result is much better for White. Black seems to get a large corner (about 13 points) while White gets sente moves at C or at A and B; the wall White builds is more valuable than Black's corner.
Reference 3: This is an example of how nasty things can get if Black doesn't watch his step carefully. Since, in the game, there is a white stone in the lower right corner, after black 10, White can cut with 11 and set up a ladder in the moves through 15. Even though the ladder is favorable for White, he should still add a move and actually capture two black stones with 17. White's thickness is superior to Black's corner territory.
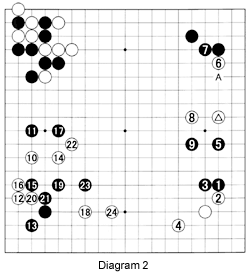
Diagram 2: Black 1 is an aggressive move, aimed at isolating the marked stone, which actually happens when White answers with 2 and 4. After black 5, White would usually play at A to make a base. However, then Black would probably switch to a move around 15 to dominate the left side. In other words, White would be trying to catch up without ever actually managing it. White 6 and 8 are an attempt to take sente and switch to the left side to disturb Black's rhythm. However, after doing so with 10, White still comes under attack. Black 11 through 23 keep up the attack--the main purpose here is to keep White's stones weak and without a proper base.
Problem 1: After white 24 in Diagram 2, where should Black play next?
7-stone handicap
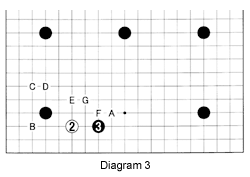
Diagram 3: This is the fifth article in a series of discussions of the 7-stone handicap game. Two weeks ago, we looked at the low pincer at 3 and the likely outcomes after White invades at B. In fact, White has many ways of replying, ranging from playing a double kakari (corner approach) at C or D, to jumping out with E (followed by black D, and pressing at A), to attaching at F. Recently G has been seen, and playing tenuki (elsewhere) is possible, too. This week we will focus on White playing a double kakari at C.
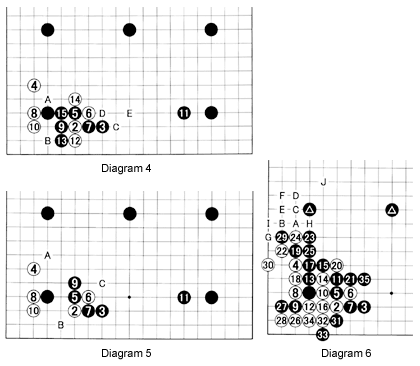
Diagram 4: If White makes a double kakari with 4, black 5 is the standard reply. The moves through 10 constitute the basic joseki. Black can now switch elsewhere, for example, to 11. At some point, perhaps immediately, White will exchange 12 for black 13 to get a forcing move at 14. White 12 and 14 provide a variety of advantages. In the first place, it is more difficult for Black to completely surround the center, while White has a good move at A to build thickness in the center for himself. Secondly, White may later play at B, threatening to connect to his stones at 2 and 12. Thirdly, he may later want to make forcing moves at C, D or E, in order to invade the lower side.
Diagram 5: To prevent White from getting the forcing moves in the center as outlined in the previous diagram, Black could play at 9. White would still take the corner with 10. Black 11 works well with Black's position on the left. Later on, Black can expand his center influence with a move at A. However, it must be said that a white move at B is large, especially because Black probably needs to defend around C.
Diagram 6: What happens if Black blocks in the corner with 9? This has actually been tried in professional games. The results were similar to the sequence shown here. White tries to push through with 10, 12 and 14. Black then has a lot of cutting points, which look dangerous. However, Black 19 and 23 are a clever combination, inviting white 24. After White defends his corner with 26, Black makes threats against the corner in sente, blocking on both sides, then strengthens his center with 35. He can also take credit for using his marked stones effectively. White can draw out his stone at 24 with A. But Black will play B, followed by white C, black D, white E, black F, white G, black H, white I and black J. Black has even more center influence now--in other words, this is a great success for Black.
The first time I saw this, I thought I would never understand nor remember it, but although this is a long sequence, most moves are forced and are easy to understand.