Below is the first game of a five-game series in which Shinji Takao challenged O for the Judan title. In spite of his apparent slump and his own statement before the match that he had to be careful not to lose three straight games, O comported himself well and won. O is black.
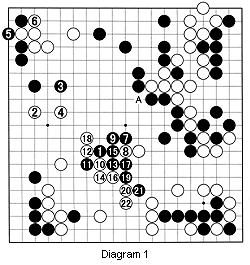 Diagram 1: Last week, the question was how should White answer black 1? Before this move, White could have looked forward to a large territory in the lower left quarter of the board and would have kept the lead, but black 1 is a good move. Takao replies with 2 and 4 to pressure Black's upper left group. However, Black cleverly takes a sente profit with 5 (White has to answer with 6), then connects his invasion stone 1 to his center group with 7 and 9. This also defends against a possible White cut at A. In other words, White has failed. How should he have played then? See Reference 1 for the answer. In the actual game, White manages to cut off black 11 with 12, but in exchange, he loses two stones in the center, including white 8. On top of that, Black gets sente. Where should Black play next?
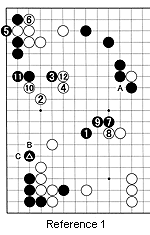 Reference 1: White should have played at 2. If Black jumps out with 3, white 4 is more powerful than 2 and 4 in Diagram 1, which have no follow-up. If Black answers in the same way as in the game, with 5, 7 and 9, white 10 and 12 press Black's stones hard. Black will be able to live but it will not be as easy as in the game. Another point is that this strategy steers Black in the direction of the left side, which is relatively benign. Why? Because White can exchange white B for black C at any time, pushing Black into a low position with little scope for expansion along the left side. In addition, black 11 is also in a low position. On the other hand, since the marked black stone is in place, White should not even try to make territory on the left side. He should keep the threat of cutting at A alive. In the actual game, Takao fails to employ either of these strategies.
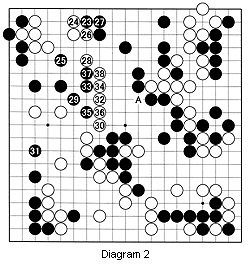 Diagram 2: Since the cut at A is not important now, as Black's center stones are strong, Black begins to harass White. Black 23 is a great move that makes points while taking them away from White. However, its most powerful benefit is that it takes away White's eye-space and weakens the White group. In turn, this indirectly strengthens Black's stones on the upper left. After all, when you are fighting an enemy, you don't care about his absolute strength, but about his relative strength. White defends with 24, but black 25 attacks while providing eye-space. Black 29 is a move typical of O it seems like an attempt to make territory by jumping to 35 next. Moreover, when White prevented this with 30, Black's real objective becomes clear jumping to 31 to make more territory. Taking territory over defense with black 23 and 31 in combination with 29 is typical of O's territory-oriented style. White tries to punish Black with 32 and his following moves. Will Black be able to live?
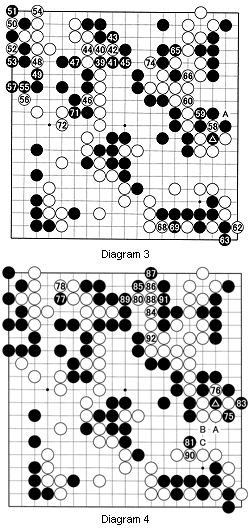 Diagram 3: Played in ko: black 61, 67, 73 where the marked stone is; white 64 and 70 at 58. Black resists with 39 on, then secures life with 57. White then starts a ko with 58. But Black refuses to give in and defend at A. In a postgame analysis it became clear Black was ahead enough already to defends at A and still win. However, Black is loaded with ko threats, so there is no reason to be meek. However, let's see what happened in response to white 74.
Diagram 4: Played in ko: black 79 where the marked stone is; white 82 at 76. During the ko, Black finally shackles up two white stones with 81 and 83. If White tries to connect at the point where the marked stone was, Black plays A, white B and black C to capture the bunch. Although he lost some territory in the upper edge of the board, Black's gain on the right is enormous. In the end, he wins by 6 1/2 points.
 Solution to last week's problem
Solution A: White 1 is correct. If Black plays at 2, white 3 next makes life. However, what comes after black 4? Intuitively, White wants to make a move, but any move is suicide because of a lack of liberties. In fact, this situation is seki (mutual life). Let's investigate a little further.
Reference 2: If white 1, then black 2. Of course, White has no choice but to connect with 3, but then black 4 takes away White's last liberty, capturing him.
Reference 3: What if White connects with 1 instead? Then Black will play at 2, making a dead shape. White can't move (so white 3 is not shown) but at any time Black feels like it, he can play at 4. Even if White captures four stones with 5, after the capture he still has a dead shape. The conclusion is that White shouldn't do anything.
Reference 4: So what happens when Black plays first? If Black plays at 1. White needs to play at 2. Next, Black must connect at 3, but with 4, White captures four black stones making a shape that is alive compared to the shape in Reference 3 that is dead.
Problems for this week
Problem 1: To make sure you understand this shape, find a solution to ensure life for White when Black plays at 1.
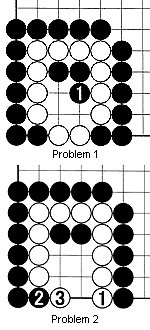 Problem 2: How should Black proceed after white 1 and 3? Find the best moves for both parties and determine the status of the White group.
Rob van Zeijist is a four-time European go champion and European representative of the Fujitsu world championship.
