Territory
The purpose of go is to surround both your own territory and your opponent's stones. The following diagrams are used only to explain the concept of territory, so don't worry if the number of black and white stones don't match.

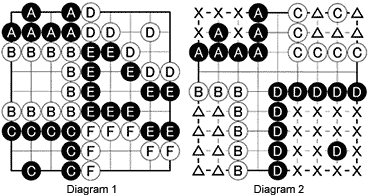
Diagram 1: To make things simple, all six groups are alive. Territory is formed by the spots that are completely surrounded by stones of the same color. So let's start counting. The A group has 2 points, the B group 6, the C group 5, the D group 8, the E group 5, and the F group 6. Therefore, Black has a total of 12 points (2 + 5 + 5), while White has 22 (6 + 8 + 6). White wins by 10 points.
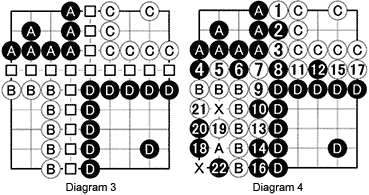
Diagram 2: Now there are four groups. Black's territory is indicated by the X marks, while the triangles signify White's territory. The A group has 5, the B group 8, the C group 5, and the D group 15. Black's total is 20 (5 + 15), while White has 13 (8 + 5). Black wins by 7 points.

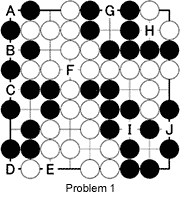
Diagram 3: What about all the other points? Don't they count? The marked spots are not surrounded completely by either color and therefore are not counted as territory. These are neutral points, and go players call them "dame." They have no value for either player, but at the end of the game, the players must fill in these dame points as in Diagram 4.
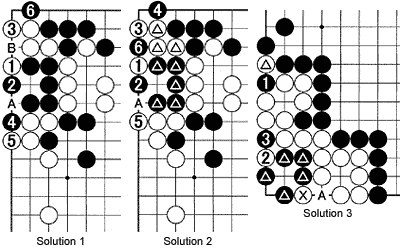
Diagram 4: After Black and White fill in all 17 dame points, something else becomes clear. The B group has a problem. If White does nothing, i.e. if he ignores white 16 and plays at 17, Black can attack the B group with 18. After black 22, neither White nor Black can fill in at A. So Black can't kill White and vice versa. This situation, a kind of standoff, is called seki. As territory is not counted in a seki, the marked points are zero points. Now, the margin is 20 - 5 = 15 points in Black's favor. As White lost all territory in the lower left corner, he is better off playing an extra move to defend his territory, e.g. by playing 17 at A or 18.
Problems

Problem 1: Put the situation on a board and
1. Find out who owns what territory.
2. Fill in the dame points, but be careful. In the correct solution, Black starts and no stones are taken.
3. What happens with the points A through J?
4. Who wins the game?
Solutions to last week's problems

Solution 1: Black 4 and 6 after white 3 is correct. After 6, this is a double ko. That means White can capture at A, but Black can then take the other ko with B. However, even with an overwhelming number of ko threats, White's recapture of B by playing at A again is answered by Black's capture of the white stone at A by playing at 4. The cycle is then repeated, but Black can never lose.
Solution 2: Black should not play at 4 immediately. White 5 is a strong move. Black can capture with 6, but it is a ko and the ko is not direct--Black's marked stones are not in atari while White's are. But if White has a lot of ko threats and Black only a few, White can eventually ignore Black's non-ko threat and approach with A, putting the heat on Black's marked stones. Then if Black loses the ko, Black's marked stones die while White's live. Black should follow Solution 1.
Solution 3: Black 1 makes a ko, but 2 starts a double ko. Black can capture with 3, but then White plays 4 (where the marked white stone is) to capture black 1 (this does not repeat a board situation). White can respond to any Black ko threat and allow Black to recapture at 1. White will recapture at 2, Black captures with A, and White recaptures black 1, etc. The lower left is a double ko, giving White an infinite number of ko threats. So he will win the ko around 1 and live.
Want to find out more? Come to Ben's Cafe in Takadanobaba, Tokyo (03-3202-2445), where the English-speaking go community congregates every Sunday. You can enjoy free lessons, 11 a.m.-1 p.m. Ben's Cafe can be accessed at www.benscafe.com.
Van Zeijst is a four-time European go champion and European representative at the Fujitsu World Championship.
