4 simultaneous ko situations
In the last column, we looked at the first 100 moves of the game between O Meien (White) and Norimoto Yoda, the current Meijin. Black accumulated a lot of territory--he has all four corners, so White felt he must start making some himself. Both players had to think fast, because they were allotted only 10 seconds per move.
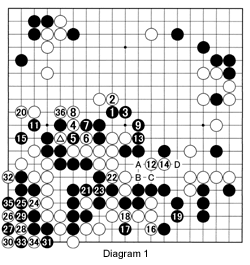
Diagram 1: (white 10 captures the ko at the marked stone)
White 2 builds territory at the top but his center stones are in danger. He tries to rectify this with 4. However, black sets up a ko with 7 and 9. After white 10 captures the ko, black 11 creates a lot of ko threats. White mistakenly believes he can ignore the threat, so he plays 12 and 14. This is another mistake as Black can cut with A, followed by white B and black C. White would have to fill in the ko (where black 5 was captured earlier), but then black D would bottle up 12 and 14. Black ignores White's mistake for the moment and kills White's entire group in the lower left. White's moaning could be heard on TV when he realized his mistake. However, he seeks revenge with 24 and 26. Black falls for it by playing at 27, leading to a double ko in the sequence through 35 (see Reference 1). White 36 puts a black stone in atari.

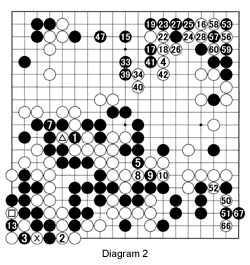
The double ko in the lower left corner means White has an unlimited supply of ko threats and he cannot lose the ko in the center (the stone with the triangle). Occasionally, however, this ko is fought over to gain more time. As he is sure to win the center ko, White tries to turn the entire center into territory with 4. Remember, White only wins the center ko by virtue of the double ko in the lower left. Black invades with 15 and White with 16. Black ensures he will live in the sequence up to 47 while White seizes the upper right corner. However, black 53 through 60 start another ko. All ko situations are too important to lose so the players keep going back and forth with moves 68 through 77. Black 77 repeats the board situation and the game is declared forfeit.


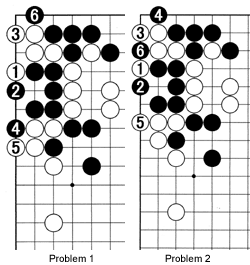
Problem 1: This situation is part of a joseki. White can now play 1 and 3 hoping to fool Black. Black 4 and 6 is the correct response. Why?
Problem 2: What happens if Black plays at 4 and then captures at 6? Why are these moves poor?


