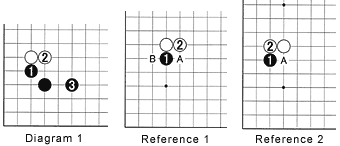
Diagram 1: One persistent misconception is the value of an exchange like this-- black 1 for white 2. The most important thing about attachments in general is that, if it doesn't kill the stone it attaches to, it usually makes it stronger (see References 1 and 2).
Reference 1: Most novices think that if they attach their stone to their opponent's stone they are attacking it. According to that concept, black 1 should weaken the white stone. That is true for the duration of that move, because it reduces the liberties of the white stone from four to three. However, it is White's turn to play and even if he merely extends to 2, White now has five liberties instead of the original four, and it is Black who has only three liberties. On top of that, White could also play at A or B, which reduces Black's liberties even more. In other words, attaching to a stone does not necessarily attack it. It is often countereffective.
Reference 2: Black 1 is similar to the attachment (also called tsuke) in Reference 1. Strengthening his stone and weakening black 1, White would probably play at 2 or at A.
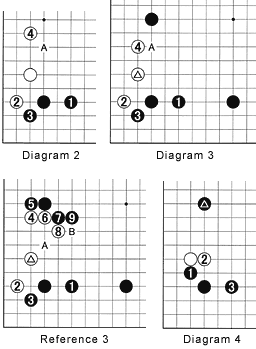
Diagram 2: The moves here show a standard joseki. If Black answers the white kakari by playing at 1, White can easily establish a base by first sliding to 2, then extending to 4 or A.
Diagram 3: In response to the marked kakari, Black could play at 1. In theory, White could then easily make a base by sliding at 2, then extending to 4 or A. This is not the same extension as shown in Diagram 2 (see Reference 3).
Reference 3: White should not extend all the way to 4 (as in Diagram 2), because this is similar to attaching to the neighboring black stone (see Reference 2). Black will play at 5. White applies pressure with 6 and 8, but Black stays one step ahead. After black 9, White still has a problem, because a black placement at A is a severe threat while a move at B would build even more thickness.
Diagram 4: To make the marked stone work even more effectively than in Diagram 1, Black can attach at 1. White 2 is the standard response. Black can then defend at 3. The exchange 1 for 2 prevents White from sliding into the corner and establishing a base. That should be your only reason for attaching at 1--to stop White from setting up a base in the corner.
It would be wrong to assume that exchanging black 1 for white 2 might strengthen the corner for Black--it does not. The exchange does not stop White from invading the corner. We established this point last week, but it is a point that cannot be stressed too often.
Solutions to last week's problems
Last week, we explored some of Black's answers to a White invasion.
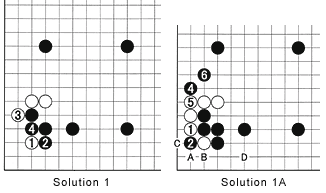
Solution 1: The problem we posed was how should White respond to black 4. This is a trick question, because the answer is nothing. This is because White has two options, and he does not want to commit himself too quickly. The two possibilities are shown in Solution 1A and 1B.
Solution 1A: As an endgame move, White could put the pressure on with 1. Black will stop him with 2. White next has two basic options. He can play A, followed by black B and white C, which is a large endgame sequence. Alternatively, he could wait for a chance to squeeze in a move at D (unlikely at this stage, but during a battle anything can happen). A stone at D threatens white B next, either capturing black 2 with a move at A or turning in the other direction and connecting to the white stone at D. This seems improbable at this time, but stranger things have happened. In the end White plays 3 elsewhere. The big problem with committing to a move at 1 is that Black will play at 4 and 6 as soon as he gets the chance.
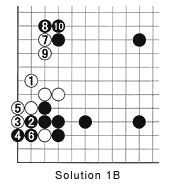 Solution 1B: The other option White has is to play at 1. This move aims to connect the invasion stone by descending to 6 next. To prevent that scenario, Black will usually defend with 2. The sequence 3 to 6 is then played out, and White will make eyes through the sequence 7 to 10. This is not a particularly wonderful result for White, but this way, he can always make a base whenever the situation demands.
Solution 2: After white 1, the moves through 5 are a standard sequence. You were asked how Black should respond.
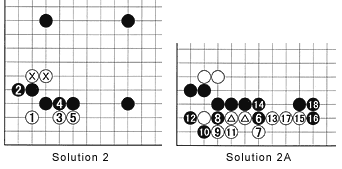
Solution 2A: The moves 6 through 12 capture the corner--this is important to ensure that Black keeps his group alive. White cannot resist black 10 or he will lose the two marked stones. After black 12, White has many options, but the combination 13, 15 and 17 seems reasonable. Black builds thickness with 16 and 18. The overall position decides whether this result is even or good for Black or White.
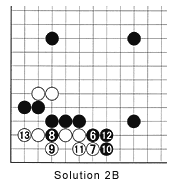 Solution 2B: If Black is committed to keeping away from the lower side, he can play the combination 6 through 10, forcing White to connect at 11. Black then shuts off the lower side with 12. Although not necessary to stay alive in the corner, White will usually add a move at 13 or so at an early stage in the game.
Problem 1: What happens if White omits 13 in Solution 2B? The answer will appear next week.
