Diagram 1: Black 1 was the last move we saw last week. It was a mistake. Question 3 last week asked where Black should have played instead. Some of you might have answered with moves like A, which seems to make a lot of territory on the upper side, or B, which starts an attack. See white 2 for a hint and Solution 3 for the full answer. Of course, black 1 is not a bad move in and of itself. It has all the ingredients of a good move--it threatens to attack the white stones above it, it defends Black's stones and it makes territory. However, it is not a move that has be made at this point.
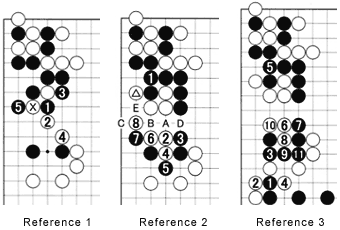
As soon as you see white 2, you realize that all is not quite kosher in this area. It seems impossible for Black to keep all of his territory intact (see Reference 1). However, with 3 and 5, which were played quickly, Black seems to want to capture the white invaders. White 6 contains a double threat and Black, suddenly realizing his problems when he sees this move, spends over an hour thinking about the next few moves. Finally, he plays 7, expecting White to answer. However, White is not compliant and continues his attack with 8. Black is really in trouble at this stage. Reference 2 and 3 show what would have happened if Black answered 6 at 10, and why White did not answer black 7 directly.

Solution 3: The left area is the most important part of the board at this juncture. With 1 and 3 attacking White's eye-space while defending his own territory, Black makes almost 25 points in this area in the sequence through 9, putting him in the lead territorially. White 10 is a good move, but Black plays forcing moves with 11 and 13. Now he is free to play elsewhere. A move at A is a good choice for making territory. Black can also start an attack with B. If White connects with C, black D is a strong move, and Black can look forward to engineering a splitting attack in the center.

Reference 1: After White invades with the marked stone, Black should have been a bit more realistic and cut his losses with black 1 through 5. True, his territory has mostly evaporated, but he is still leading because of his strength in the center.
Reference 2: After the marked white stone, if Black connects with 1, white 2 through 6 will put him on the spot. Black 7 is answered by white 8, and Black's position falls apart. Without the exchange of the marked stone for black 1, after white 8, Black would have been able to play at A, followed by white B, black C, white D and black E, capturing all of White's stones here.
Reference 3: If White answers black 1 (7 in Diagram 1) with 2, Black can then play at 3 at any time. Timing when to exchange black 3 for white 4 is difficult, but if we look at the same moves as in Reference 2, Black can connect at 11 after white 10, and White is in trouble.
 Diagram 2: White gains a lot of profit in the sequence through 20, which Black is forced to answer with 21. If he extends to 22, White will cut at 21 and kill the black stones. O expressed the most regret over 22. Why was that a slack move? Doesn' t this move connect White's stones at 16 and 20 to his group at 14 and 18, while making a lot of points?
Problem 1: Where should Black play his next move?
Problem 2: What is wrong with 22? Where should White have played instead?
Actually, it may be better to answer Problem 2 first before going on to Problem 1.
7-stone handicap
 Diagram 3: This is the seventh article in a series of discussions on the 7-stone handicap game. Last week, we looked at the variation shown here. After black 15, White can choose between playing at A or playing at B. Note that White has to sacrifice his stone at 2, while Black should sacrifice his two stones in the corner. See Diagrams 4 and 5.
Diagram 4: After black 1 (11 in Diagram 3), White should not defend with 2. After white 4, black 5 is a strong move. White has no choice but to defend with 6, but after Black connects with 7, White has another problem--how to keep his corner alive. He should either play at A or at B, followed by black C and white D. Black should be worried about a cut at E, while White would love to cut there. Why?
 Problem 3: After black 5, White can cut with 6. Black should keep his cool and read the board carefully. To start with, black 7 is a kikashi that White must answer in the corner with 8. Next, Black plays at 9, followed by white 10, black 11 and white 12. Where should Black play next?
Solution to last week's problem
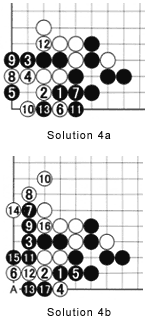
 Solution 4a: The problem was why White should not answer at 2 after black 1. The answer is that then Black will descend to 3. If White blocks with 4, Black strikes at the vital point with 5. No matter how White plays, Black can at least make a ko. This type of ko, with one player having a lot at stake and the other nearly nothing, is called a hanami-ko, literally "flower-viewing ko." Clearly, this is bad for White.
Solution 4b: This is an alternative, though more difficult, solution. White 4 and 6 are a good combination--6 is, after all, the vital point (black 5 in Solution 4a). It is a clever move for Black to first make an extra liberty with the combination 7 and 9. Next, 11 and 13 are a good follow-up. After black 17, white can capture at A, but then Black will play at 17 again, reducing White to only one liberty.
The conclusion, then, is that after black 1, White must not block at 2, but should play at 3 right away.
