 In business, companies aim to become more efficient through mergers or tie-ups. So it is with go. One stone cannot be left alone to fight and ensure life by itself. Connecting stones, tightly or loosely, often is a good strategy, although sometimes a stone or small group must be left to its own devices--to make eyes or even be sacrificed.
Last week, we introduced 501 Opening Problems, a book to be published shortly. Below are some problems from the book that illustrate this strategy. Hints are included, but don't refer to them at first. Look at the problem diagram and try to come up with a couple of possible solutions.
Keep these questions in mind: Which area is large? Is there a move that changes a weak group into a strong one, or vice versa? Can you make your group stronger at the expense of your opponent's group? Read the hint only after you have determined a move. You might then have to rethink your strategy and come up with a new move. After that, check the answer.
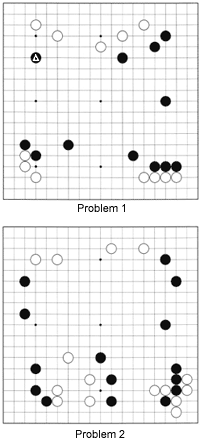
Problem 1: Black to play. Look at the marked black stone. What is its raison d'etre?
 Hint: "Expand your moyo (territorial framework) on a grand scale!"
Problem 2: Black to play. Try to find lone stones like the marked one in the previous problem, and see if you can connect them to increase your territory.
Hint: "Link up your weak stones to your strong ones!"
Problem 3: Black to play. Black's marked stones form its only weak group. Simply playing at A will provoke white B, which gives White's marked stones good shape, while Black's stones are still weak.
Hint: "Build a moyo by sacrificing weak stones!"
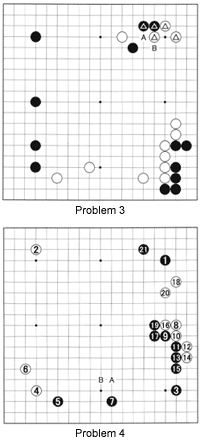
Problem 4: White to play. This is a problem from an actual game between two top pros, Chang Hao (Black) and Lee Chang Ho. The mini-Chinese fuseki (opening) pattern 3, 5 and 7 is popular, as its winning percentage is close to 60 percent. White 8 is a common counter to split the black formation on the right. Black 9 is a recent development. The moves 10 to 21 all seem logical, although the exchange 14 and 15 was questionable on White's part. This move is not necessary to make life, but it does erase the possibility of an invasion in the lower right--we refer to this as aji-keshi.
 After black 21 it is White's turn. Where should he play? A few weeks ago we said an invasion could well prove to be a liability worth 20 points--i.e., a negative value of 20 points if he cannot make even one eye. It is unlikely that White can successfully invade, so eliminating Black's potential at the lower edge seems to be the thing to do. White A and B are likely candidates. Which is better?
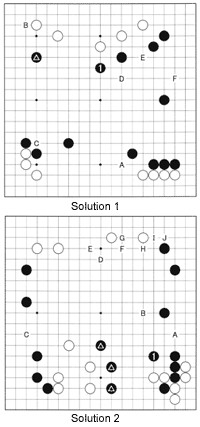
Solution 1: Black 1 is correct. It involves the marked stone in a greater strategy. The book, however, doesn't explain why moves such as A, B and C are no good. Locally, none of these moves is bad, but if White gets the chance to jump to 1, Black is almost forced to defend at D, otherwise White could invade at E or even F, which would lay waste to most of Black's territory on the right. In addition, the marked stone would become isolated.
Solution 2: Black 1 is the vital point. This move reaches out to the three marked stones, while expanding Black's framework. Imagine if White were to play here. Next, White would aim at an invasion at A, further isolating the marked stones by a move at B, and, if the marked stones do become weak, even an invasion at C becomes easier. In contrast, after black 1, Black next threatens to play D, followed by white E, black F, white G, black H, white I and black J, building up a large framework while increasing actual territory.
 Solution 3: Black 1 is tesuji--locally the vital point. White is almost forced to cut with 2 and 4, allowing Black to sacrifice his two marked stones with the sequence to 10, then capture one stone in a ladder with 11. At the same time, White's marked stones have made bad shape. The bottom line is that, thanks to the sacrifice of two stones, Black's other stones work together perfectly. This is an example in which stones that don't work together well are sacrificed.
Solution 4: White 1 was well-received because Black needs to defend with 2. White 3 is a good kikashi (forcing move) before 5. If Black wants to keep his territory, he should probably defend at A, but White can then play at B to unite his stones with his stones on the lower left, even exerting influence all the way to the upper left. If Black plays C, then white D, black E and white F follow, and White is connected.
Reference 1: White 1 looks like a strong alternative, but black 2 and 4 isolate the White stones. White 5 is a light move, but even after that move, White cannot link up his stones to the left easily. Black may either defend his lower right or play at A to continue the attack. Even if Black chooses to defend the lower right, White's stones are still feeble and floating in the center.
Reference 1 illustrates why white 1 in the solution is a better move: it unites all of White's stones.
