Therefore, to improve our go game, we need our stones to work together-not just some of them, but all of them. But how can stones that have already been played work together better ? The answer is simpler then you think, but exceedingly difficult to execute. A strong go player knows what an efficient shape is and which stones to play in what order to achieve that shape.
Efficiency calls for good shape
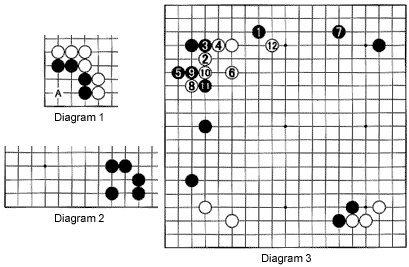
Diagram 1 :Last week, we looked at this shape and found out the vital point is at A, regardless of whether Black or White plays next. Why is playing the vital point so important ? Because it is the difference between having an economic shape, in the sense of making eyes and liberties, or an uneconomic one without eyes and lacking in liberties.
Diagram 2 :
So the basic good shape looks like this.

Diagram 3 :
In a recent game between two top pros, this shape appeared. It came into existence through an unusual sequence-see Diagram 4 for the standard sequence. Even though Black deviated from standard play, White still played one of the moves to make our basic shape, or kuchi (mouth). After black 7, White played at 8 to induce a black cut at 9 and 11. Voila, White gets his mouth shape, even though white 8 got cut off. However, white 8 hasn't lost all life yet and White can threaten black 11 in many different ways, meaning he is strong in the center, enabling him to attack strongly with 12.
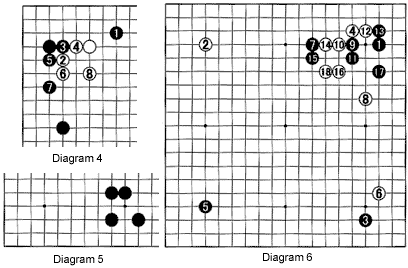
Diagram 4 :
If Black plays at 5, after white 6, he needs to play at 7 as well. But this would be all too easy on White-he would play at 8, our basic shape.
Diagram 5 :
But not all elements need to be present to make good shape. The shape shown here is similar to that in Diagram 2, minus one stone. And as a matter of fact, this shape is even more efficient, because it saves one move.

Diagram 6 :
This is another game between two top pros. Only a few moves are shown. But already a variation of the mouth shape has appeared. Most amateurs would think of cutting between 10 and 16, or something similar, but the pros' first concern is usually shape, as bad shape often comes back to haunt you, while good shape is a source of strength to build on.
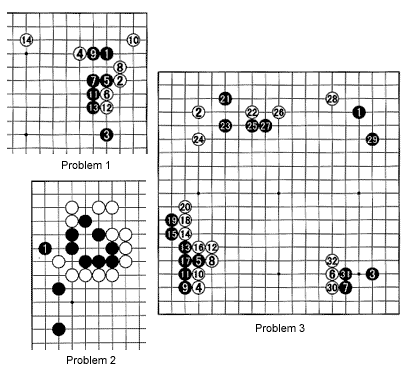
Problem 1 :
This is a joseki (standard corner exchange) often played in handicap games. Black's purpose is to make a strong wall and attack any surrounding white stones. But he still has a deficit in his wall between 13 and 3. At the same time, the moves 2, 6, and 12 form a portion of the variable mouth shape, needing one more move for completion. Also, keep in mind that "my opponent's vital point is my vital point." Your mission is to combine these elements and find the best moves for Black.

Problem 2 :
This problem is similar to last week's problem 3. Playing at 1, Black is trying to form the derivative mouth shape, while also trying to connect underneath to his stones below black 1. How should White respond ?
Problem 3 :
This is a recently played game between O Meien (Japan) and Cho Sen (China) for the Toyota Denso Cup World Oza Championship. Cho, one of the strongest female go players in the world, plays Black. After white 30 and 32, the moyo (sphere of influence) on the lower side suddenly looks very impressive. But as good students of the mouth shape, you know where the vital point is in the white wall on the left. Actually, there are two possible mouth shapes, but the threat of the one in the center is too small. So where should Black play ?
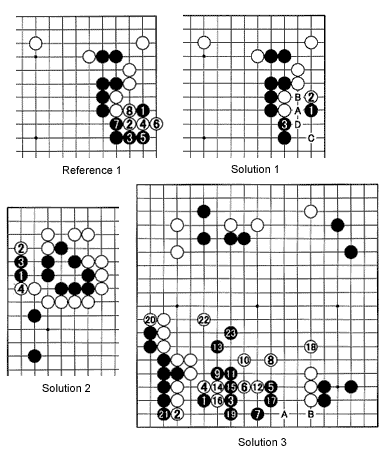
Solution 1 :
Black 1 is the correct move. White should answer at 2, followed by black 3. This is a famous combination. Note: Black should not exchange A for B, as then a weakness at C appears. In the situation shown, black D is sente, too.

Reference 1 :
After black 1, White can try cutting with 2, 4 and 6, but this is a terrible strategy as, after black 7, White has gained only a few points, while Black's wall is worth much more.
Solution 2 :
In response to black 1, White should take the other vital point (preventing the mouth shape), threatening to cut. If Black connects with 3, white 4 disconnects the two black groups.
Solution 3 :
Black 1 is the vital point, as it prevents the derivative mouth shape. The moves to 4 are pretty much standard. Black 7 might remind you of the shape mentioned several articles ago, when I was talking about connecting. Black 9 and 11 make a mouth shape, as do white 6 through 12. As you can see, this type of shape is very common and handy to know.
