
Yoda defends Meijin Title
Norimoto Yoda is one of a handful who holds a top title, and it took a lot of hard work to get there. He turned pro at the age of 14, took his first title before he turned 20 and has been at the top of the go world ever since. However, the top titles eluded him for a long time, until he dethroned Cho Chikun three years ago to take the Meijin title. He has held it ever since.
This year, he was challenged again by Cho Chikun, who recently won his 65th title, breaking the record of 64 wins set by Eio Sakata almost 20 years ago. The Meijin title is one of only three that are played over two days, and has a time limit of eight hours per person, as opposed to international title matches, which have a time limit of three hours per player. The players' mental endurance is severely tested.
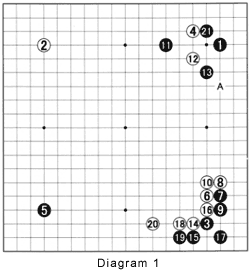 Diagram 1: This is the fifth and final game of the best-of-seven Meijin title match. Yoda is White. Black 1 and 3 start out with a conventional Shusaku opening. The moves to 6 have been used in countless games, but black 7 goes against current ideas of common sense in go.
However, although Black 7 is an unorthodox move, it might become more common eventually. Cho commonly bucks common sense, and this can be both a strong and a weak point. In this situation it is more common to pincer white 4 by playing at a point around 11. Depending on White's response, Black can then think about how to deal with white 6.
After white 10, Black would normally play at 18 to prevent this corner from being sealed in, as happens in the game. White would then get the initiative in the upper right by playing a move around A. So Black's decision to move the focus of the battle to the upper right is understandable.
Yoda played the moves 14 through 20 out of kiai--loosely translated as "fighting spirit." He tries to punish Black in the lower right corner for omitting a move, while omitting a move in the upper right himself. His attitude seems to be, "Do your worst!" Black 21 is a natural move as it prevents White from making a base in the corner, while making one for Black's stones and securing territory at the same time. If you were White, what would your next moves be?
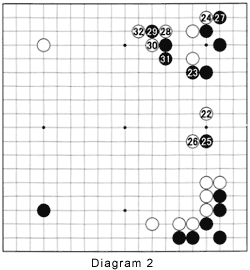 Diagram 2: White can't save his stones in the upper right, so he sets out on a strategy to sacrifice them in the most advantageous way possible. First he limits the damage by playing 22. Note this is also an extension from his thickness below (see Reference 1).
He then plays at 24, expecting Black to block at 27. But Cho first plays at 25. This is a highly advanced technique called yosu-miru (probe). He is feeling out White's response to determine his own strategy after white 28 and 30, two White moves that can be anticipated in this situation. At this moment, White has little choice but to play at 26 (see Reference 2).
As the right area was so complicated, both players used a lot of time and white 32 was the last, sealed move of the day. This procedure, where one player (in this case Yoda) writes a move on a piece of paper, seals it in an envelope and hands it to the referee, is to ensure that neither player gets a time advantage by seeing his opponent's next move and having the whole evening to analyze it.
As a matter of fact, white 32 is almost the only move that comes to mind, while black's next move is forced. Since White was almost certain what move Black would make, he had the luxury of being able to study his follow-up moves that evening. While Yoda had only one evening to study his moves, you have the whole week to ponder how White continued his play. Think up some scenarios and pick the best. The Meijin game will be continued next week.
 Reference 1: This is a very different situation than the one in the game. Because of the presence of the marked stones, instead of 1 and 3, a pincer around 8 would be a bad idea. That stone might be captured. In this case, pushing with 3 through 7 before jumping to 9 is a good plan, because it connects White's stones, while the territory on the right is already Black's to begin with.
Reference 2: The upper right corner represents the final result in this area. The marked stones give Black's position enormous outward strength. If Black were to invade at 1 next, White would surely forgo a frontal clash with a move at A. Instead, White should be happy to connect underneath with the combination to 6, even though his position becomes low.
Solutions to last week's problems 2 and 3

Solution 2A: You were asked what Black should do in response to white 2. Obviously, White is aiming at cutting either through the triangle-marked stone and black 1 or through black 1 and the stones marked with crosses.
Solution 2B: Black must block at 1. Letting White slip into the corner would let him off the hook. Blocking at 1 takes away an easy base for White's marked stones, while providing one for Black. Besides, Black makes a lot of points in the corner. After white 4, Black has a few options, but cutting with 5 and 7 is a resolute way of dealing with the situation. White is in dire straits.
Solution 2C: White 8 through 12 are dangerous--for White. Black 13 seals the fate of White's marked stones. Setting up a ko with 14 and 16 is foolish. After black 17, White has no ko threats.

Solution 2D: White, therefore, needs to save his marked stones. But after white 8, Black captures with 9 and 11, then moves out with 13. Black's marked stones already make a lot of secure territory and the cut at A has potential, too. Black is doing well.
Solution 3A: You were asked what Black should do if White cuts at 2. He should not lose the triangle-marked stones, or even worse, the stone marked with a cross.
Solution 3B: Black 3 and 5 are strong moves. White 6 and 8 form a tesuji, but Black does not need to answer in the corner and can seal White in with 9. Black 15 is a clever move because it prevents the black stones being captured. With the sequence to 20, White ensures life, but only on a small scale. Black 21 is a good move, and Black is so far ahead of White at this point that the game is virtually over.