
Absolute beginners should start playing on a 9x9 board (Diagram 1) or a 13x13 board (Diagram 2), before moving up to a standard 19x19 board (Diagram 3). The beginner's rank is usually set at 35 kyu and initially goes up one kyu per game. Upon reaching 30 kyu, the beginner should switch to a 13x13 board and play at least 10 games, although there is no limit to the number of games he can play before switching to the standard board.
At this stage, the player will have advanced to about 25 kyu. On a standard board, one handicap stone is given for each kyu difference between the players. So a 25-kyu player can expect to play a good game against somebody with a 16-kyu rank by taking a handicap of nine stones.
At this stage, a motivated player should advance at the speed of about one kyu every two or three games. So, it is entirely possible to reach 16 kyu and start giving a 9-stone handicap to beginners after having played about 40 or 50 games, which can be accomplished in as little as two to three months.
Handicap go
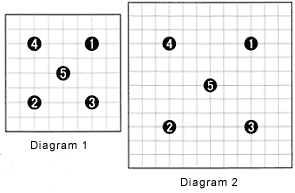 Diagram 1: This is the board beginners should use. When playing advanced players, a handicap might be a good idea. Personally, though, I have never given a handicap on a 9x9 board. If a handicap is used, Black places the stones in the exact order and position shown. Placing the handicap stones is generally considered to constitute one move. White then plays the next move.
This size board is good for practicing elementary tactics and understanding territory, but is too limited for understanding strategy.
Diagram 2: On a 13x13 board handicap stones are placed in the order and position shown.
This size board is excellent for practicing both tactics and basic strategy. Neophytes should use this board as soon as possible--maybe after practicing on the 9x9 board five to 10 times. Compared to the standard 19x19 board, a beginner won't feel so lost.
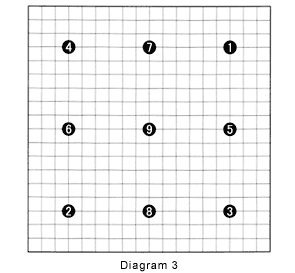 Diagram 3: Once a beginner feels fairly comfortable playing on a 13x13 board, he should try playing on the standard 19x19 board. Handicap stones are placed in the order and position shown. However, if the handicap is five or seven stones, the fifth or seventh stone should be placed in the center spot, where black 9 is now (this spot is called Tengen, literally the center of the universe).
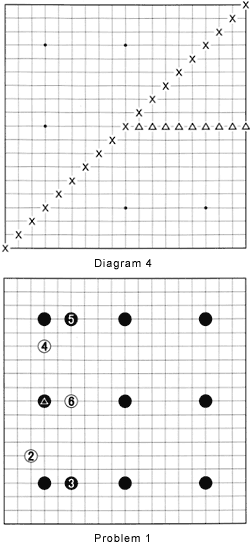 Diagram 4: There is a reason for the order shown in Diagram 3. The reason is that the lower right side (seen from the perspective of the black player) is Black's side, while the upper left side is White's. The x's running from the upper right to the lower left is the dividing line. It is considered good manners for Black to play inside or on the lines formed by the crosses and the line with the triangles.
For his second move, White will usually play inside his own half of the board, but it is not a breach of etiquette if he does not do so.
About two years, when Norimoto Yoda defended his Meijin title against Koichi Kobayashi, he played his first move (as Black) inside Kobayashi's half of the board, which led to numerous newspaper articles about etiquette and Yoda's breaching of it.
Problem 1: White 2 is a normal first move for White. Black 3 is the usual response. White 4 is also a standard corner approach, and again Black's usual reply would be the simple jump to 5. Attacking the marked black stone, white 6 next leaves many a black player shaken. However, there is no reason to be afraid or to feel that White is being overly aggressive. Some black players even consider white 6 is an insult, but this is ridiculous. In general, there are two basic strategies. What do you think they are?
 Reference 1 (Bad result) Let's start with the wrong idea. Many black players will be attached to the marked stone--after all, that stone is theirs to begin with. But let's see what happens when Black tries to ensure that the marked stone lives. By making moves like 5 through 9 and 11 through 14, Black's surrounding positions are swamped. This is a quick way to lose a game, because even though Black managed to make over 10 points with the marked stone, he has lost two corners and is likely to lose more.
Solution 1A: The easiest way of dealing with the marked stone is by sacrificing it. I recommend this strategy for beginners. This may seem to be a courageous approach, but if we look at the moves through 13, we see that White's territory on the left is rather small, while Black has two large corners.
Solution 1B: Later on, Black can exchange 1 for 2, then playing 3 through 6 in sente. In the end, Black's territory will likely be similar to that shown by the crosses, while White's territory won't amount to more than that shown by the triangles. Each of the black corners are larger than White's total territory.
 Solution 2: Black's alternative to ensuring life for the marked stone or sacrificing it is to save it by running away. Compared to Solution 1, this approach takes much more courage, skill and ability to read the board. The general idea is to cut through White's net of marked stones. Moves like A, B and C come to mind. Next week, we'll begin discussing these moves in detail.
Solution to last week's problem
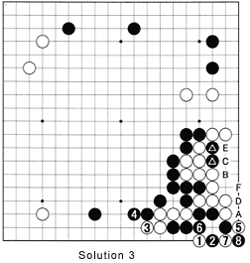
Solution 3: In this game, the semifinal of the Toyota Denso Cup, Lee Chang Ho (White) from South Korea uses a ko as an aggressive weapon against Yu Bin from China.
 The combination of white 1 through 7 start an aggressive ko for the survival of both the white and the black groups in that corner. However, Black can take the ko first with 8, meaning White has to play the first ko threat. If Black wins the ko by capturing at A, he can use the marked stones later on by playing at B, followed by white C, black D, white E and black F, making a large dent in White's territory.
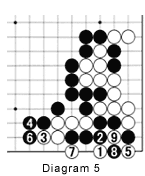
Diagram 5: However, Bin made a mistake and played as shown here. There is a big difference between the solutions in two respects. In the first place, White can take the ko first and Black has to make the first ko threat. In the second place, even if Black wins the ko, he doesn't have the endgame sequence A through F as seen in Solution 3.