This is the third part of the game in which Yoda is White.
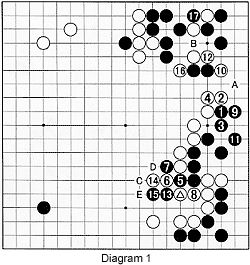
 Diagram 1: White has just played the marked stone. The question last week was what response Black should make. Black 1 and 3, and the follow-up 9 and 11, ensure life.
Once 3 is played, Black can set out to exploit the weaknesses in White's position. For that, black 5 and 7 are excellent moves--they split White's position, and for a moment it seems as if White has taken on more than he can handle. But white 8 is sente, forcing Black to exchange black 9 for white 10, which prevents a connection at A, and add another move at 11.
In the meantime, White cleverly strengthens the his cut group in the center with 10 and 12. Black 13 and 15 are challenging moves, but White saves his center group first with a move at 16, which is sente--Black has to answer this move. However, instead of answering at 17, Black should have played at B. This move makes more territory and takes away a liberty from White's neighboring stones that may be important in a future battle.
After black 17, the action moves back to the lower side. White still has to respond to the challenge Black posed with 13 and 15. Where would you play? Would you defend white 14 and 6 with a move at C or D, would you counterattack at E, or would you follow another strategy?
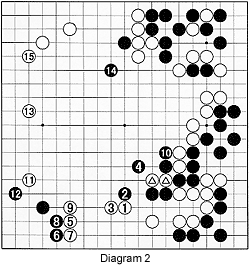
 Diagram 2: With 1 and 3, Yoda implemented an excellent strategy of sacrificing the two marked stones--after all, they play no part in an attack on White's group after Black has defended with 1, 3, 9 and 11 in the previous diagram.
At this moment, the marked stones have lost their strategic significance and consequently can be abandoned. Black, on the other hand, more or less captures the marked stones, then adds another stone with 10, which assures their capture while threatening to capture two more stones. However, White seizes the initiative with 11 and 13. The game is close now. Black launches 14 to threaten the upper side, but White ignores the threat to secure the upper right corner with 15.
Problem 1: Look at Diagram 2. Why did Black add a move at 10? Before black 10, could the white stones have escaped? Instead of 10, where should Black have played?
Problem 2: How should Black continue after white 15? The answer will appear next week, when we will continue this game.
 Solution 1: Black should have played at 1. But he was worried that White would escape with the sequence starting with 2. But Black squeezes the white stones in the sequence to 7, then extends to 9, after White plays at 8 where the marked stone is. If White wants to keep Black's stones separated, his only choice is at 10 and 12. But that means he will get an even bigger dango--the ultimate bad shape--when he is forced to connect at 14.
Handicap go
In handicap go, the player with the black stones should realize that large White groups do not die easily, and it is not a good idea to try to kill them. The same can be said about territory. Defend it, but not at any cost.
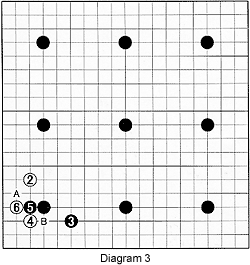
 Diagram 3: After the handicap stones are on the board, White plays the kakari (approach) at 2, which is a standard move. This week we will look at black 3 as a response. Note that this does not protect the corner. White can still invade with a move like 4. Black must play at 5. Now White can either play at B or play a hane at 6. The latter being the most popular, let's investigate possible responses for Black. His only options are A and B.
Diagram 4: Although the marked stone is nearby, if Black feels threatened, blocking with 7 is an option for Black. After white 10, Black has sente to occupy a large point, for example 11 or A.

Diagram 5: Black can also cut with 7 and 9. This will allow White to ensure life in the corner, but Black wins some influence. After white 10, Black can choose between A, B and C.
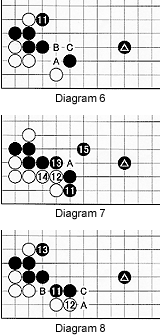
 Diagram 6: Black 11 is a steady move, although the cut of white A, followed by black B and white C remains. However, with the marked stone in place, there is no reason for Black to panic after that cut.
Diagram 7: Alternatively, Black can aggressively contain White in the corner with 11 and 13. If White defends with 14, Black is happy to defend with 15 against the cut at A. However, there is no guarantee that White won't cut at A instead of defending with 14. In the end, though, White will have to come back at 14 to ensure life there. During the battle, the presence of the marked stone should come in handy for Black.
Diagram 8: If the cut described in Diagrams 6 and 7 is considered dangerous, it might be a good idea for Black to bide his time and quietly defend with 11 and 13. Instead of 13, it is also possible to play at A, followed by white B and black C. The cut would be dangerous if there were white stones around the marked black stone. In this case, the benefit of Black having stones at A and C is small. Consequently, if he chooses to defend against the cut with 11, it is consistent to then defend with 13.
Next week, we will look at some other corner battles where Black is better off giving away the corner.
