
These qualities do not differ significantly from the ones that go players work on, except that go focuses more on the mental aspects than the physical. In go, style, shape, pure reading ability and, of course, mental toughness and flexibility are the name of the game.
Tobi, kosumi, keima
Jiro Akiyama, a 24-year-old 7-dan, and Kimio Yamada, a 29-year-old 8-dan, have been involved in professional go for 10 years and 14 years, respectively, but both started playing go even before enrolling in primary school. In the game shown in Diagrams 1 and 2, Akiyama (Black) and Yamada demonstrate how important they regard shape and style, and how well they can read the board. Last week, we saw tobi (one-space jumps) played both to expand territories and to defend them. See Reference 1 and 2.Sometimes the kosumi (diagonal move) is preferable, because it is stronger and cannot be cut. However, it is also slow and inflexible. See Reference 3 and 4.
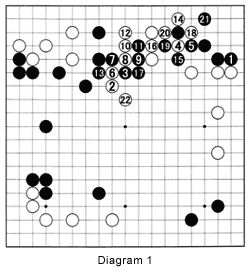
Diagram 1 :
In the game, after Black defended his corner with 1, White played 2-see Solution 3-and Black countered with 3. A fierce fight erupted, which can be seen in moves 14 through 21. But the main theme-the power in the center-is formed by 22. Note that instead of 12, White could have cut at 17 and captured black 9 and 11, but this would kill his own stones at 2 and 6. Note also that Black got gote (a move not requiring an answer) during the 14 through 21 exchange. Basically, after white 22, the game is over: White has taken the initiative in the center.
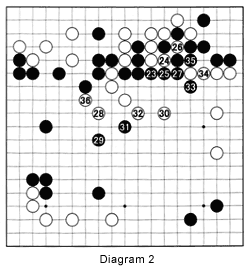
Diagram 2 :
Black links up his stones with 23 through 27. White destroys Black's moyo (territorial framework) with 28, then forces Black to connect with 35. Meanwhile, White has moved to the center with 28, 30 and 32. White 36 strengthens his center group while laying waste to Black's moyo on the left. After this move, Black really has no hope of winning. The game went on for another 100 moves or so, but basically the game was lost when White played 22 in Diagram 1.
Reference 1 :
Black earlier played tobi at 1 to defend against either a white invasion at A or a reducing move at B. This move also expands Black's territory, while its third role is to prepare for an invasion at C. White immediately responded with 2, another tobi, both to keep the threat at A alive and forestall an invasion there.
Reference 2 :
In response to black 1, White plays 2-which prevents Black from playing a tobi there. Black 3, a tobi, and white 4, another tobi, are good defenses against the sequence black A, white B, black C, white D and black E, which would cut White to pieces. In addition, white F would be a good move as it prevents Black from expanding his corner.
These two examples illustrate some of the different uses of the tobi. In general, we can say the tobi makes a good, strong, yet flexible shape.
Reference 3 :
A few moves after White plays the marked stone, Black plays a kosumi at 1. This prevents an invasion at A, and prepares for an invasion at B or C. White first defends with a kosumi himself, which Black has to answer at 3 (black D looks like a forcing move, but it would ruin a possible black invasion in the corner), then plays another tobi at 4 to strengthen the corner.
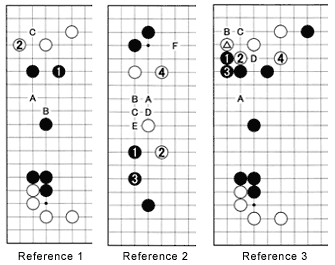
Reference 4 :
Black 1 is a kosumi, which keeps the connection between his stones strong, but is also slow. Usually, when fleeing, it is better to make a tobi, a one-space jump, to A.
Problem 1 :
During the furious battle from white 6 through black 21 in Diagram 1, Black somehow lost the initiative, allowing White to play 22, erasing Black's center influence. Can you find a combination that allows Black to take the initiative in the center, without leading to the death of his stones in the upper right corner ?
Solutions to last week's problems
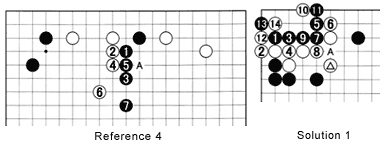
Solution 1 :The clamp of black 1 is a dangerous move, but thanks to the marked stone (a tobi), White seals in Black's group and kills it in the sequence to 14. Without the marked stone, Black would be able to cut at A, and White collapses.
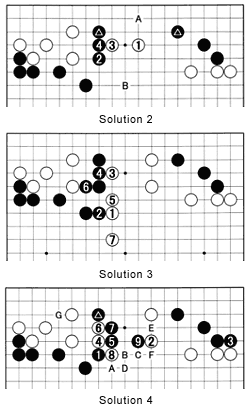
Solution 2 :
In a shape like this, with the two black marked stones five spaces apart on the third line, usually white 1 is the correct invasion point. This forces Black to jump to 2, leaving White with the option to exchange white 3 for black 4, before jumping out to the center, for example to B. The problem with this variation is that Black can always link up with A. In other words, white 1 is a little soft.
Solution 3 :
White 1 is the point that marks the line between the black moyo on the left and the white one on the right. Of course, it also threatens to cut Black's keima (knight's move) shape. But if Black passively defends with sequence 2 through 6, he will soon lose the game. That accounts for white 6 in Diagram 1.
Solution 4 :
After the game, Akiyama said he should have played a kosumi at 1. The marked stone is left slightly weaker, but that is not the important stone. White can try to cut with 4 through 8, but black 9 is a good move that sets up the escape tesuji black A, followed by white B, black C and white D. Alternatively, Black can aim for a wedge at E, a hane (a diagonal connecting stone) at F, and, once his stones are slightly stronger, an invasion at G (combined with the clamp in solution 1). In other words, this spells more danger for White than for Black