A few weeks ago, we started a series of articles on ponnuki and segued into the gray area of the ko. The degree to which you understand the ko is the ultimate measure of your strength, general analytical ability and ability to visualize moves ahead of time.
Ponnuki and Ko

Before diving into explanations about the ko, you might want to read the previous columns on ponnuki once again. The ko is a special kind of ponnuki. Players vie to solidify their own positions and destroy those of their opponents.
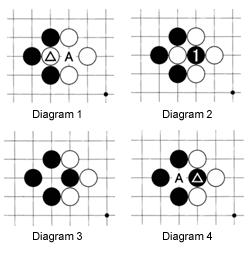
Diagram 1: This is a ko situation. If it is White's turn, he can fill in his ponnuki at A to connect and save the marked stone. However, if it is Black's turn, he can capture the marked stone.
Diagram 2: Black can capture one white stone by playing at 1.
Diagram 3: After capturing the white stone, the situation looks like this.
Diagram 4: Next, the marked black stone is the one being contested. If White captures it by playing at A, we would be back to Diagram 1. The ko rule prevents this.
The ko rule says simply that a full board position cannot be repeated. So Black can play as in the Diagrams 1 through 3, but White cannot immediately capture the black stone with A in Diagram 4. He must first play elsewhere.

Diagram 5: Let's see how this works in practice. Suppose we have the moves up to 13.
Diagram 6: Black 13 in the previous diagram is the marked black stone. The marked white stone is being contested now. White has several options. The simplest way of dealing with the threat of a ko is connecting at A.
Diagram 7: If White connects with 1, Black will connect with 2. The moves to 8 are one possibility. White is alive in the corner, but Black creates a great wall to gain an overpowering influence toward the left side. This is a terrible result for White.
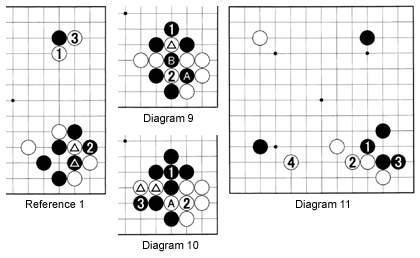
Diagram 8: A better alternative is cutting with 1, leaving the marked stone under contest. Black 2 captures the marked stone. Next, White has to connect at 3. See Reference 1 for what happens if he doesn't. Black can next put white 1 in atari, threatening to capture that stone. White could play at A, or resist with 5.

Reference 1: Black has just played the marked stone. He threatens to capture the marked white stone next. White's attitude could be "do your worst!" and he plays at 1. But black 2 captures the stone. White next has the advantage in the upper right corner after playing at 3, but the whole lower right corner has become Black's. Black has made two ponnuki shapes by capturing the marked stone, immobilizing all White's stones in the neighborhood. This is a bad result for White.
Diagram 9: After white 5 in Diagram 8, Black can capture with 1, but White captures black A with 2. Next the stone marked B is being contested.
Diagram 10: Black had better connect at 1. He is still threatening the white stone marked A, so White connects with 2. Black 3 is a strong move, cutting the marked stones in the center from the ones in the corner. White is in trouble.
Diagram 11: To go back to move 10 in Diagram 5, White is probably better off avoiding the ko for the moment and defending with 2. Black can then descend to 3 and White extends to 4. This looks reasonable for both parties.

Diagram 12: However, the chances are Black will play at 3 and, after white 4, start a ko with 5. White can capture with 6 and after black 7, connect with 8 where the marked black stone used to be. But now Black grabs the initiative in the upper left by playing at 9. White's success in the lower right spelled his failure on the rest of the board.
Diagram 13: Instead of defending the marked white stone, White has a better option--not defending, but answering with 2. And if Black captures the marked stone with 3, White can keep up the tempo and move to 4. This is the way ko is usually fought between stronger players--they like to win it, but not at all costs. And they don't mind losing it if there is reasonable compensation.
Solution to last week's Problem 2
Due to lack of space, Problem 3 will be answered in next week's column.

Solution 2A (White 6 takes ko):
After Black 1, white 2 is the only move. Black needs to capture with 3, and white 4 puts one stone in atari. This leads Black to defend with a bad shape. But with 5, Black starts a ko to fight back--his aim is not only to win the ko, but to ensure White has a bad shape.
Solution 2B: (white 12, black 15, white 18, black 21 in ko, black 25 connects where the marked white stone is)
Black 7 is too big a threat to ignore--besides, after white 8, Black loses points because 7 dies. But after Black recaptures the ko with 9, white 10 is necessary--now White has bad shape. The goal of the ko fight is, of course, to win the ko, but the greater issue is to give your opponent a bad shape in the process. White 24 gives Black the opportunity to end the ko. White 26 through 30 is a clever combination to connect his stones underneath.
