However, the defender overcame such challenges before capturing the title. In addition, he is psychologically better positioned. In the case of the Kisei match, seven games are played, each lasting two days. The mental stamina required is staggering and the players must be psychologically well-balanced. That is also the reason why most titleholders are in their 30s or 40s. If we look at statistics, it is apparent a titleholder is much more likely to defend his title than lose it.
This is the fourth installment in a series examining the second game of the Kisei championship, which wrapped up Thursday with challenger Keigo Yamashita taking the title from three-year champion O Rissei 4-1 in the fifth game of the seven-game competition. The 24-year-old Yamashita had taken the first and the second games, while O took the third game. Yamashita then came back to win the fourth and fifth games to become the youngest holder of the Kisei title. Yamashita held the black stones in the second game.
 Before looking at the actual game, let's first look at the solutions to last week's Problems 1 and 2.
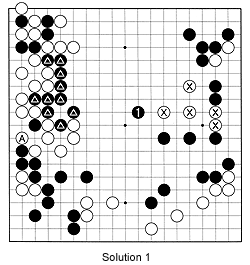
Solution 1: White's last move was at A and Black played his next move at 1. This is an excellent move as it influences the whole board. First, it attacks the marked white stones on the right. Second, it strengthens Black's marked stones on the left. Third, it threatens to make territory in the center.
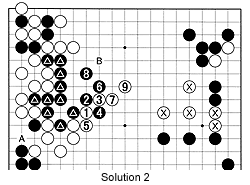 Solution 2: After Solution 1, it is obvious White should not have played at A as it has no strategic value whatsoever. Instead, White should play at 1 and attack the marked black stones. The moves through 8 are almost inevitable, after which White strengthens his center (his marked stones) while making territory. Meanwhile, Black is still under pressure and probably needs to defend, as a move at B would be hard to deal with. Had White played this way, he would probably have won the game.
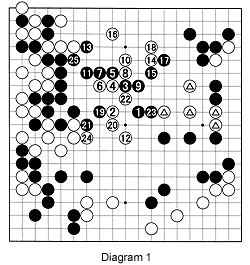 Diagram 1: Upon seeing 1, it was immediately clear to O that he was in trouble. Since he could not afford to just defend his marked stones, he did what he does best: he caused confusion. White counterattacked Black's stones on the left by playing at 2. However, Yamashita didn't panic and steadily kept up the attack with 3, 5 and 7. The sequence that follows is difficult to understand, but the result is that Black's group is alive when he plays at 25--stage one of this fight. The second stage is what happens to the marked white stones. What do you think? Will White be able to keep them alive?
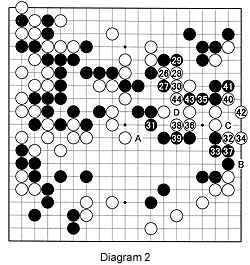 Diagram 2: White starts out creating defects in Black's shape by cutting at 26 and making the beginnings of eye-shape with 30. Black 31 is not an elegant move--that would be A--but it defends against a possible white cut there while eliminating bad aji (potential). Threatening to connect at B or build an eye at C, white 32 and 34 are a clever combination. Black 37 is questionable. He should have played at 43--then White would have to connect underneath at B, and later Black could capture four stones with 44. In the game, White lives with the sequence to 42. These moves make miai of playing at C to make two eyes immediately, or to defend the eye at D, should Black play at C. Either way, White has two eyes. This concludes the second stage of the fight that erupted after black 1.
Problem 1: Count the territory to see who is leading and determine which groups are strong and alive and which ones are vulnerable to attack.
Problem 2: Based on Problem 1, determine in what area Black should play next. Then find the vital point.
7-stone handicap
 This is the eighth article in a series of discussions on the 7-stone handicap game.
Diagram 3: In answer to 2 and 4, black 3 and 5 are another possibility. White will invade at 6. Black should block at 7 and, after white 8, play at 9 to connect all of his stones (see Reference 1). After white 10, black 11 is another important move (see Reference 2). The same is true for black 15--connecting at B would only give Black bad shape. White A would not amount to more than an endgame move, and Black would switch to or in the neighborhood of C.
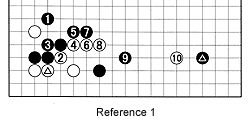 Reference 1: Wrong! After White's marked move, Black often plays something like 1. However, White can now break into the center, for example, with 2 through 8. If Black then defends his lone stone with 9, white 10 attacks these two stones and the marked black stone at the same time.
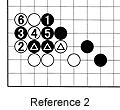 Reference 2: Wrong! In response to the marked white stone, black 1 is a problem move. This allows White to play at 2, and if Black blocks with 3, to cut at 4. As this is atari on the black marked stones, Black has to connect at 5 and White can then play at 6. Clearly, Black has failed.
Solution to last week's Problem 3
 Solution 3A: Last week, we looked at a variation involving White cutting with the marked stone. The problem was how Black should handle this. Black 1 and 3 are an unlikely combination, but they set up the tesuji of 5 and 7.
Solution 3B: White has to connect at 8. However, this gives Black a good move at 9 as it takes away a vital white liberty. Even after white 10 and 12, Black just hangs tough and answers every forcing move. It is extremely unlikely that Black will lose either of his two marked groups. Besides, if White does not defend his corner quickly, he dies. In other words, White's cut (the marked stone in solution 3A) is an overplay.
Rob van Zeijst is a four-time European go champion and European representative of the Fujitsu world championship.
